How to Use Windows Server Backup and Its Alternative in 2022
If you're looking for a comprehensive guide on backing up Windows Server content, we've got you covered. On this page, you'll find a complete guide that will walk you through the process of installing and successfully backing up Windows Server.
What Is Windows Server Backup
Windows Server Backup, also known as WSB, is a tool that provides backup and recovery features for Windows Server systems. It allows users to create backup images on the Server computer, protecting business content from disasters and ensuring successful data recovery.
Windows Server Backup is now available in various Windows Server versions, including Windows Server 2022, 2019, 2016, 2012, and 2008.
To install and use Windows Server Backup on your Server computer, follow these steps: First, ensure that Windows Server Backup is installed on your server. You can do this by going to the "Add Features" or "Add Roles" section in Server Manager, and selecting Windows Server Backup. Once installed, you can access the Windows Server Backup console by searching for it in the Start menu.
How to Install Windows Server Backup
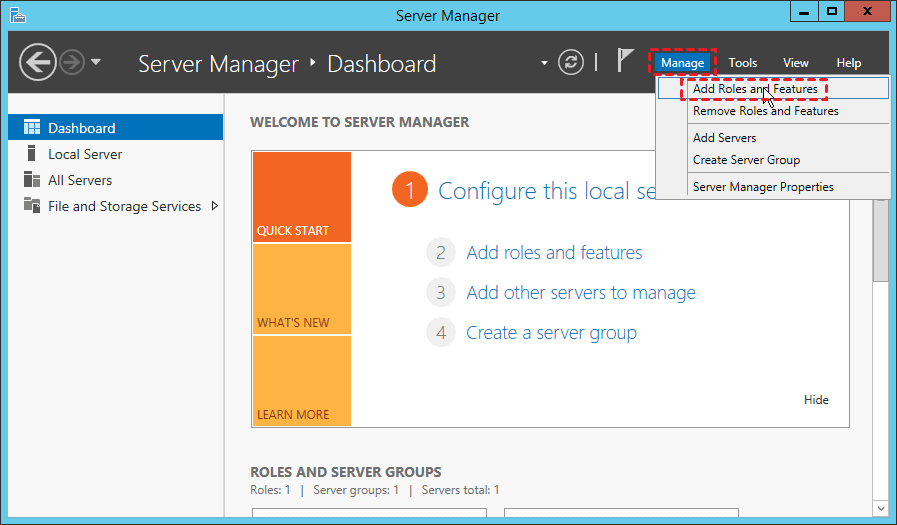
Step 1. To add roles and features to Windows Server, launch Windows Server Manager, click the "Manage" button at the top right corner, and then select "Add Roles and Features".
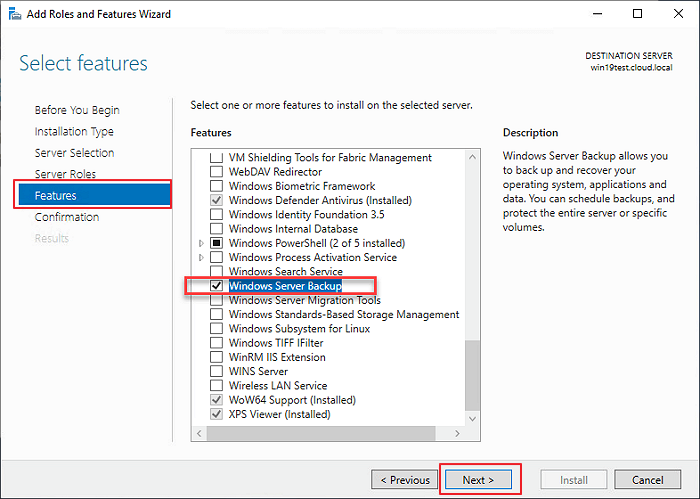
Step 2. At the Add Roles and Features Wizard, select Features, check Windows Server Backup, and click Next.
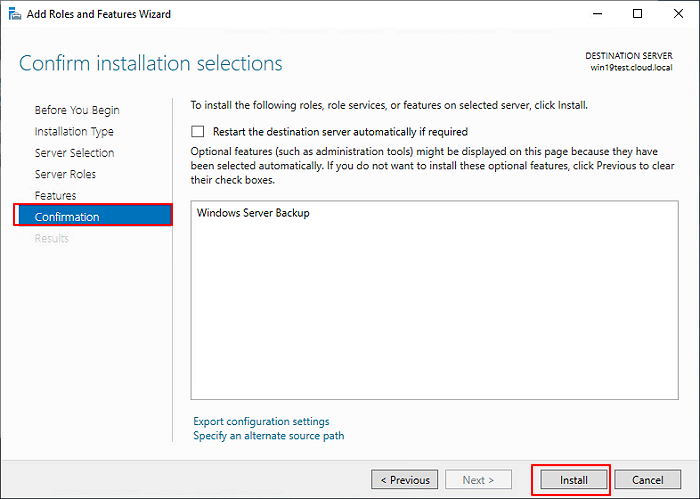
Step 3. Click "Install" at the confirmation window.
After installing Windows Server Backup, you can use its features to start backing up content on Windows Server computers.
How to Back Up Windows Server with Windows Server Backup
Windows Server Backup provides a range of features for backing up Server computer data, including the ability to back up and recover Server computer data, create and manage backup schedules, and perform backups of specific Server computer components such as files, folders, and system state.
- Backup Schedule
- Backup Once
- Recover backup
- Backup full server
- Costume to back up volumes or files
Here we'll show you how to back up Windows Server content with the following steps.
Step 1. Type wbadmin.msc in the search menu and open Windows Server Backup.
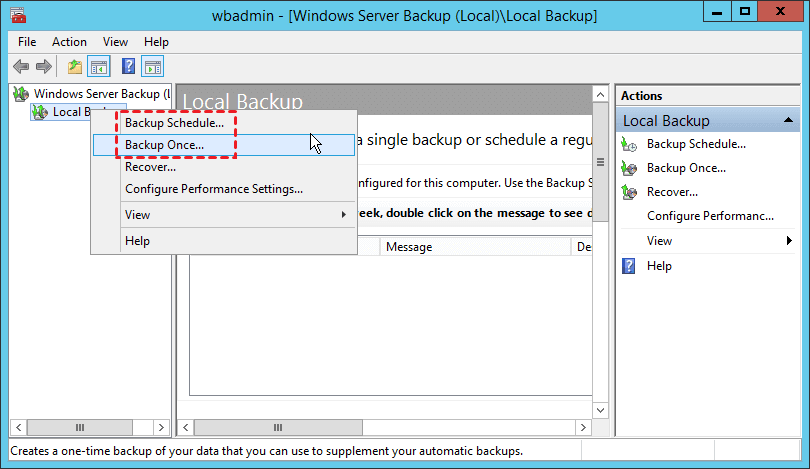
Step 2. To create a local backup on a Windows Server, click on "Local Backup" in the left pane of the Windows Server Backup interface, and then select "Backup Once" from the options.
Step 3. Click "Next" on the Getting Started window.
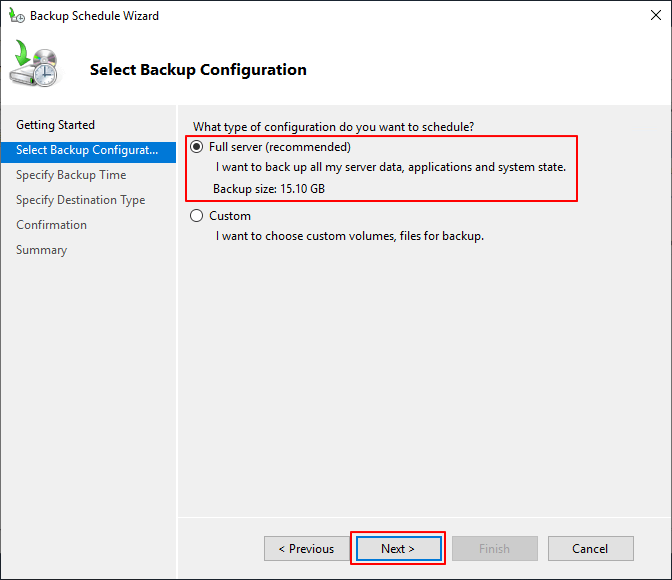
Step 4. To proceed, select the "Full server" backup configuration and then click "Next".
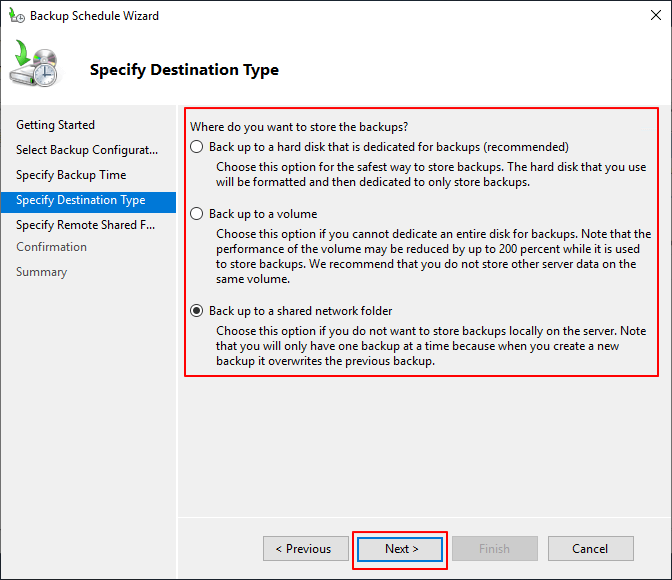
Step 5. To specify a destination type for storing backups, select the desired option, which could be a local drive, network location, or cloud storage service, depending on the available choices.
- Back up to a hard disk is dedicated for backups
- Back up to a volume
- Back up to a shared network folder
And then, click "Next" to continue.
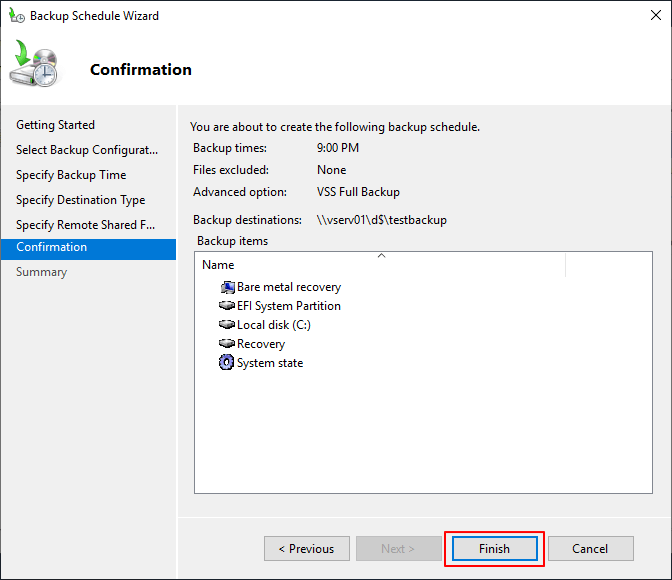
Step 6. Click "OK" to confirm, and click "Finish" at the confirmation window.
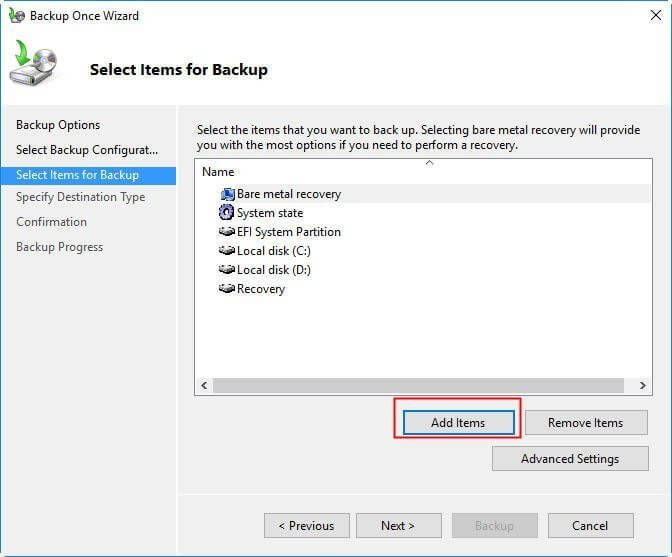
You can also choose to back up specific drives or volumes in the Server computer, aside from backing up the entire Server data, by selecting them in the "Select Items for Backup" column.
To create a scheduled backup in Windows Server Backup, click on "Specify Backup Time" to set up the plan.
Windows Server Backup Limitation and Its Alternative Recommendation
Windows Server Backup has several limitations that users should be aware of. It can only back up and restore system state and system volumes, and not individual files or folders.
- Doesn't support Virtual hard drive backup.
- Support Hyper-V, but VMware and other hypervisors are not fully supported.
- Only store one backup to a network shared drive.
You can use Veeam Backup & Replication, a powerful and flexible backup solution that can back up Windows Server data, including applications, settings, and more, without the limitations of Windows Server Backup. It offers flexible backup options, such as full, incremental, and synthetic backups, and can back up to various destinations, like local storage, network shares, or cloud storage. Additionally, Veeam provides advanced features like replication, which allows you to create a copy of your data at a secondary site for disaster recovery purposes.
Sure! Third-Windows Server Backup software can be a bit overwhelming, but a reliable alternative is Qiling Disk Master Technician. This software is designed to help with Windows Server backup and recovery, making it a professional and capable tool for the job.
Qiling Disk Master Technician
Your smart Windows Server file transfer software.
- Unlimited file transfer between Servers.
- Transfer programs, apps without reinstallation.
- Transfer account, settings to new Server computer.
- Data rescue, find product key for installed programs.
Windows Server Backup with Qiling Disk Master Technician
Qiling Disk Master Technician is a basic file and app transfer software that can be applied to transfer files and apps between devices.
- Transfer files from Windows Server to Server
- Clean up system C drive
- Migrate user profile to a new Server computer
- Find Windows and installed program product keys
This software offers a Backup and Restore feature, allowing users to effectively back up data, applications, and account and settings in a Windows Server with success.
Step 1. Create a backup file.
1. Connect your USB (flash) drive/external hard drive to your source computer, then launch Qiling Disk Master and click "File backup" on the main page.

2. To create a backup file, hover over the "Applications", "Files" and "Accounts" columns to select the specific data, applications, etc. you want to include, and then click "Proceed" to initiate the backup process.

Step 2. Recover via the created backup file.
1. To restore a backup, plug your USB drive containing the backup file into the target PC and open Qiling Disk Master. Then, navigate to the "Backup & Restore" page.

2. To proceed, click "Browse for recovery" to locate the Image file, then select "OK" and proceed to the next step.

3. Now, you can select Applications/Files/Accounts you want to restore.
To transfer specific data, go to Applications, Files, or Accounts and select the data you want to transfer. Click "Restore" to confirm the transfer. Alternatively, you can click the browse icon to change the target path to recover and save the files.
Conclusion
This page provides a step-by-step guide on how to install and use Windows Server Backup or alternative software to back up an entire Windows Server content to a local hard drive. Both methods allow for a successful Server computer backup, and you can choose the correct solution to follow.
If you want to back up partial or the entire content on the Server computer, you can navigate to the "Select Items for Backup" option for assistance.
If you need to back up important content, applications, and server computer accounts and settings, Qiling Disk Master Technician is the tool for you.
Related Articles
- Can I Transfer My Netflix Downloads to Another Device?
- How to Transfer Everything From your Old Computer to your New Computer Windows 11
- How to Transfer Windows 11/10 License to Another PC
- Best Cloud Transfer App: MultCloud, cloudHQ, CloudFuze, Cloudsfer, Odrive
- How to Transfer Files from Mega to Dropbox
If you're looking to transfer files from Mega to Dropbox, it's easier than you think. We'll show you simple ways to move your files from one cloud storage service to another. Keep reading to discover how. - How to Transfer Files from Mega to Google Drive
The fear of losing personal data is a common concern, but there's an easy solution. To keep your data secure and safe, you can transfer files from Mega to Google Drive, freeing you from the worry of accidentally losing your data.