Foolproof Guidance: Get Old Versions of MacOS (2022)
Older versions of macOS may seem outdated, but they still have their uses. Newer operating systems offer more features and capabilities, which means they receive more updates. However, as time passed, Apple stopped supporting older versions of macOS, leaving them without security updates.
Installing an older version of macOS can be a viable option for older Macs that operate better on older versions of the operating system, as newer versions like Big Sur and Monterey are not compatible with earlier versions like Yosemite and Mavericks. This may be the best solution for these Macs, making it worth learning how to install an older version of macOS.
Know All: The Latest Mac OS Update in 2022
If your device feels slow, consider updating your macOS to the latest version. This will help keep your device updated and running smoothly.

Why Do You Need an Old Version of macOS?
You may wish to install an older version of macOS or Mac OS X for several different reasons, including compatibility with older software, preserving a specific system configuration, or for educational or research purposes.
- It's possible that you dislike the version of macOS you currently have installed on your computer. You might prefer a newer version for its updated features and better performance.
- You're considering downgrading to an older version of macOS because some software you rely on isn't compatible with the latest release, so you're looking for a way to revert to an earlier version that still supports the software you need.
- Your Mac device doesn't fit compatible with the newest version.
- You're a software developer who needs to test your application on several macOS versions to ensure it functions properly across all of Apple's operating systems.
You can install an earlier version of macOS, and we will explain how to do so, regardless of why you want to install an older version of macOS, you may do so.
Check Compatibility
You can run an older version of macOS on your Mac without any issues, but running a newer version on an older Mac may cause problems due to Apple's discontinued support for older models. There are workarounds to avoid this, but they may slow down your Mac.
Step 1: Click the "I" icon located in the upper left corner of the screen.
Step 2: Choose the About This Mac option.
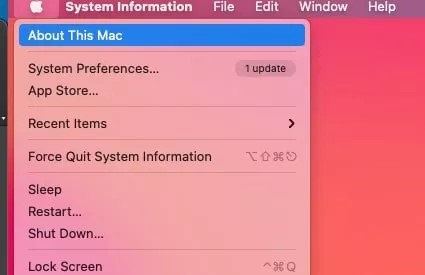
Step 3: In the Overview area, you will see your Mac's model name and its release year.
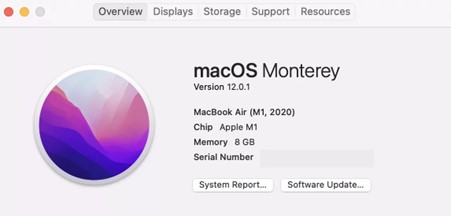
Step 4: Look up the technical specifications for the version of macOS that you wish to install.
Step 5: If your Mac's model is listed as compatible, you can downgrade to an earlier macOS version.
How to Download Old Versions of macOS
1. Get it from the Mac App Store
Here is how you can use it from the App Store on Mac:
When upgrading your Mac to the latest version of macOS, you can quickly and easily download the installer from the Apple menu.
When searching for macOS Big Sur, macOS Catalina, or any previous versions of macOS in the App Store, the results will not appear, as these versions are no longer available for download.
2. Reinstall macOS Using a Bootable USB Drive
After making a USB device bootable, you can use it to install macOS. To do this, simply choose the USB drive when your Mac starts up, and follow the steps to reinstall macOS.
Step 1: You may either restart your Mac or turn it on.
Step 2: To make the chime sound, hold down the Option key on your Mac keyboard while you press the Command key. This will produce a distinctive sound that can be heard through the computer's speakers.
Step 3: Continue holding it down until a menu with several boot choices appears.
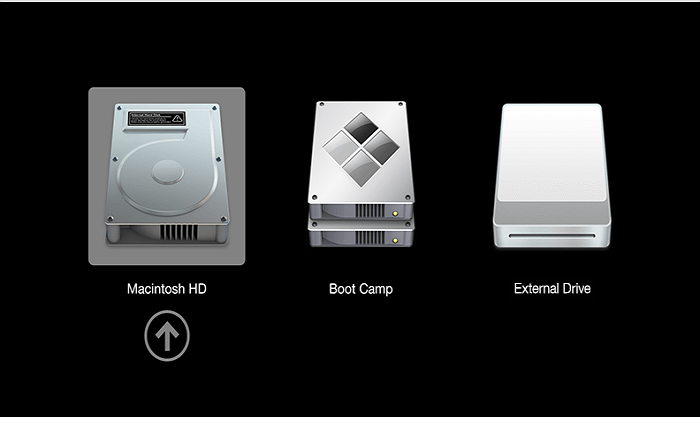
Step 4: Connect the USB drive to your computer and wait for it to load, then you can proceed with the rest of the process.
If you're installing to an external disk or a new partition, you don't need to do anything special; just follow the installer's instructions.
To install an earlier version of macOS on your primary storage device, you will first need to erase everything on it entirely. This is because Apple does not allow downgrading from the current macOS version. You can then use a bootable USB drive to install the desired earlier version of macOS. If you need help making a bootable USB drive for Mac, you can refer to a separate article.
Related Reading: How to Make a Bootable USB Drive for Mac
Difficulties You May Encounter After Installing Old MacOS?
Here are some of the most common difficulties you can encounter after installing old MacOS:
1. macOS could not be installed on your computer
This warning will appear as a sheet that descends from the macOS or OS X installer soon after starting the installation process.
2. Couldn't find installation information for this machine
This error message may occur if you upgrade from OS X Yosemite to El Capitan or later. To resolve the issue, check if your Mac can run a newer version of the operating system.
3. Couldn't find installation information on disk
The mistake affects all Macs running macOS Sierra and later, and is not specific to any model, so make sure your Mac is compatible with the macOS version you're about to install.
4. Data lost after installing
If you're experiencing issues with your computer's operating system, it may be due to incompatible third-party software or peripherals connected during the process.
Restore Your Data with a Third-Party Tool
Qiling Mac Data Recovery Wizard is the most powerful and reliable Mac data recovery program globally, designed to recover lost Mac data in just three simple steps, searching deeper than other programs to guarantee the best results.
Deep Data Recovery for Mac can recover a wide range of file types, including photos, videos, audio files, documents, emails, and more, from various Mac-based devices, such as HDD, SSD, Fusion Drive, Time Machine Backup Drive, memory card, USB drive, camera, and more, while keeping your personal information safe and secure by keeping it separate from the original data.
Main Features of Qiling Mac Data Recovery Wizard
- Perform thorough data recovery from formatted hard drives on Mac.
- Deleted files can still be recovered from memory cards, flash drives, and digital camera data, even if they were previously in the Recycle Bin.
- We can help you recover data that was deleted, formatted, corrupted, virus-infected, or otherwise damaged, under various circumstances.
To retrieve important files, follow these steps: 1) Identify the location of the files, 2) Check if they are stored locally or in the cloud, and 3) Use a backup or recovery tool to access them. If you need help, consider consulting a professional or seeking assistance from a trusted IT support service.
Step 1. Launch Qiling file recovery software on your Windows computer. Select file types and click "Next" to start the recovery process.

Step 2. Select the disk location where you lost data and files, then click the "Scan" button.

Step 3. Deep Data Recovery for Mac will immediately scan your selected disk volume and display the scanning results on the left pane, allowing you to quickly locate and recover lost files.

Step 4. To recover the selected file(s), simply select them from the scan results and click the "Recover" button to have them back.
People Also Ask
1. How do I know if an application is compatible with Mac?
Step 1: The Apple logo can be seen in the upper-left corner of your Mac screen.
Step 2: A drop-down menu will appear.
Step 3: Select "System Report" from the drop-down menu.
Step 4: Next, choose software> Applications from the drop-down menu.
Step 5: 64-bit apps are a type of software that can run on 64-bit operating systems, which provide more memory and processing power than 32-bit systems. To check if your favorite apps are 64-bit, look for the "64-bit" label in the app's details or settings. This will indicate whether the app is compatible with your device's 64-bit operating system.
Step 6: If the software indicates "Unknown," Apple, the Mac Software Store, or an "Identified Developer," your device should have no issues running it.
2. How do I find incompatible software from my Mac?
Step 1: Open Finder using the keyboard shortcut Command + F.
Step 2: Select This Mac from the drop-down menu and choose Other.
Step 3: To close the attribute window, select Executable Architectures in the drop-down menu and click OK.
Step 4: Select "i386" from the next drop-down menu and type it into the text box provided.
Step 5: To add more criteria, click the + symbol next to the existing ones.
Step 6: Select Executable Architectures once again, then choose Is Not from the drop-down menu and enter x86,64 in the text box.
3. How can I download the latest version of macOS?
Step 1: To access System Preferences, select the Apple menu located in the lower-right corner of your screen, and choose System Preferences from the dropdown list.
Step 2: Click Software Update in the System Preferences pane.
Note: Since System Preferences doesn't have Software Update, you can either upgrade your macOS or switch to an earlier one, and then use the Updates tab in the Software Store to get app updates if your system doesn't have this option.
Step 3: To begin, click the Update Now button.
Conclusion
You now know how to install previous versions of macOS or OS X on your Mac after reading this article.
You have the option to use Bootable USB Driver before installing macOS, but it's entirely up to you. If you experience data loss after upgrading macOS, you can also use Deep Data Recovery for Mac.
Related Articles
- Operations You Should Know when Switching from Windows to Mac
- How to Make a Bootable USB Drive for Mac
- External Hard Drive Data Recovery Mac: How to Recover Deleted Files from External Hard Drive
- How Recover Deleted or Unsaved InDesign Files on Mac
- How to Recover OBS Recording Deleted, Crashed and Corrupted
Any way to recover OBS recordings that were accidentally deleted, not fully finished due to software crash or corrupted after computer suddenly turns to black or blue screen? Read the post and figure out whether your OBS video recordings can be retrieved or not. - How to Recover Permanently Deleted Files from Dropbox
You can recover permanently deleted files from Dropbox through two methods: recovering from Dropbox Trash, where you can restore files deleted within the past 30 days, or using Qiling file recovery software to retrieve files from Dropbox's temporary files.