Operations You Should Know when Switching from Windows to Mac
Quick Navigation:
| Workable Solutions | Step-by-step Troubleshooting |
|---|---|
| 1. Mouse Go the Opposite Direction | Click the Apple icon from the menu bar...Full steps |
|
2. Right Click on A Mac |
Click the Apple icon from the menu bar...Full steps |
|
3. Keyboard Shortcuts on Mac |
Take a screenshot on Mac...Full steps |
When people who are used to Windows systems buy a Mac computer, they may find the unfamiliar interface and operations frustrating. The once-familiar actions don't work as expected on a Mac, leading to a steep learning curve. This can be a major turn-off for many, making them hesitant to use a Mac computer.
If you've recently purchased a new Mac and want to quickly get familiar with the operating system, here's where to start. This article provides a comprehensive guide on the precautions for switching from a Windows computer to a Mac computer, helping you quickly get up to speed with your new device.
Deep Data Recovery for Mac
- Recover lost or deleted files, documents, photos, audio, music, emails effectively with specialized software and techniques, such as data recovery tools, digital forensics, and file system analysis, to restore access to important data and minimize data loss.
- To recover unsaved Office files, you can try the following steps:
- Data recovery for external hard drive sudden deletion involves using specialized software and techniques to retrieve lost data from a storage device that has been accidentally or intentionally deleted. This can include using data recovery software such as Deep Data Recovery or Disk Drill to scan the drive for recoverable files, as well as using techniques such as photo and video recovery for camera SD cards, hard drive recovery for HDDs, and SSD recovery for solid-state drives.
- Enable users to preview before performing actual recovery
Overview of Windows and Mac
Before comparing Windows and Mac, it's essential to understand that Mac is just a brand name for Apple's laptops, which run on the macOS operating system. On the other hand, Windows is a system designed by Microsoft, used by most computer brands, including Dell, HP, and Lenovo. This distinction makes switching between different brand computers, such as from a Dell to an HP, relatively straightforward, but switching from a Windows-based computer to a Mac can feel unfamiliar because you're essentially switching operating systems.
We won't delve into the complexities of macOS system features, as they're not essential for everyday users to know. Instead, we'll focus on the most commonly used operations that people encounter in their daily use of the operating system.
#1. Why Does My Mouse Go the Opposite Direction on Mac?
When switching from Windows to Mac, one of the first challenges many users face is getting used to the reversed scrolling direction of the mouse wheel. Unlike in Windows, scrolling the wheel down makes the page move up, and vice versa, which can be frustrating for those accustomed to the traditional behavior. However, it's possible to manually adjust the scroll direction to match the Windows experience.
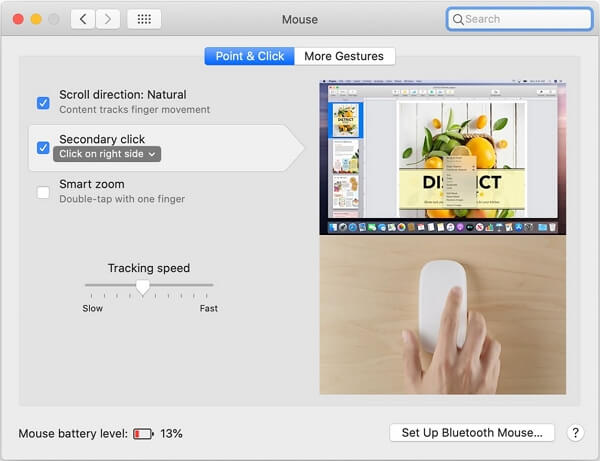
Step 1. Click the Apple icon from the menu bar, and select "System Preferences".
Step 2. Click on "Mouse" and choose "Point&Click".
Step 3. The option for scrolling direction is set to natural, allowing the mouse to scroll in the same direction that your finger moves.
To confirm the changes, click on the Start menu, then click on Settings, then click on Devices, then click on Touchpad, and finally click on the toggle switch to turn on the touchpad. You can now use your mouse the same way as on a Windows computer.
See also:
#2. How to Right Click on A Mac?
In the early days of switching from Windows to Mac, users often struggle with the unfamiliarity of right-click functionality, which is typically used to refresh, create new folders, open software or files, and more. However, on a Mac, right-clicking does nothing. Fortunately, users can also modify their mouse settings to enable right-click functionality.
For users who have a magic mouse:
Step 1. To access System Preferences, click the Apple icon from the menu bar and select "System Preferences".
Step 2. Click on "Mouse" and choose "Point&Click".
Step 3. Find and check the "Secondary Click" option.
For users who use the Trackpad:
Step 1. Click the Apple icon and select "System Preferences".
Step 2. Click "Trackpad".
Step 3. In the Trackpad Preferences, tick the option "Click with two fingers".
Now you can tap with two fingers as a right-click.

#3. Keyboard Shortcuts on Mac
If you used to be a Windows user, the keyboard shortcuts should bring you lots of conveniences. On a Mac computer, the keyboard is a little bit different from that of Windows. The most obvious difference is that Mac keyboards have Command and Option keys, but there are also different keyboard shortcut combinations. Here we will list some of the common ones for you.
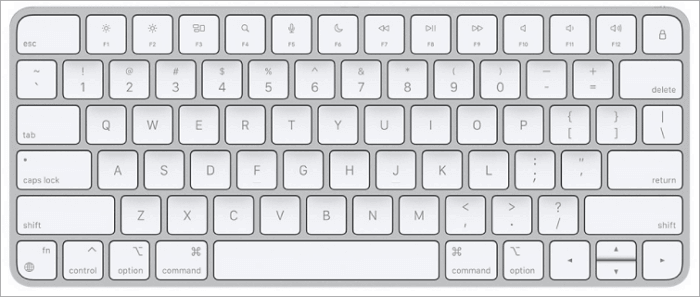
1. Take a screenshot on Mac:
To capture a screenshot on a Mac, press Shift + Command + 3 to capture the whole screen, Shift + Command + 4 to capture a portion of the screen, or Shift + Command + 5 for Mojave or later versions.
2. Copy and Paste on Mac
When cutting, copying, and pasting on a Mac, the shortcuts are similar to Windows, but use the Command key instead of the CTRL key.
- Cut: Command + X
- Copy: Command + C
- Paste: Command + V
3. Undo an Operation on Mac
To undo a previous operation on a Mac, you can press Command + Z, which will revert the last action. If you want to reverse the undo command, you can press Shift + Command + Z.
4. Other Common Shortcuts on Mac
Command + A: Select All items.
The Command + F shortcut allows you to quickly find specific items within a document. This can be done in two ways: either by searching for a word or phrase within the document, or by opening a dedicated Find window.
Press Option + Command + H to hide all windows of the front app, or press Command + H to hide the windows of the front app. To view the front app but hide all other apps, press Option + Command + H. To hide the windows of the front app, press Command + H.
Command + S: Save the current document.
Command + T: Open a new tab.
The Command + O shortcut allows users to either open the selected item or open a dialog to select a file to open. This command is typically used in graphical user interfaces (GUIs) and can be accessed by pressing the Command key (⌘) and the letter "O" simultaneously.
To minimize the front window to the Dock, press Command + M. To minimize all windows of the front app, press Option + Command + M.
Option + Command + esc: Force quit an App.
Closing Words
Switching from Windows to Mac can be a challenge, as you're learning a new system, but with some guidance, it can be made easier. This article aims to help you navigate the transition, and for more in-depth support, you can refer to Apple's official guidelines and resources, such as their support website, which can be accessed through a search engine.
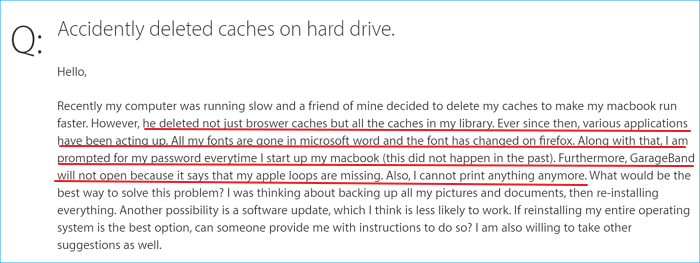
Recovering deleted cache files on a Mac can be done using various methods. First, check if the cache files are still in the Trash, and if so, restore them.
Maintaining the fast performance of macOS and applications on Mac can be achieved by regularly clearing the cache. However, if you accidentally delete caches that contain important system files, libraries, or logs, don't worry - you can recover deleted cache files on Mac by following the provided guide.
Related Articles
- How to Recover Previous Version of Files/Document on Mac [5 Ways]
- 2022 Fixed: Time Machine Won't Complete First Backup
- How to Recover Deleted/Disappeared Notes on Mac
- How to Repair Bad Sectors on External Hard Drive Mac Without Losing Data
- Full and Free Solutions for CHK File Recovery
This page provides a full, free, and easy solution for recovering CHK file data. You can use Qiling data recovery software to recover deleted CHK files, or follow simple steps to restore data from CHK files for free. - 3 Ways to Fix Google Chrome Bookmarks Disappeared
Lost your Chrome bookmarks after a Windows or Chrome update? Learn how to recover lost bookmarks in Chrome easily. Restore from backup, history, or use data recovery software to get your bookmarks back.