Screenshots Management - How to Crop a Screenshot on Mac
Quick Navigation:
| Workable Solutions | Step-by-step Troubleshooting |
|---|---|
|
1. Take a Screenshot on Mac |
Command + Shift + 3: full-screen...Full steps |
|
2. Crop a Screenshot on Mac |
Crop a screenshot using shortcut...Full steps |
|
3. Recover Deleted Photos on Mac |
Select the location where your valuable...Full steps |
Taking a screenshot on your Mac is a common operation, whether it's to create an infographic, share information, or show a friend a page design. To manage screenshots effectively, you'll want to know how to take a screenshot, as well as how to crop and edit it to suit your needs. This article will cover the basics of screenshot management on a Mac.
Deleted Recovery:
How to Take a Screenshot on Mac
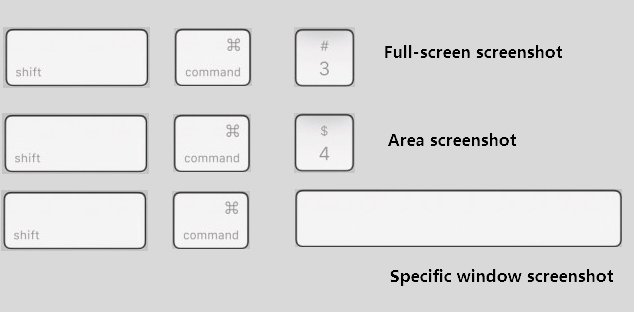
On a Mac, you can use keyboard shortcuts to manage screenshots, similar to Windows. There are several combinations available.
Command + Shift + 3: Full-screen screenshot. Captures the entire screen.
Command + Shift + 4: The mouse cursor turns into a small cross with coordinates when you hover over an area in a screenshot.
Command + Shift + 4 - Space - Click on the specific window: To capture a window, press the space bar on the specified window, and the mouse cursor will transform into a camera. Click on the window with the camera cursor to capture it.
You can take a screenshot on Mac using one of three shortcuts, depending on your needs: Command + Shift + 3 for a standard screenshot, Command + Shift + 4 for a selected area, and Command + Shift + 4 followed by a space for a window screenshot. Each of these shortcuts will save the screenshot to the desktop, or you can change the default saving path if desired.
How to Crop a Screenshot on Mac
When you need to crop a screenshot, you can either use the area screenshot shortcut or a picture manage tool, whether it's built-in or third-party.
1. Crop a Screenshot using Shortcut
When you want to capture only a portion of your screen, you can use the Command + Shift + 4 shortcut. This will turn your mouse cursor into a small cross with changing coordinates, allowing you to select the specific area you need. Once you've selected the desired area, the screenshot will be saved on your desktop for you to view.
2. Edit after Taking a Screenshot
When taking a screenshot, a thumbnail of the image is displayed at the right corner before it is saved to the desktop, allowing you to click on it to edit the screenshot.
Step 1. Click the thumbnail at the corner.
Step 2. When opening the thumbnail, an edit bar appears at the top. Clicking the Crop button will initiate the cropping process.
Step 3. Now you can drag the mouse cursor to crop the screenshot.
Step 4. Once you've made the desired changes, click "Done" to finalize the edits. You can then view the updated screenshot on your desktop.
3. Use Preview to Crop a Screenshot
If you don't click the thumbnail, click the saved screenshot on the desktop to preview it, where you can edit it.
Step 1. Open the target screenshot in Preview.
Step 2. To make the selection, click the "Show Markup Toolbar" button and select Rectangular Selection.
Step 3. Select the area you need.
Operations You Should Know when Switching from Windows to Mac
If you've recently switched from a Windows computer to a Mac, you may find that many common operations on Windows don't apply on Mac due to their different operating systems. This article is designed to help you get accustomed to using a Mac computer, especially if you're new to the Mac platform.
Bonus Tip: Recover Permanently Deleted Photos on Mac
If you need to recover some permanently deleted photos, data recovery software is a good choice, such as Deep Data Recovery for Mac which is designed for Mac users to recover lost files on external storage devices.
Deep Data Recovery for Mac
- Recover lost or deleted Mac photos, documents, and so on
- Recover Camera SD card photos and videos
- Automatically repair corrupted file documents and photos during recovery
Step 1. Launch Deep Data Recovery. Select the file types you want to recover and click "Next" to begin the process.

Step 2. Select the location where your valuable photos were lost and click Scan button.

Step 3. Deep Data Recovery for Mac initiates a quick scan and a deep scan on the selected disk volume, displaying the scanning results in the left pane.

Step 4. To quickly recover lost photos, select the target files by path and type, then click the "Recover" button to retrieve them.
Related Articles
- Fix Mac Not Recognizing Gopro With Quick Solutions
- How to Format USB Flash Drive to FAT32 on Mac without Data Loss
- Help! Mac Trash Bin Won't Let Me Empty it, How to Fix?
- [Free] Deep Data Recovery for Mac 2.6 Torrent/Serial Key
- Pen Drive Recovery 2021 | How to Recover Files from Pen Drive
Restoring files from a corrupted Pen drive is possible, and you can find effective solutions for pen drive recovery by reading on. - [4 Ways] How to Remove Write Protection from USB in Windows
When you get the 'disk is write protected' error on USB or other devices, you can't make changes on your drive. Here is how to remove write protection from USB, HDD in Windows 11/10/8/7: [1] Remove write protection in 4 ways; [2] Let deep file recovery software restore all your files.