[Mac Guideline] How to Format SD Card on Mac
Mac computers typically have a single partition by default, requiring minimal disk management compared to Windows computers. However, with the use of external hard drives, macOS has a built-in feature called Disk Utility to manage disks, allowing users to organize and maintain their storage devices.
| Workable Solutions | Step-by-step Troubleshooting |
|---|---|
| 1. Format SD Card using Disk Utility | Connect your SD card to your Mac...Full steps |
|
2. Repair SD Card with Disk Utility |
Connect your SD card to your Mac and open...Full steps |
|
3. SD Card Recovery |
Correctly connect your memory card to your...Full steps |
Overview of Formatting SD Card
Formatting an SD card erases all data and resets its file system, and common formats include FAT32, exFAT, and NTFS, with FAT32 and exFAT being compatible with Macs.
FAT32 has limitations on file size, but formatting as exFAT can accommodate larger files.
To format an SD card on a Mac computer, you'll need to know what file system format to use. The SD card typically comes with a FAT32 file system format, but if you're using it for a Mac, you'll need to format it with the APFS or exFAT file system.
File System Format Comparison: ExFAT vs Mac OS Extended
Choosing between ExFAT and Mac OS Extended file system formats on macOS can be tricky, especially when you're unfamiliar with their pros and cons. Fortunately, this article aims to clarify the differences between these two formats, helping you make an informed decision for your external storage needs.

How to Format SD Card using Disk Utility on Mac
You can use Disk Utility on all Mac computers, regardless of the model or macOS version. However, the way to connect an SD card to the computer may differ depending on the model: some Macs have an SD card slot where you can insert the card directly, while others require an adapter or card reader for connection.
Mac models with an SD card slot:
- MacBook Pro introduced in 2021
- MacBook Pro introduced in 2011 through 2015
- Mac mini introduced in 2011 through 2014
- 13-inch MacBook Air models introduced in 2013 through 2017
- 27-inch iMac models introduced in 2010 or later
- 21.5-inch iMac models introduced in 2010 or later
The SD card slot is located on the side of your Mac, and you can insert your card into it. If your computer doesn't have an SD card slot, you can get an adapter. To format an SD card, you can follow the guide below.
Step 1. Connect your SD card to your Mac.
Step 2. Go to Disk Utility. There are three methods for you to enter Disk Utility, choose any one of them.
- LaunchPad: To access Disk Utility, click on Launchpad in the Dock, type "Disk Utility" in the search field, and then click on the Disk Utility icon.
- Finder: To access Disk Utility, click "Go" in the Finder and select "Utilities", then double-click the Disk Utility icon, which can be found in the /Applications/Utilities folder.
- Recovery Mode: Boot into Recovery Mode, choose Disk Utility and click Continue.
Step 3. To erase an SD card, select it from the left side of the screen and click the Erase option.
Step 4. When formatting an SD card, a pop-up window will appear, where you can enter the SD card's name and choose the file system format. For SD cards 64GB or larger, choose ExFAT, while for SD cards 32GB or smaller, select MS-DOS (FAT).
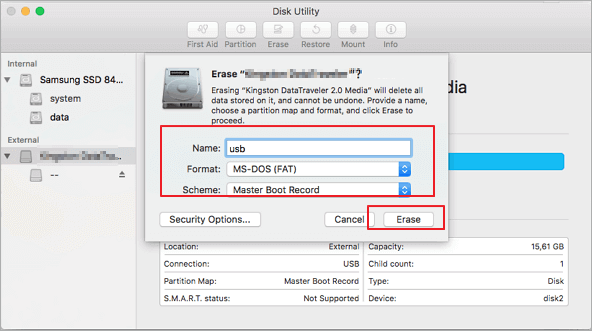
Wait until the formatting process is finished, then you can use the SD card on your Mac.
Repair Corrupted SD Card with Disk Utility
Disk Utility can help repair a corrupted external storage device, such as a USB drive or SD card, if it's not showing up on your Mac.
Step 1. To connect your SD card to your Mac, simply plug it into a USB port and open Disk Utility, which is a built-in application that allows you to manage and configure your storage devices.
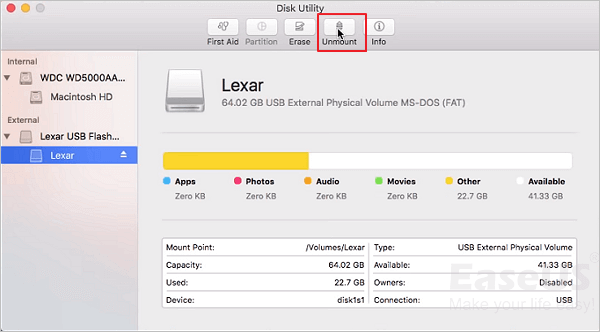
Step 2. To repair SD card errors, select the SD card in the left panel and click on "First Aid" in the top toolbar. Then, click "Run" to initiate the repair process, which will automatically correct any errors on the drive.

Step 3. To resolve the issue, select the SD card again and click "Unmount". Then, unplug and plug it back in for 10-15 seconds.
To fix a damaged SD card, you can try using a card reader to recover any data that might still be on it. If the card is physically damaged, you may need to replace it.
Bonus Tip: SD Card Recovery Software - Deep Data Recovery
Deep Data Recovery for Mac is a specialized tool that helps Mac users recover lost or deleted files with ease, completing the process in just a few simple steps.
Deep Data Recovery for Mac
- Recover lost or deleted files from Trash, documents, photos, audio, music, and other data with ease using specialized software or built-in tools on your device. These tools scan your storage for deleted files, restore them, and sometimes even recover partially overwritten data.
- Protects users from a sudden loss of files by automatically saving their work at regular intervals, ensuring that unsaved Word documents, Excel documents, and other files can be recovered in case of a system crash or other unexpected event. AutoSave feature is a lifesaver for users who work on important projects and want to minimize the risk of losing their work.
- To make file recovery more convenient, you can allow users to preview the files they want to recover before actually doing so. This way, they can easily find the specific file they're looking for without having to sift through a list of recovered files.
- To create a bootable data recovery USB drive, you'll need a USB drive with at least 8GB of storage and a computer with a working operating system. Download a bootable USB creator software like Rufus or Etcher, and follow the on-screen instructions to create a bootable USB drive.
Step 1. To recover data from your memory card on a Mac, correctly connect the memory card to your Mac and launch Deep Data Recovery for Mac. Then, choose the file types you want to recover and click "Next" to start the recovery process.

Step 2. To recover lost files, start by selecting the card and clicking the Scan button to initiate the search process. This will allow the software to thoroughly search the card for any recoverable files.

Step 3. After a quick scan and deep scan, the scan results will be presented in the left panel, showing all files found.

Step 4. Select the files you want to recover and click the "Recover" button, but avoid saving the recoverable files to the SD card itself to prevent data overwriting.
Closing Words
Before using a new external storage device, it's essential to format it first. On a Windows computer, use Disk Management, while on a Mac, use Disk Utility. However, formatting and erasing the SD card will delete all data on it, so be cautious. If you accidentally format the SD card, don't worry, as Deep Data Recovery for Mac can help recover lost data.
Related Articles
- (2022) How to Restore from Time Machine: for Data Recovery and macOS Recovery
- Get Deep Data Recovery for Mac Crack with License Code
- How to Recover Unsaved, Lost and Deleted Word Document Mac
- Recover Lost Mac Data with iMac Data Recovery Utility
- How to Restore Desktop Background/Wallpaper in Windows 10/11
If your desktop wallpaper has disappeared or been lost on your Windows 10/8/7 laptop or computer, don't worry! You can recover it using two methods: by using file recovery software to restore the lost background, or by changing your Personalization settings to bring it back. - A Complete Guide to Recover Deleted Files
If you're looking to recover deleted files on Windows 10, use this guide. It provides a comprehensive solution for recovering deleted files not only on Windows 10 but also on Windows 11, Mac, iPhone, Android, SD cards, USB flash drives, and even Google Drive.