How to Recover Previous Version of Files/Document on Mac [5 Ways]
Quick Navigation:
| Workable Solutions | Step-by-step Troubleshooting |
|---|---|
| 1. Browse File History | On your Mac, open the document (be it a Word...Full steps |
| 2. Qiling Recovery Software |
Launch Deep Data Recovery for...Full steps |
|
3. Use AutoRecovery |
Click "Finder", select "Go" and click "Go...Full steps |
|
4. Restore via Temporary Folder |
On Finder, go to Applications> Utilities >...Full steps |
| 5. Time Machine Backup | Connect the Time Machine backup disk...Full steps |
Apples to: If you've lost important documents or files on your Mac due to replacement, saving over, or not saving them, don't worry - you can recover them.
If you've accidentally replaced a file or can't find a previous version of a saved document on your Mac, don't worry! There are 5 ways to restore a previous version of files like Word, Excel, PowerPoint, Pages, and Keynote on your Mac. Follow these steps to recover your lost file and get back to work quickly.
5 Ways on How to Recover Previous Version of Documents or Files on Mac
- 1. Browse File History
- 2. Qiling Mac File Recovery Software – Easiest & 100% Working
- 3. AutoRecovery
- 4. Temporary Folder
- 5. Time Machine backup
For Your Information:
- Except for Qiling Mac file recovery software, the other four methods are sourced from Apple and Microsoft support teams.
- To prevent file loss, save and back up your current editing file before making any changes.
- To restore a previous version of a lost or saved over document on a Mac, use Time Machine to revert to a previous backup, or use the "Revert to Saved" feature in the application you used to create the document, such as Pages or Word, if it was saved automatically. If you don't have a backup, you can try using a data recovery software to scan your Mac's hard drive for the lost file.
Method 1. Browse File History to Recover a Previous Version of Document
When you accidentally replace a file and didn't have a Time Machine backup, you may first try to use the File History, which is a feature in Windows that automatically saves copies of your files at regular intervals, allowing you to recover previous versions of a file. However, if File History is not enabled or the file was not backed up, you may need to use other methods, such as checking with others who may have a copy of the file, or using cloud storage services like Google Drive or Dropbox to see if a previous version was saved.
Here are the steps (source from support.apple.com):
Step 1. To access your document on your Mac, open the application in which the document was created. If the document was created in Microsoft Word, for example, open Microsoft Word.
Step 2. To revert to a previous version of a document, go to the Apple Menu, click "File", then select "Revert To" and finally "Browse All Versions".

Step 3. To access previous versions of a lost document, browse through the timeline by clicking on the tick marks. This allows you to view and potentially recover earlier iterations of the document.
Step 4. To restore a previous version of a file, go to the file's location, right-click on it, and select "Properties". In the "Properties" window, click on the "Previous Versions" tab.

Step 5. To save the restored document file on your Mac, navigate to the desired location such as the desktop, documents folder, or any other folder you prefer. You can browse through the Finder or use the sidebar to quickly access your frequently used folders.
After this, you can view and reuse the replaced, not saved, or saved-over document from its previous version again.
Method 2. Recover Previous Version of Files with File Recovery Software
If you don't see a previous version of your lost file on Mac using Method 1, you can try using the Data Recovery Wizard for Mac, a reliable third-party software that can recover historical versions of lost files, including unsaved documents, using its Unsaved Document feature.
See what you can do with this software:
Deep Data Recovery
- Recover lost or deleted files, documents, photos, audio, music, and emails with ease.
- Recover files from various storage devices, including the Recycle Bin, memory cards, flash drives, hard drives, and digital cameras, even after they have been emptied or lost data.
- To recover saved over or unsaved files, you can use data recovery software that supports various file types, including Word documents, Pages, Excel, Keynote, Numbers, and more. This software can scan your device for deleted or lost files and recover them, even if they were not saved.
To restore the previous version of a document on a Mac, follow these steps:
Step 1. Launch Deep Data Recovery. Choose file types and click "Next" to initiate the recovery process.

Step 2. To recover a lost unsaved file, hover your mouse over the device where the file was last saved, and click the "Scan" button. This will initiate a search for any recently deleted or unsaved files on the device.

Step 3. After scanning, click on "Type" and expand "Unsaved Documents" to locate the lost file. Select the exact file type, such as Word, Excel, PowerPoint, Keynote, Pages, or Numbers, that you were working on without saving.

Step 4. To recover a file on Mac, double-click on the unsaved file to preview it, select the correct version, and then click "Recover" to save it to a secure location.
Method 3. Use AutoRecovery to Find Previous Version of Unsaved/Saved-Over File on Mac
AutoRecovery is a local folder on Mac that automatically saves previous versions of Office and iWork files, enabled by default, allowing for recovery of unsaved work.
If you've lost a file or need to restore a previous version, on a Mac, you can recover it by going to the 'File' menu, selecting 'Revert To', and choosing the desired version from the list. Alternatively, you can use Time Machine to restore a previous version of the file from a backup.
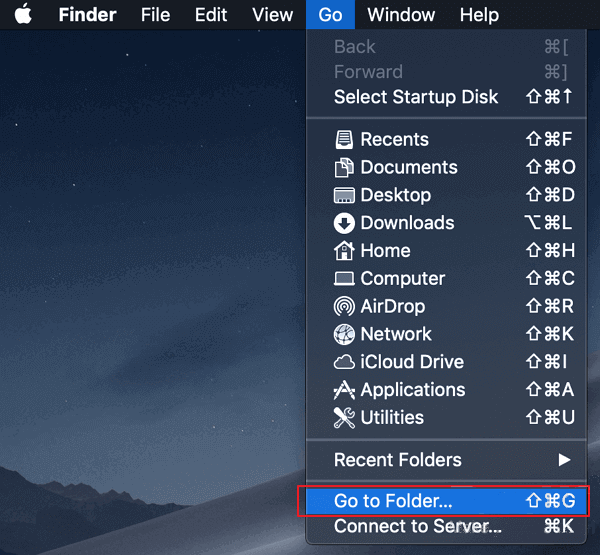
Step 1. Click "Finder", select "Go" and click "Go to Folder".
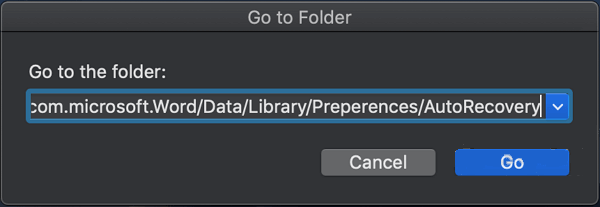
Step 2. The path to the AutoRecovery folder is: C:\Users\YourUsername\AppData\Roaming\Microsoft\Word\AutoRecovery\Word\VersionNumber. To find the lost document, type the correct path and click "Go" in the AutoRecovery folder.
- Word: ~/Library/Containers/com.microsoft.Word/Data/Library/Preferences/AutoRecovery
- Excel: ~/Library/Containers/com.microsoft.Excel/Data/Library/Application Support/Microsoft
- PowerPoint: ~/Library/Containers/com.Microsoft.Powerpoint/Data/Library/Preferences/AutoRecovery
- Numbers: ~/Library/Containers/com.apple.iWork.Numbers/Data/Library/AutoSave Information
- Pages: ~/Library/Containers/com.apple.iWork.Pages/Data/Library/AutoSave Information
- Keynote: ~/Library/Containers/com.apple.iWork.Keynote/Data/Library/Autosave Information
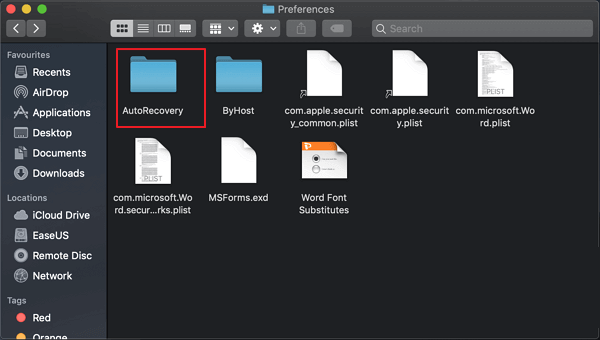
Step 3. To find the previous version of your file, you can browse through your file history to locate the desired version. Once you've found it, open the file in its respective application to review its content.
Step 4. Once you've confirmed the content is correct, click "File" and select "Save" to save the file to a secure location on your Mac.
Method 4. Restore Document That You Saved Over from Previous Version via TemporaryItems Folder
On a Mac, the TemporaryItems folder serves as a local storage for documents and caches that are currently being edited, similar to AutoSave. If you close a file without saving or lose it, you can try searching for it in the TemporaryItems folder.
Be quick as it only keeps the cache files for a while. Here are the steps that you can try:
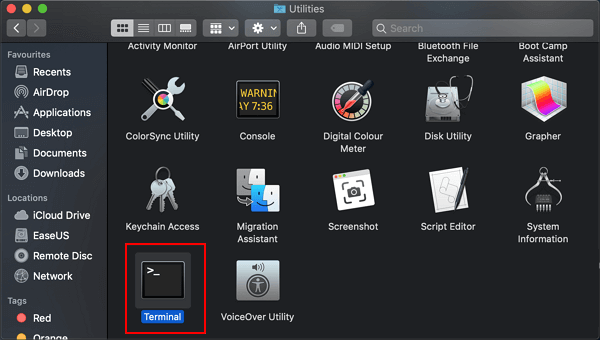
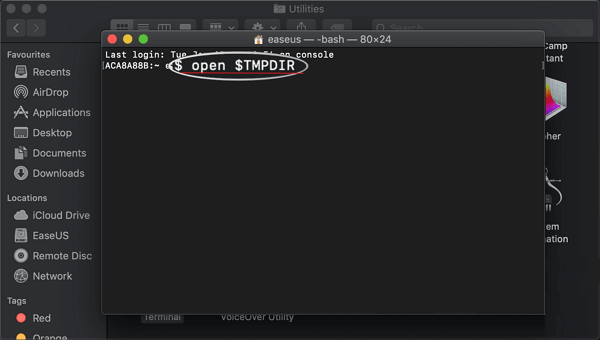
Step 1. On Finder, go to Applications> Utilities > Terminal.
Step 2. Type open $TMPDIR in Terminal and press "Return".
Step 3. Find and open the TemporaryItems folder.

Step 4. To recover lost files with a ".tmp" extension, you can try renaming them to a more recognizable format such as ".doc", ".docx", ".xls", or others. This can be done by right-clicking on the file, selecting "Rename", and then changing the file extension to the desired format.
Step 5. Open the file in its respective application, like a Word or Excel application, to check its content.
Method 5. Restore Previous Version of Lost file on Mac using Time Machine Backup
If you've created a backup of your files on Mac via the Time Machine application, you can rest assured that you'll be able to recover your files in case of a loss, making it a lifesaver in times of digital distress.
You can use the backup to revert your document to a previous version on Mac. To do so, go to the "File" menu, select "Revert to Saved" or "Revert to Autosaved" to revert to the last saved or autosaved version of your document. If you have a backup, you can also select "Revert to Last Backup" to restore your document to its state at the time of the last backup.
Step 1. Connect the Time Machine backup disk to your Mac computer.
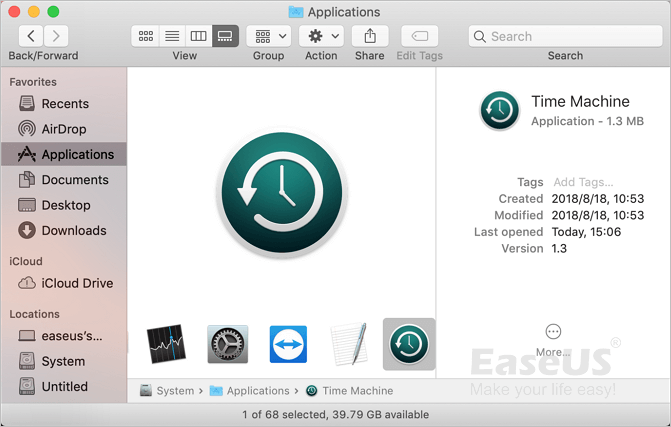
Step 2. On the Apple menu, click "Go" and select "Applications".
Step 3. Locate and open Time Machine.
Step 4. Scroll the Timeline to find the date and time that you did a backup through Time Machine.
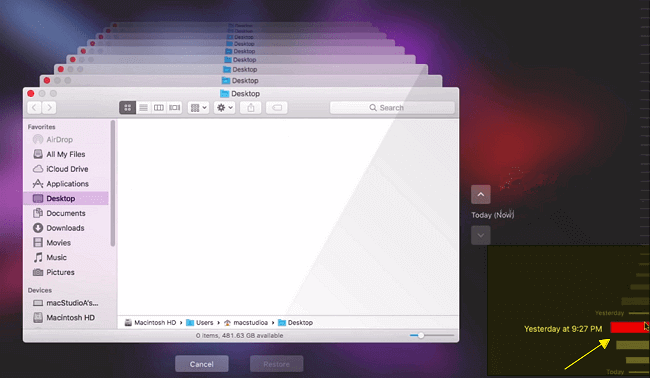
Step 5. To restore previous versions of a file or folder, double-click on the specific file or folder to check if the files are the previous versions that you want to restore.
Step 6. To recover deleted files, select the items of the lost document and click "Restore" to retrieve the old versions of files.
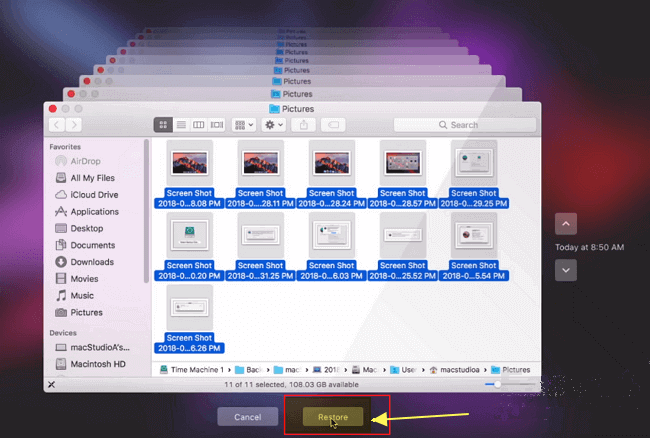
The selected files will be restored to their original location on your Mac, and you can access and use them again.
Don't Worry for the Saved Over or Unsaved File, You Can Restore It from Previous Version
If you've lost a document on your Mac, don't worry! There are 5 practical ways to help you recover saved, replaced, or even unsaved documents.
Qiling Mac file recovery software is a reliable and efficient tool for recovering lost or deleted files on a Mac. It offers a user-friendly interface and a high success rate in recovering files from various storage devices, including hard drives, SSDs, and USB drives.
You can recover lost files on a Mac by going to the "Revert" or "Restore" option in the app's menu, using the "Time Machine" feature to go back to a previous version of the file, or using the "Versions" feature in apps like Word and Excel to restore a previous version of the file. If you've overwritten a file, you can try using the "Revert" option to go back to the previous version. If you've closed a file without saving, you can try using the "Restore" option to bring it back. If you only want to open an old version of your file, you can use the "Versions" feature to restore a previous version.
Related Articles
- Ring Deleted Video Recovery: How to Recover Deleted Ring Doorbell/Camera Videos
- Apple Mail Recovery | Recover Deleted Emails Messaged on Mac
- Follow Our Tips to Resolve A Collection of Mac No Startup Disk Issues
- Know All: The Latest Mac OS Update in 2022
- How to Recover Shift Deleted Files Windows 11[Recover Readily]
To recover shift deleted files on Windows 11, you can use one of three tested solutions. The Windows File Recovery tool allows you to recover shift deleted files, or you can try recovering them from the File History. Alternatively, the simplest method is to use Deep Data Recovery to recover your deleted files. - Stray Lost Progress: 2 Best Ways to Recover Lost Stray Game Saves on PC/PS4/PS5
If your Stray game save is corrupted, you can recover the lost data using Qiling game data recovery software on your PC. Simply download and run the software, and follow the simple clicks to restore your Stray game data. Alternatively, you can watch a video to learn how to recover Stray data on your PS4 or PS5.