How to Recover Shift Deleted Files Windows 11[Recover Readily]
When you use the Shift + Delete keys to delete files on Windows 11, the files are directly deleted without being moved to the recycle bin. However, these files are not gone forever and can still be recovered before they are overwritten.
You can recover deleted files on Windows 11 using three proven methods. One way is to use the Windows File Recovery tool to recover shift deleted files, while another is to retrieve them from File History. The fastest way, however, is to apply data recovery software to recover deleted files.
Recover Shift Delete Files Windows 11 with File Recovery Software
You can recover permanently deleted files on Windows 11, even if you used the Shift + Delete keys to delete them, which bypasses the recycle bin. Although the files may seem irretrievable, they still have a chance of being recovered before they are overwritten.
With Deep Data Recovery, you can efficiently recover shift deleted files with high quality, recovering unlimited data with a high success rate. This software can recover various types of files from different storage media, including a dead hard disk.
Deep Data Recovery
- Recover data from external hard drives, SD cards, USB flash drives, cameras, and NAS with this software.
- This tool is not only used for recovering PDF files but also supports the recovery of various other file types, including images, videos, and documents, with a total of over 1000 supported file types.
- This data recovery software is not only used to recover deleted files, but also serves as a bootable tool that can help recover data from a PC that is unable to boot, allowing users to recover shift deleted files even when their PC is unresponsive.
Step 1. Select the location to scan
To recover permanently deleted files, select the device and drive where the files were deleted using Shift delete or emptied from the recycle bin. Click the "Scan" button to initiate the recovery process and locate the lost files.

Step 2. Check the results
The software will automatically scan the selected drive, and once complete, users can select the "Deleted Files" and "LostFiles" folders in the left panel. They can then use the "Filter" feature or search for specific files or folders using the "Search files or folders" button to quickly locate deleted files.

Step 3. Recover deleted files
Select the deleted files and click "Preview" to confirm the files you want to recover. Then, click "Recover" to save them to a secure location or device.

Recover Shift Deleted Files Windows 11 Without Recovery Software
There are several workable solutions to recover deleted files without software, and we'll introduce two tested ways to recover shift deleted files on Windows 11.
Fix 1. Recover Shift Delete Files Windows 11 from File History
File History is also a built-Windows 11 has a feature called File History that allows you to recover accidentally deleted files easily. Enabling this option will back up your files, including documents, graphics, videos, and music, making it a wise choice for protecting your data.
How to Enable File History on Windows 11
To enable the option, you can go to Settings > General > Software Update. Tap on "Enable" to turn it on.
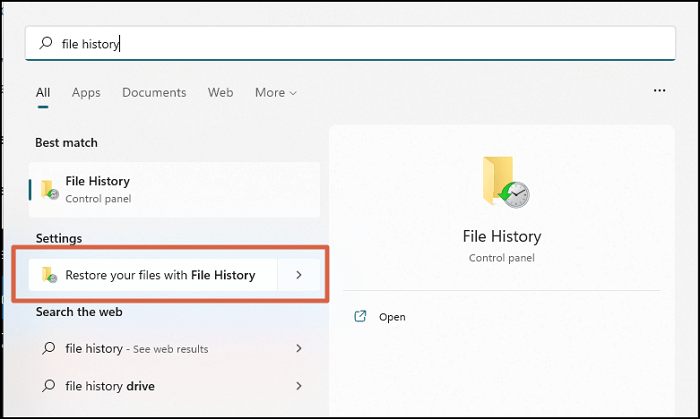
Step 1. Click the Windows icon and search for File History.
Step 2. You will see some options in a Window, and select the "Restore your files with File History" option.
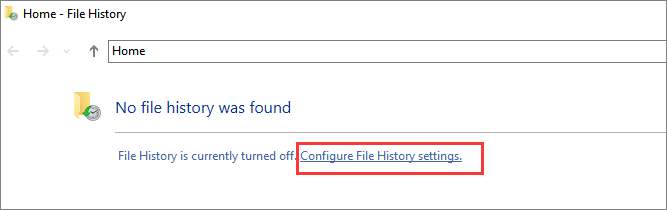
Step 3. Click "Configure File History settings".
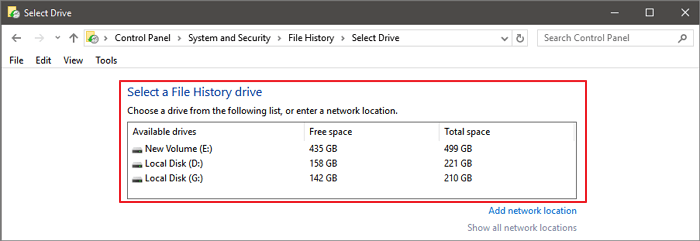
Step 4. To enable the File History feature, select the drive where you want to save the backups. This drive should have enough free space to hold all the files you want to back up.
Step 5. Click "Turn on", and the File History is enabled.
How to Recover Shift Deleted Files Windows 11 from File History
To recover shift deleted files on Windows 11, you need to have enabled File History successfully. Once you've done that, you can follow the steps to recover your deleted files.
Step 1. Click the Windows icon and search for File History.
Step 2. You will see some options in a Window, and click on "Restore your files with File History".
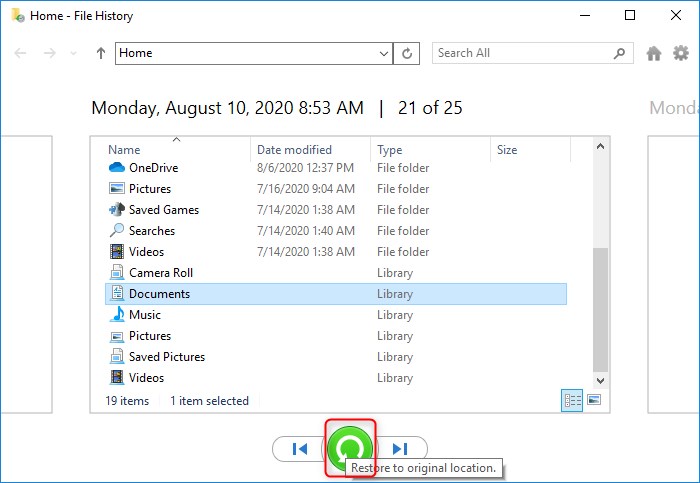
Step 3. After scanning, you will see a list of recoverable files, select the ones you want to recover and click the green button to initiate the recovery process.
Fix 2. How to Recover Shift Deleted Files with Windows File Recovery
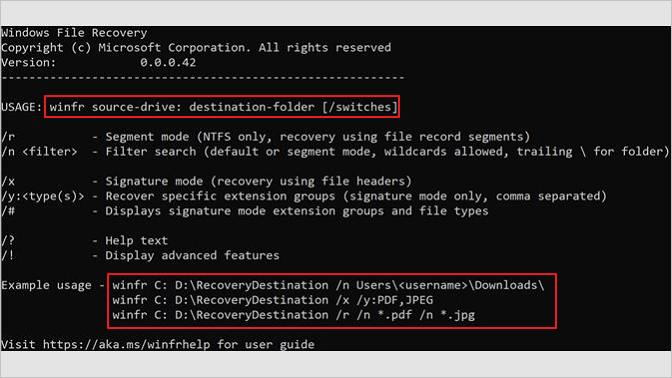
Download Windows File Recovery from Microsoft Store, a command-line tool to recover deleted files in Windows 10 and 11. However, it's recommended for computer novices to avoid using it due to its complexity. To recover files, a secondary drive is needed, and the location of the files must be known.
Step 1. Click the Windows icon and search for Windows File Recovery. Download this recovery tool.
Step 2. Run Windows File Recovery on Windows 11.
Step 3. To use the Winfr command, type `winfr source-drive: destination-drive: [/switches]` in the Command Prompt, replacing "source-drive" and "destination-drive" with the actual drive letters you want to copy from and to, respectively. For instance, you might use `winfr C: D: /n \Users\Documents\test.docx` to copy the file `test.docx` from the `C:` drive to the `D:` drive, specifically placing it in the `\Users\Documents` folder.
Step 4. Then you can follow the prompts to restore the files.
Bottom Line
When recovering shift deleted files using the Windows File Recovery tool, be mindful of your command lines and ensure you're typing the correct commands. Additionally, if you're using File History to recover shift deleted files, make sure File History is already enabled, otherwise, the files won't appear in File History.
Don't worry if you fail to recover shift deleted files with the Windows File Recovery tool or from File History. Deep Data Recovery can scan the whole disk, list all lost or deleted files, and let you preview them to ensure they're the exact ones you want, allowing you to get back your shift deleted files with one click.
Recover Shift Deleted Files Windows 11 FAQs
You can find more information about recovering shift deleted files on Windows 11 in the following Q&As, which provide detailed answers to related questions.
Does Windows 11 have File History?
On Windows 11, you can find the File History option in the Settings app, under the "Update & Security" section. From there, you can see a list of all the files that have been backed up using File History, and even recover files that were previously deleted or lost.
- 1. Click the Windows icon and search for File History.
- 2. You will see some options in a Window, click on "Restore your files with File History".
- 3. Click "Configure File History settings".
- 4. To enable the File History option, you should select the drive that contains the files you want to save. This drive should have enough free space to hold the files you're backing up.
- 5. Click "Turn on", and the File History is enabled.
- 6. If File History is already enabled, you'll see a list of recoverable files. Select the desired deleted files and click the green button.
Can shift deleted files be recovered on Windows 11?
The easiest way to recover shift deleted files on Windows is by using Deep Data Recovery.
- 1. Download and install Deep Data Recovery, then run it.
- 2. Scan the shift deleted files.
- 3. You are allowed to preview the deleted files.
- 4. Select all the deleted files and recover them.
Can we recover permanently deleted files on Windows 11?
You can recover deleted files on Windows 11 before they are overwritten, using the Windows File Recovery tool or from the File History. Alternatively, you can download a professional deleted file recovery tool, such as Deep Data Recovery, to retrieve your lost files.
- 1. Download and install Deep Data Recovery, then run it.
- 2. Scan the deleted files.
- 3. You are allowed to preview the deleted files.
- 4. Select all the deleted files and recover them.
How can I recover permanently deleted files with CMD?
You can't recover permanently deleted files using Command Prompt, but you can recover hidden files with CMD. To do this, follow the tutorial below.
- 1. To access the Command Prompt in Windows, click the Windows icon and type in "cmd" to see the Command Prompt appear.
- 2. You should run Command Prompt as an administrator.
- 3. Type the command `chkdsk drive letter: /f` in the command prompt, replacing "drive letter" with the actual drive letter of the drive you want to scan.
- 4. To confirm your operation, please type in "Y" and press the Enter key.
- 5. To fix the issue, restart your computer and go to the BIOS settings. In the BIOS settings, navigate to the Boot Order settings and set the boot order to the correct drive.
- 6. The command `attrib -h -r -s drive letter:\*.* /s /d` is used to remove the "hidden", "read-only", and "system" attributes from all files and directories on a specified drive. This command is typed in the Command Prompt, with the "drive letter" being replaced with the actual drive letter (e.g. C:, D:, etc.
Related Articles
- How to Recover Locked SD Card Pictures/Files
- How to Recover Data from VMware Disk [2023 Updated Guide]
- Top 5 Free Folder Recovery Software in Windows 10/8/7
- Call of Duty Mobile Account & Data Recovery [2023 Troubleshooting]
- 4 Best Ways to Recover Lost Save Data in Hogwarts Legacy
If your Hogwarts Legacy progress and game save are gone or missing, don't panic! There are four working ways to recover lost Save data in Hogwarts Legacy, and using Qiling Data Recovery Wizard is the most effective method. Simply download this tool and restore your game data as soon as possible to get back to your magical adventure. - Recover Lost Save Data in the Legend of Zelda: Tears of the Kingdom [4 Methods]
If your Legend of Zelda: Tears of the Kingdom game save and is lost, don't worry. In the Legend of Zelda: Tears of the Kingdom, this page offers four effective strategies to restore deleted Save data. The most effective tool for restoring lost save data is Deep Data Recovery.