iPhone 8 Data Recovery: Recover Data from iPhone 8/X/8 Plus
Summary
Are you looking for ways to recover data on your new iPhone 8, iPhone X, or iPhone 8 Plus? Don't worry, this article provides three easy solutions to recover lost or deleted data from your device. With these methods, you can easily retrieve your important files and get back to using your iPhone as usual. Whether you've accidentally deleted something or your data is lost due to a software issue, these solutions can help you recover your data with ease.
iPhone 8/X/8 Plus Data Recovery Software
Losing data such as contacts, messages, photos, music, or videos from an iPhone 8 can be overwhelming. Fortunately, it's possible to recover data from an iPhone 8, even if it's deleted. This means you can retrieve lost photos, contacts, music, and more from your iPhone 8, 7, or 6.
You can recover data from your iPhone 8 with the help of iPhone data recovery software, which allows you to restore data without damaging your phone. If you've lost data and are unsure how to recover it, there are three ways to do so: using iPhone data recovery software, which can help you retrieve your data without harming your iPhone 8/X/8 plus.
Part 1: How to Recover Data from iPhone 8/X/8 Plus Directly
Thanks to Qiling MobiSaver, a professional iPhone 8 data recovery software, recovering lost or deleted data from your iPhone has been simplified. With this software, you can easily recover deleted data from your iPhone 8, iPhone X, or iPhone 8 Plus.
Step 1. Connect iPhone to Your PC
Launch Qiling MobiSaver, click "Recover from iOS device" and then click "Start".
Step 2. Scan for Lost iPhone Data
Qiling MobiSaver will automatically scan your iPhone/iPad/iPod, finding both present and potentially lost data, and the process is completed once the scan is finished.
Step 3. Click the "Recover" Button
You can select the types of lost data you want to recover, such as photos, videos, contacts, SMS, notes, voice mails, and other files, and save them to a new location.

Tip: If this solution does not work, try the next one.
Part 2: How to Restore Data on iPhone 8/X/8 Plus from iCloud Backup
You can recover lost data from your iPhone 8 directly from your iCloud account using the iCloud data recovery method, which involves a few simple steps.
To recover permanently deleted photos from an iPhone, you can use an iCloud backup. First, restore your iPhone from an iCloud backup that was created before the photos were deleted.
Step 1. Go to "Settings" > "General" > "Reset".
Step 2. Tap "Erase All Content and Settings" to reset your iPhone.
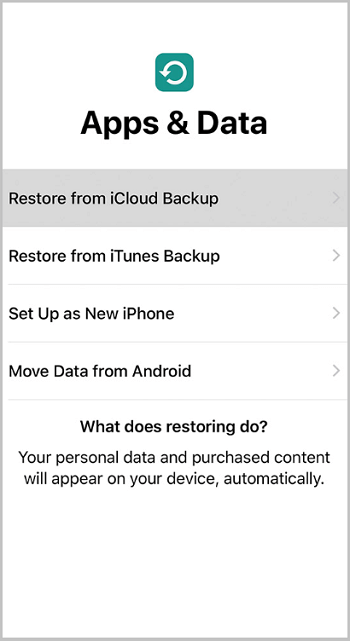
Step 3. Set up your iPhone and choose "Restore from iCloud Backup" on the Apps & Data screen.
Step 4. Sign in with your Apple ID and tap "Choose backup".
Step 5. To restore your iPhone from the most recent iCloud backup, go to Settings > [your name] > iCloud > iCloud Backup, and select the most recent backup to restore from. This will allow you to restore your iPhone to its most recent state, including all of your data and settings.
Part 3: How to Retrieve Data on iPhone 8/X/8 Plus from iTunes Backup
If you've made an iTunes backup of your iPhone 8, you can use Qiling MobiSaver to retrieve and save your data. To do this, follow the steps in Qiling MobiSaver's iOS Data Recovery program, which allows you to recover data from your iPhone 8, iPhone X, or iPhone 8 Plus using your iTunes backup.
Step 1. Run Qiling MobiSaver
To recover deleted data from your iPhone or iPad using Qiling MobiSaver, first download the software, then connect your device to your computer and start Qiling MobiSaver. Next, select "Recover from iTunes Backup" and choose an iTunes backup to recover your data.
Step 2. Unlock iTunes
If the iTunes backup is encrypted, enter the password to unlock it, then click "Continue". Qiling MobiSaver will automatically scan the backup file to find the lost data.
Step 3. Preview and Recover Data from iTunes
After scanning, preview the contents of your lost photos, videos, contacts, messages, notes, and SNS data. Choose the desired file and click the "Recover" button to save it on your computer.
Select the files you want to recover, then click "Recover" to export them to your computer.
The Qiling iOS Data Recovery program is a tool that allows users to recover data from their iPhone 8, X, or 8 Plus. The process is straightforward and can be completed in a few steps, ultimately allowing users to view their retrieved data.
Related Articles
- How to Recover WhatsApp Messages Without Backup on iPhone/Android
- iPhone Backup Extractor Crack
- Fix iPhone 6s/6/5s Shut Down at 50% Battery Without Losing Data
- Free Download Qiling MobiSaver Full with Serial Key
- How to Recover Files Deleted from USB Flash Drive/SD Card Not in Recycle Bin [2023]
If you deleted files from a USB drive or SD card and they're not in the recycle bin, don't panic. You can use Deep Data Recovery software to try and recover the deleted files. - Solved - Files in Downloads Folder Disappeared [2023]
If your files in the downloads folder have mysteriously disappeared, there's a solution.