What Is the Other in My Mac Storage and How to Clear It
On a Mac, such as a MacBook Pro, disk space is a valuable resource, especially when editing videos, which can quickly fill up even the largest storage capacity, ranging from 128GB to 2TB.
When checking the storage status on your Mac, you may notice an item called "Other" that takes up a significant amount of space, leaving you wondering what it is and how to clear it to free up space. The "Other" category typically includes various types of files, and understanding what's inside can help you safely remove unnecessary data and reclaim storage space on your Mac.
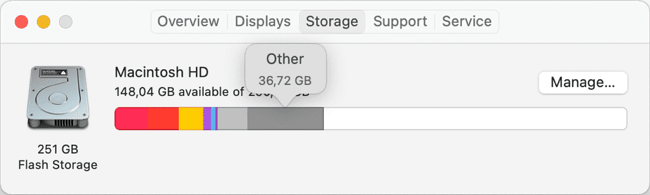
What Contains in The Other Category?
Here are the main files in the Mac "Other" category:
- All documents, including .pdf .doc .psd
- All compressed files and disk images, including .zip .dmg .iso
- All user data and system files, including the System folder and cache folder, are deleted.
- All files that Spotlight doesn't recognize, including .exe extensions that are strange to OS X, are ignored by the Spotlight search feature.
- All video and audio files that are not in the OS X standard format (such as .mp3, .
- All application plugins and extensions
- All backup files from iTunes
The Mac is able to easily recognize common file types such as music, pictures, and movie files, but it struggles to identify project files created in Adobe software like After Effects (AE) and Photoshop (PS), categorizing them as "Other" instead.
You need to delete cache files, iTunes backup files, and unnecessary applications on your Mac, in addition to the files that your Mac cannot recognize.
1. How to Clear Cache Files on Mac
Clearing cache files on Mac is not harmful and can save a lot of space on your hard drive. Removing app cache files will free up space, and the cache will be automatically generated again when you open the app next time. It's a good idea to clear the caches of apps that are rarely or will not be used. To clear cache files on your Mac, follow these steps: follow the steps below.
Step 1. To open a Go to Folder window, press Shift + Command + G at the same time while the Finder is open.
Step 2. Enter "~/Library/Caches" in the Go to Folder window, then press Go.
Step 3. You can view a list of caches saved from active applications. To delete the cache, select the program folder, right-click or control-click it, and choose Move to Trash, repeating this process for all applications.

2. How to Clear iTunes Backup Files on Mac
iOS backup data is the main contributor to the "Other" files, as iPhone or iPad backups can be several gigabytes in size, making it crucial to clean up these files to free up storage space.
Don't worry about deleting iTunes backup files on your Mac, as it won't affect your iCloud backup. iCloud saves backup files in the cloud, while Mac saves them locally, so deleting local data won't impact cloud backups. To delete iTunes backup files on Mac, follow these steps: follow the steps below.
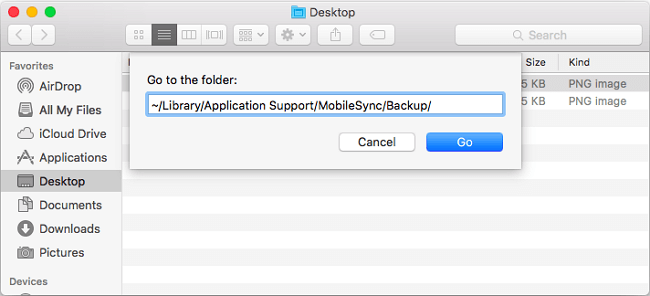
Step 1. To open a "Go to Folder" window in Finder, press the keys Shift + Command + G simultaneously. This will open a new window where you can enter a path to navigate to a specific folder.
Step 2. Enter "~/Library/Application Support/MobileSync/Backup/" and press Go.
Step 3. You can now view all iTunes backups of your iPhone or iPad, and delete the unnecessary ones to free up space on your Mac.
3. How to Clear Unnecessary Applications
Deleting unwanted applications on a Mac is straightforward, as users can simply drag them to the Trash. However, this method is not effective for removing redundant files, such as log files and cache files. To clean up these types of files, users need to rely on a third-party tool, with options like CleanMyMac X, MacCleaner 2 Pro, and Daisy Disk available, each with its own features and suitability for individual needs.
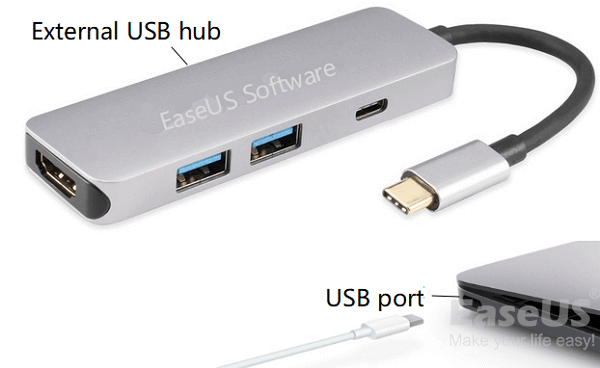
Solved: USB Flash Drive Not Showing Up on Mac
If your Mac doesn't recognize a USB drive or the USB flash drive isn't showing up on Mac after being inserted, you can try downloading Deep Data Recovery for Mac to recover data from the unrecognizable USB drive.
Bonus Tip: Recover Accidentally Deleted Files
When manually cleaning up Mac files, unexpected situations can arise, such as accidentally deleting important files, only to realize their importance when trying to start certain software. In such cases, seeking help from data recovery software is often the best solution.
Deep Data Recovery for Mac is a tool designed to allow Mac users to retrieve lost files and data in the easiest way, requiring only three steps to perform thorough data recovery.
You can download the software from the button below, and follow the guide to see how to recover lost files on your Mac.
Step 1. Launch Deep Data Recovery on your computer, select the file types you're looking to recover and click "Next" to initiate the recovery process.

Step 2. Click the "Scan" button after selecting the location where your important data & files were deleted.

Step 3. The software will perform both a quick scan and a deep scan on the selected volume, working diligently to identify as many deleted files as possible.

Step 4. The scan results will be displayed in the left pane. To retrieve the files, simply select them and click the "Recover" button.
The Closing Thoughts
In Mac's Other category, you'll typically find files that Apple can't recognize, cache files, and iTunes backup files. To free up disk space, you can safely delete these cache files and iTunes backup files, which can be done by following the steps outlined above. This will help declutter your Mac and make more space available.
If you've accidentally deleted important files, you can use Deep Data Recovery for Mac to recover them.
Related Articles
- 5 Best Free Snipping Tools for Mac
- How to Open a Corrupt Word File on Mac and Recover Deleted Word
- 2022 Recover Photoshop File Mac: Unsaved, Corrupt, Deleted and Closed
- How to Recover Deleted iMessages on Mac with Four Effective Ways
- Fix Exracted Files or Files Not Showing in Folder Windows 10
Here are four solutions to resolve the issue of files not showing up in folder or extracted files not showing up in Windows 10: Try to check the file type association, reset the File Explorer, check for corrupted system files, and run a full system scan with an antivirus software to retrieve your important data in Windows 10/8/7. - How to Fix Inaccessible Boot Device (Stop Code 0x0000007b)
The Inaccessible Boot Device error code 0x0000007b is a common Blue Screen of Death issue that often occurs on Windows 10 computers and laptops. This error can be resolved using one of the five best solutions outlined in this guide, which also includes a capable WinPE data recovery program for retrieving data from the Blue Screen of Death.