How to Change HEIC to JPG on Mac
Mac introduces the new image and video formats HEIF and HEVC since macOS High Sierra (macOS 10.13). Though you can view HEIC images on most of the new macOS systems, sometimes you may still need to convert HEIC photos to JPG because some apps/tools don't accept HEIC images. This article introduces you four tips on how to change HEIC to JPG on Mac.
Method 1. Change HEIC to JPG When Syncing Photos to Mac from iPhone
There are several ways for you to send photos on iPhone to Mac, like using Airdrop, Finder, Cloud services, and third-party iPhone data transfer tools. Most of them will keep photos in their original format, HEIC. While this transfer tool Qiling MobiMover can change HEIC to JPG in the transfer process if you set it in Settings. This solution that manages the transfer and conversion tasks at the same time is very easy to operate. You get multiple photos converted efficiently.
Step 1. Connect your iPhone or iPad to your Mac. Start Qiling MobiMover and go to "Content Management" > "Pictures" > "Albums."
Step 2. Select the albums you'd like to copy from your iPhone/iPad to Mac. You can select specific items or select all, depending on your needs. You can choose "Original" and "JPG" as the format of the transferred photos in "Preference".
Step 3. Click the "Transfer" button, and MobiMover will start transferring albums from your iPhone or iPad to your Mac automatically. When it has completed, go to the destination to check the files.
>>Also read how to batch convert HEIC to JPG on PC here.
Method 2. Change Photo from HEIC to JPG with Preview App
As Apple is the first company to adopt HEIC images, Apple apps are compatible with HEIC images since then. You can use the Preview app and Photo app to open and convert the photo format. The steps are simple.
Step 1. Open HEIC images with the Preview app. Usually, photos are opened by the Preview app by default.
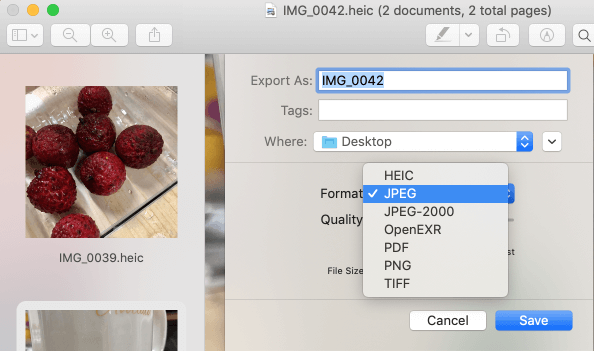
Step 2. Click "File" > "Export...".
Step 3. In the dropdown menu, edit the photo name and save path (optional), choose "JPEG" as the format, then click "Save" to export a JPEG version for this HEIC photo.
Method 3. Convert HEIC to JPG using Photos App
Apart from using the Preview app to view HEIC images and export them in JPEG format, the Photo app can also convert HEIC to JPG. Check the steps below for details.
Step 1. Import HEIC images to the Photo apps.
Open photo with the Preview app, then click "File" > "Share" and choose "Add to Photos". You can also drag and drop the HEIC images to the Photos app.
Step 2. Change HEIC images to JPEG by adding them to Finder
Open the Finder app, Then drag and drop one or multiple HEIC images from the Photos app to any Finder window. The HEIC image will be saved in JPEG in Finder.
Method 4. Change HEIC to JPG with Online Image Converter
Online HEIC to JPG converters works on both operating systems. Mac users can also get their HEIC images converted to JPG with the help of online tools. You can search for one on Google. As we said earlier, online tools may collect your info for processing usage. If you don't mind, choose one to try.
Summary
That's all about how to change HEIC to JPG on Mac. Using the Preview app converts one photo each time. If you want to convert lots of images, using the rest three solutions. If you find this tutorial useful, support us by sharing this post with your friends.
Related Articles
- How to AirDrop from Mac to iPhone in Details
- How to Transfer Music from iTunes to iPhone Without Syncing
- Free iPhone Manager for Windows/Mac - Qiling MobiMover
- How to Transfer Contacts from iPhone to iPad With/Without iCloud