How to Transfer Photos from iPhone to iPad with/Without iCloud
Transferring photos from iPhone to iPad is required in many situations, such as want to free up more space on the iPhone, view photos in a larger screen, or migrate photos from old iPhone to new iPad, etc. For whatever reason, you can find five possible methods to transfer photos from iPhone to iPad with or without iCloud.
- Part 1. How to Transfer Photos from iPhone to iPad Without iCloud
- Transfer Photos from iPhone to iPad Using Qiling MobiMover
- Transfer Photos from iPhone to iPad via AirDrop
- Transfer Photos from iPhone to iPad with iTunes
- Transfer Photos from iPhone to iPad via Email
- Part 2. How to Transfer Photos from iPhone to iPad Using iCloud
Part 1. How to Transfer Photos from iPhone to iPad Without iCloud
As we all know, iCloud only offers its users 5GB storage for free. That means you have to buy more storage space if you have more than 5GB of photos to transfer. That's why many users don't like using iCloud. In that case, the following options give you the chance to transfer photos from iPhone to iPad without iCloud.
Option 1. Using Qiling MobiMover - All-in-one method
Qiling MobiMover is a comprehensive and mature iOS data transfer program that enables users to transfer any data, including photos, between two iOS devices without iCloud. It supports various image formats including JPG, BMP, ICON, TIFF, PNG, GIF. You can either choose to back up photos to the computer or transfer them to your iPad with a few simple steps. Besides, this powerful tool offers you a chance to have a free upgrade video downloader, with which you can free download videos from any website to your iPhone.
Step 1. Connect both of your iOS devices to your computer (Mac/PC). Launch Qiling MobiMover, and choose "Phone to Phone" on the screen. Correctly set the source device and target device, and click the "Next" button to continue.
Step 2. Check the category/categories you want to transfer from your iPhone to iPad or from iPad to iPhone. As you can see, in addition to photos, you can also copy videos, audios, contacts, messages, and more between your iPhone and iPad.
Step 3. After checking the settings, click the "Transfer" button to start transferring photos from your iPhone to iPad or iPad to iPhone. When it has completed, go to the "Photos" app on your target device to check the newly imported items.
Option 2: Using AirDrop - The wireless way
AirDrop is a pre-installed program on iDevices and Mac to be used to share content among iPhone, iPad, and Mac in a wirelessly, including photos, videos, music, notes, and more.
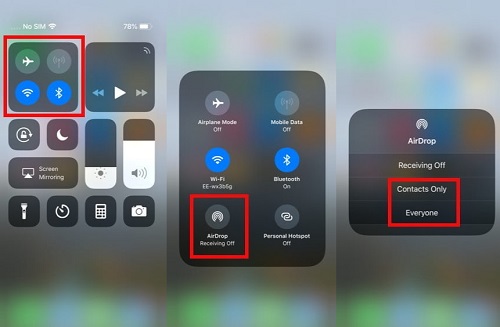
Step 1: Turn on AirDrop, Wi-Fi connection, and Bluetooth on both iPhone and iPad within the Control Center.
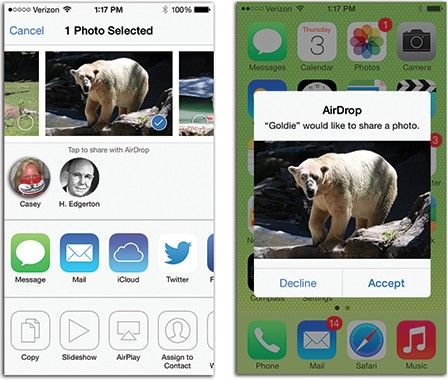
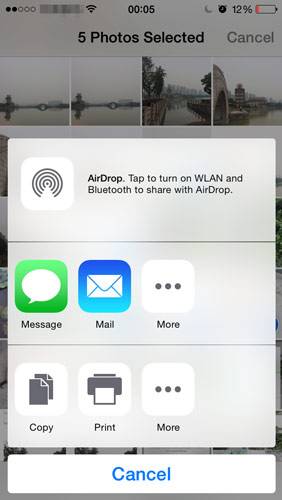
Step 2: Open the Photos app on your iPhone. And select the photos you want to sync to the iPad, tap the "Share" button, and then tap AirDrop and choose your iPad. AirDrop will start to send photos from iPhone to iPad.
Step 3: Go to your iPad and tap the "Accept" tab on the pop-up to receive photos from the iPhone. When the process finished, run the Photos App on the iPad and check the updated files.
Related tips: How to transfer music from Mac to iPhone with AirDrop
Option 3: Using iTunes - Sync all iPhone files
iTunes data syncing is the most complex method among the three to transfer photos from iPhone to iPad without iCloud, as you need to first back up photos from iPhone then use iTunes to sync to iPad. Or just restore the iPad with an iTunes backup of the iPhone, which will definitely wipe the existing data. Therefore, take this way with caution!
Back up iPhone photos with iTunes
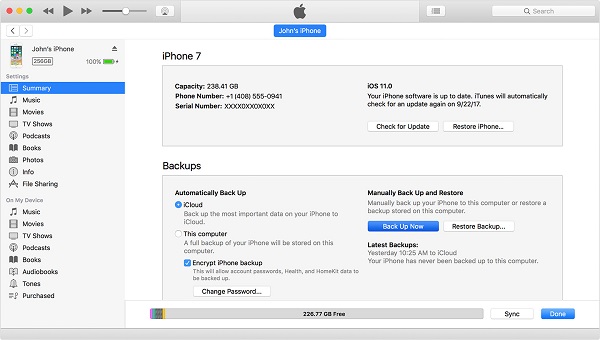
Step 1: Connect your iPhone to your computer with a USB cable and run iTunes.
Step 2: Click the Device button and choose "This Computer" on the right-side panel.
Step 3: Then click "Back Up Now" and start to sync the photos from iPhone to the computer with iTunes.
Sync iPhone photos to iPad with iTunes
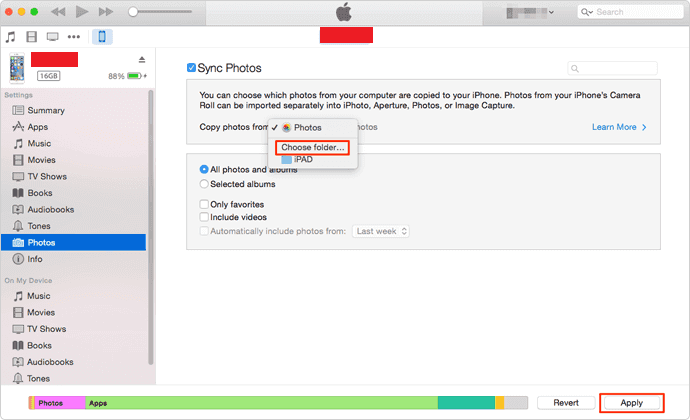
Step 1: Plug out your iPhone and plug in your iPad to your computer with a USB cable > Run iTunes.
Step 2: Click the Device button and choose Photos on the right-side panel.
Step 3: Then check "Sync Photos" and "All photos and albums." Click "Apply" to transfer photos to the iPad.
Option 4: Using Email - Apply to transfer one or two photos
Step 1: Open the "Photos" app on your iPhone.
Step 2: Select the photos you want to transfer to iPad.
Step 3: Tap the "Share" button > Choose "Mail."
Step 4: Login your Mail account if you haven't logged in > Check "Send" to send the email to your mail account.
Step 5: Go to the "Mail" app on your iPad > Check the email from your iPhone > Save the photos on your iPad.
Part 2. How to Transfer Photos from iPhone to iPad Using iCloud
iCloud is a cloud service offered by Apple. It provides two ways to sync photos across iOS devices - via My Photo Stream and via iCloud Photo Library. There are some differences between them, as shown below.
| My Photo Stream | iCloud Photo Library |
|---|---|
|
|
After learning the differences between My Photo Stream and iCloud Photo Library, you can now choose your desired way to sync photos from iPhone to iPad.
Option 1. Transfer Photos from iPhone to iPad via My Photo Stream
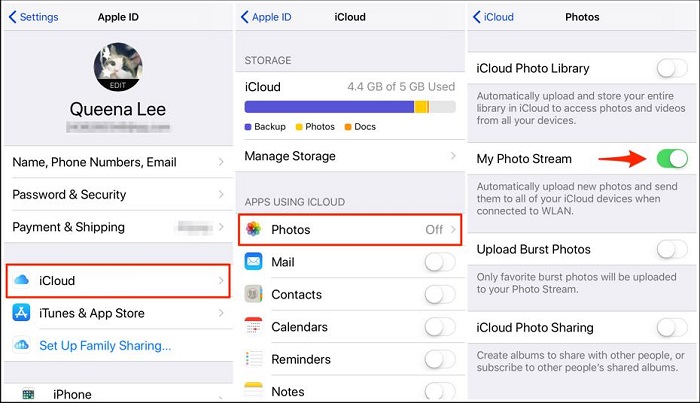
Step 1. Launch the Settings app on your iPhone > Tap on [your name] > Select the "iCloud" option > Tap on "Photos."
Step 2. Tap the "Upload to My Photo Stream" toggle to enable photos and videos over Wi-Fi.
Step 3. Then, you can repeat the steps on your iPad. After that, all photos will be synced from the iPhone to the iPad.
Option 2. Transfer Photos from iPhone to iPad via iCloud Photo Library
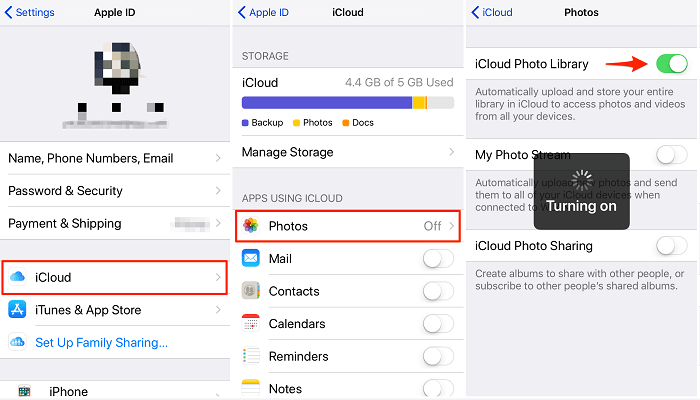
Step 1. Go to the Settings on your iPhone > Tap on your Apple ID's profile > Tap on "iCloud."
Step 2. Tap on "Photos"> Toggle the "iCloud Photo Library" on.
The Bottom Line
After reading our post, we hope you have known how to transfer photos from iPhone to iPad with/without iCloud. We offer you the option of Qiling MobiMover, iTunes, AirDrop, Email, and iCloud. Of these options, Qiling MobiMover is the most recommended since it owns the fastest transfer speed and supports the widest photo formats. Anyway, don't miss it.
Related Articles
- How to Download Twitch Clips to MP3
- Free and Fast Way to Sync iPhone Music Without iTunes
- Transfer Files from PC to iPad with PC to iPad File Transfer Software
- How to Transfer Contacts from One Apple ID to Another