How to Transfer Photos from iPhone to PC Without iTunes
Quick Navigation:
- Why It Is Necessary to Transfer Photos from iPhone to PC
- How to Transfer Photos from iPhone to PC Without iTunes
- Option 1. Copy Photos from iPhone to PC via iPhone Transfer Software
- To transfer photos from iPhone to PC:
- Option 2. Import Photos from iPhone to PC via the Photos App
- Option 3. Transfer Photos from iPhone to Computer via File Explorer
- How to Transfer Photos from iPhone to PC Without USB
- Option 1. Download Pictures from iPhone to Computer via iCloud Control Panel
- Option 2. Transfer Pictures from iPhone to PC via iCloud.com
- The Bottom Line
Why It Is Necessary to Transfer Photos from iPhone to PC
Taking photos with your iPhone is a common activity, but as your photo collection grows, it can take up a significant portion of your iPhone's storage. To free up space, transferring photos from your iPhone to your PC is a great option. This allows you to declutter your iPhone's storage and keep your photos organized on your computer.
Transferring photos from iPhone to computer is a great way to back up your precious memories and free up storage on your iPhone. You can do this using third-party iPhone data transfer tools or built-in programs in Windows, making it easy to import photos from iPhone to PC in Windows 10, 8, or 7. This allows you to delete photos from your iPhone and make the most of your storage space.
How to Transfer Photos from iPhone to PC Without iTunes
If you want to free yourself from iTunes installation, you can try using three tools that allow you to transfer photos from iPhone to PC without iTunes. To apply one of these tips, you'll need a USB cable that works properly and a computer that can recognize your iPhone successfully.
Option 1. Copy Photos from iPhone to PC via iPhone Transfer Software
Also supports: Videos, contacts, music, ringtones, messages, books, and more
Whether you want to transfer photos you take, download, or save from iOS apps, the iPhone transfer software - Qiling MobiMover could help. This tool is a combination of an iPhone data transfer tool, an iOS content manager, and a video downloader, allowing you to easily transfer, manage, and download content from your iPhone.
- Transfer files from PC to iPhone and vice versa
- Transfer data from one iPhone to another
- Back up and restore iPhone data
- Transfer, back up and restore WhatsApp messages
Qiling MobiMover is a versatile tool that allows users to transfer files between their iOS device and computer. It supports the transfer of various file types, including photos, and is a convenient option for users who need to frequently transfer files between their device and computer.
To transfer photos from iPhone to PC:
Step 1. Connect your iPhone to a PC running Windows 7 or later, then run Qiling MobiMover. Select the "Phone to PC" option and click "Next" to proceed.
Step 2. To transfer photos and other supported files from your iPhone to your computer, select the desired categories, and MobiMover will copy them to your PC, allowing you to customize the storage path for the exported photos, which will be saved on your desktop by default.
Step 3. Click the "Transfer" button on MobiMover to export files from your iPhone to your PC, making it a great way to back up your data and avoid unexpected loss.
Option 2. Import Photos from iPhone to PC via the Photos App
If you don't want to use a third-party program, you can also use the built-in Photos app on Windows to transfer photos from your iPhone to your PC. The Photos app can help you manage photos and videos on your computer and import pictures from an external device, including your iPhone, making it easy to transfer photos from iPhone to PC in Windows 10.
To transfer photos from iPhone to computer:
Step 1. Connect your iPhone to the PC with a USB cable.
Step 2. Enter your passcode to unlock your iPhone if asked and click "Trust" on your iPhone to continue.
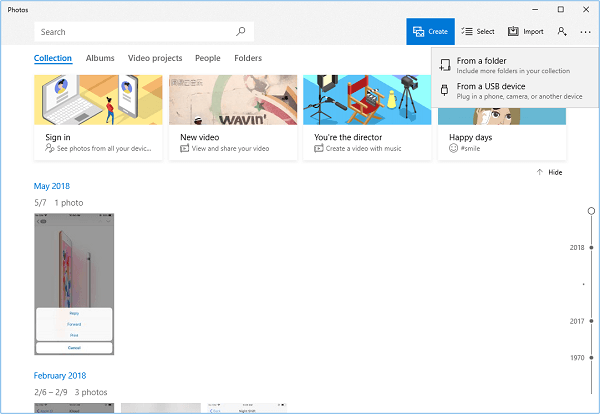
Step 3. To import photos and videos from a USB device, open the Photos app and select "Import" followed by "From a USB device." The Photos app will then automatically scan your device for new photos and videos.
Step 4. To import settings, tap on "Import settings" and make changes to the import destination, group items by date/month/year, and decide whether to delete items from your iPhone after importing. Confirm your settings and click "Done".
Step 5. Select the videos you'd like to transfer and then click "Import Selected" to initiate the transfer process.
If Photos is not working in Windows 10, fix it first or try other alternative ways to get things done.
Option 3. Transfer Photos from iPhone to Computer via File Explorer
You can also transfer photos from iPhone to PC using File Explorer, without needing iTunes or any other software. As long as your iOS device can be recognized by your PC, you can follow these steps to move photos from your iPhone to your computer.
In File Explorer, all pictures and videos are stored in a single folder, making it hard to transfer specific items, unlike in albums where they are organized.
To transfer all pictures and videos from iPhone to PC:
Step 1. Connect your iPhone to your PC, unlock your iPhone, and when prompted, click "Trust" to allow your PC to access your iPhone.
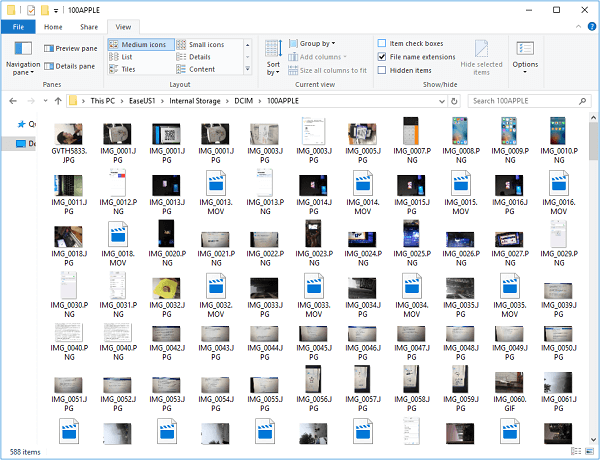
Step 2. Open "This PC" on your computer, go to "[your iPhone name] > Internal Storage > DCIM > 100APPLE."
Step 3. When transferring data from your iPhone to your computer, you have the option to copy the entire folder or select specific items to transfer, depending on your needs.
How to Transfer Photos from iPhone to PC Without USB
You can use AirDrop to wirelessly transfer photos from your iPhone to your PC. This method requires both devices to be connected to the same Wi-Fi network and have AirDrop enabled. You can also use iCloud Photo Library to upload your iPhone photos to the cloud, and then access them on your PC through a web browser.
Option 1. Download Pictures from iPhone to Computer via iCloud Control Panel
To transfer photos from iPhone to PC wirelessly, you can use iCloud Photos, which allows you to sync photos across devices with the same Apple ID account.
The process of transferring photos from an iPhone to a laptop or computer depends on whether iCloud for Windows has been installed on the PC. If it has, photos can be transferred from the iPhone to the computer via iCloud.
Make sure there is enough iCloud storage available for you to save your iPhone photos, then follow the steps below to download pictures from iPhone to computer without a wired connection.
To copy photos from iPhone to PC via iCloud for Windows:
Step 1. Run iCloud for Windows on your computer.
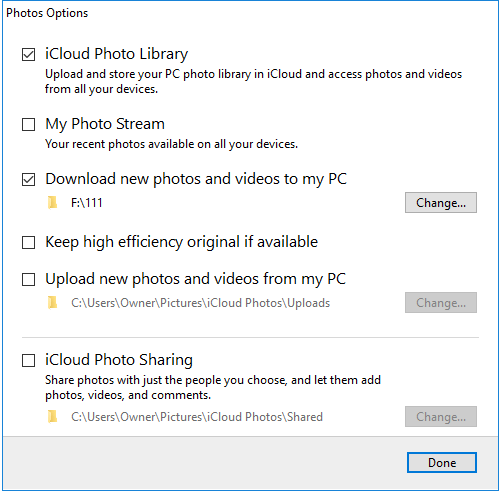
Step 2. Click "Options" next to "Photos" and enable "iCloud Photo Library."
Step 3.Ensure the "Download new photos and videos to my PC" is enabled. If you want to change the storage location for your iPhone photos, tap on "Change" under this option to set an alternative storage path.
Step 4. When your iPhone is connected to a computer via USB and there is a WiFi connection available, your iPhone photos will be copied to your computer.
Option 2. Transfer Pictures from iPhone to PC via iCloud.com
If you don't install iCloud for Windows on your computer, you can access your iCloud account and its features through the iCloud website at icloud.com.
To download iPhone photos to computer via iCloud.com:
Step 1. Go to visit iCloud.com from your PC.
Step 2. Enter your Apple ID to sign in to iCloud.
Step 3. Choose "Photos" among the options.
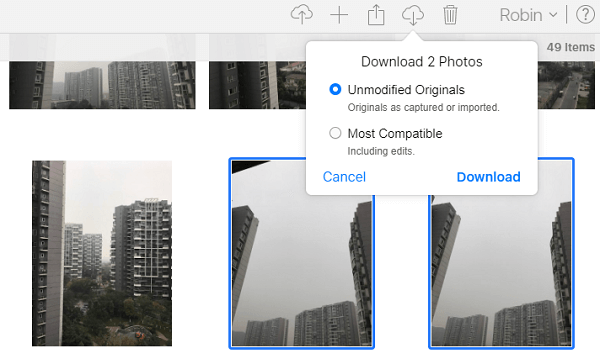
Step 4. Select the photos you'd like to download from iCloud to your PC, then click the "Download Selected items" icon at the top right corner of your screen, or press Alt to select multiple items.
You can also use cloud-based storage services like Google Photos, Dropbox, and others, which can transfer photos from your iPhone to your PC.
The Bottom Line
Besides popular solutions, there are other ways to transfer photos from iPhone to computer, such as sending them via email, but this method is only recommended for transferring a few items.
To import photos from your iPhone to Windows, you can use the Photos app, iCloud, or a USB cable. If you need to transfer a large number of photos, using the Photos app or iCloud is recommended.
Related Articles
- Safe & Fast iPhone Data Transfer to PC Software
- [Proven Tip] How to Transfer Music from iPhone to USB Flash Drive
- How to Back Up iPhone to External Hard Drive on Windows 11
- 5 Ways to Transfer Contacts to New iPhone 13/12/11