How to Transfer Files from PC to iPhone or iPad
Quick Navigation:
- Part 1. How to Transfer Files from PC to iPhone/iPad Using iTunes
- Method 1. Transfer Files Between PC and iPhone/iPad via iTunes File Sharing
- Method 2. Move Files from PC to iPhone via iTunes Syncing
- Part 2. How to Transfer Files from PC to iPhone/iPad Without iTunes
- Method 1. Transfer Files from PC to iPhone/iPad with Qiling MobiMover
- Method 2. Transfer Files from PC to iPhone or iPad for Free Using iCloud Drive
- Method 3. Transfer Files from Computer to iPhone/iPad with Dropbox/Google Drive
- Method 4. Send Files from PC to iPhone/iPad via Email for Free
- Part 3. How to Transfer Files from iPhone/iPad to PC
- Method 1. Transfer Photos from iPhone/iPad to PC via File Explorer
- Method 2. Import Photos from iPhone/iPad to PC via Photos
- The Bottom Line
To transfer files from a PC to an iPhone, there are six ways to do so. You can use AirDrop to wirelessly send files from your PC to your iPhone, or use iTunes to sync files between the two devices.
- iTunes File Sharing
- iTunes Syncing
- iPhone Data Transfer Software
- iCloud Drive
- Dropbox/Google Drive
Part 1. How to Transfer Files from PC to iPhone/iPad Using iTunes
You can use iTunes to transfer files from your PC to your iPhone in two ways: iTunes File Sharing and iTunes Syncing. Depending on the type of content you need to copy, you'll need to use either of these methods to help you transfer data from your PC to your iPhone.
Method 1. Transfer Files Between PC and iPhone/iPad via iTunes File Sharing
Files created by apps that work with File Sharing can be shared with others, allowing for collaboration and communication.
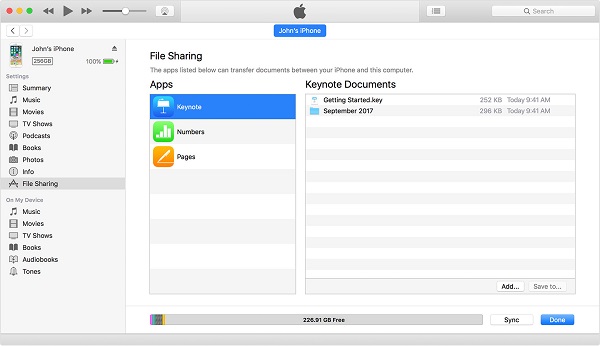
The "File Sharing" feature in iTunes allows you to transfer files between your computer and a supported app on your iPhone or iPad, making it a convenient option for sharing files created by apps like Keynote, Pages, and Numbers.
To copy files between your computer and iOS apps:
Step 1. To ensure a smooth and secure experience, make sure you have the latest version of iTunes installed on your PC. This will guarantee that you have the most up-to-date features and security patches.
Step 2. Connect your iOS device to the computer and launch iTunes.
Step 3. Click the device icon and choose "File Sharing".
Step 4. In the iTunes app, select the app that works with File Sharing and click "Add" in iTunes.
Step 5. Select the files you want to transfer to your computer and click "Add".
Step 6. To check the transferred files on your iPhone, go to the app you used to send or receive the files, such as Photos, Files, or Mail, and look for the transferred files in the app's library or inbox.
Method 2. Move Files from PC to iPhone via iTunes Syncing
Support: Photos, Videos, Music, Podcasts, Audiobooks...
If you have files stored in iTunes, you can transfer them to your iPhone or iPad using iTunes, but be aware that this method may cause data loss on your mobile device, as it will replace existing media files. Alternatively, you can use a tool to transfer files to your iPhone or iPad without overwriting existing data.
To transfer files from PC to iPhone/iPad with iTunes:
Step 1. To connect your iPhone or iPad to the computer and launch iTunes, simply plug the device into the computer using a USB cable, then open iTunes on your computer. This will allow you to access and manage your device's content, including backing up and restoring data, syncing music and apps, and more.
Step 2. Unlock the iDevice and trust the computer.
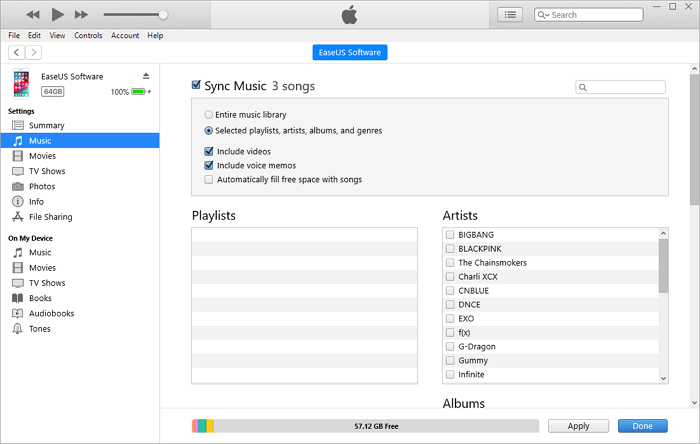
Step 3. To organize your content, click on the "Device" tab and select the category you'd like to view, such as Photos, Movies, Songs, or other media types.
Step 4. Check the "Sync [category]" option and select the items you'd like to copy.
Step 5. To transfer files to your iPhone or iPad, click "Apply" to initiate the process.
If your iPhone is not showing up on your PC, try following the troubleshooting guide to resolve the issue. The guide provides fixes to get your iPhone detected and connected to your computer.
Part 2. How to Transfer Files from PC to iPhone/iPad Without iTunes
You might want to transfer your favorite photos to your iPhone, transfer videos to your iPad for watching, or add a document to your iOS device to share with others.
When transferring files from a PC to an iPhone or iPad, you can use alternatives to iTunes to avoid potential data loss, opting instead for solutions that allow for direct file transfer.
Method 1. Transfer Files from PC to iPhone/iPad with Qiling MobiMover
This device supports various file types, including photos, videos, audio files (such as music, ringtones, voice memos, and audiobooks), and contacts.
If you're looking for an alternative to iTunes that allows you to copy data from your computer to your iPhone or iPad without syncing, Qiling MobiMover is a top choice. This software enables you to transfer files between your device and computer, making it a convenient option for managing your data.
With this tool, you can easily transfer data between an iOS device and a computer, or between two iOS devices, making it a convenient solution for sharing files, photos, and other data.
- Transfer files from computer to iPhone/iPad
- Back up your iOS device to the computer
- Transfer data from one iPhone to another
You can complete all the file transfer tasks listed above without installing iTunes, and then you can use it to quickly add content to your mobile device from your computer, whether it's a Mac or PC.
To transfer files from PC to iPhone or iPad without iTunes:
Step 1. To continue, connect your iPhone/iPad to your computer, then tap "Trust" on your device. Next, start Qiling MobiMover and navigate to the "PC to Phone" section, where you can select the files you want to transfer.
Step 2. Once you've selected the files you want to transfer, click the "Open" button to proceed.
Step 3. To transfer files from a PC to an iPhone or iPad, click "Transfer" and wait for the process to complete. Once done, access the corresponding app on the iOS or iPadOS device to verify the transferred items.
In addition to data transfer, Qiling MobiMover has an amazing feature that allows you to download online videos from YouTube, Vimeo, Facebook, and more to your computer or iPhone/iPad for offline watching, making it a good helper if you need to download online videos often.
Method 2. Transfer Files from PC to iPhone or iPad for Free Using iCloud Drive
Supports: Almost all types of content
iCloud Drive is Apple's equivalent of Dropbox, but it's a document-oriented file-sharing service, different from iCloud Backup. When enabled, it allows you to store files in iCloud and access them on iCloud.com, computers, iOS devices, and iPadOS devices. This means you can transfer files from a PC to an iPhone or iPad without using iTunes, making it a convenient option for transferring documents.
The steps to transfer files to your iPhone or iPad depend on whether you have installed iCloud for Windows. If you have, you can transfer files using the iCloud Drive app on your device.
To transfer files to iPhone/iPad with iCloud for Windows:
Step 1. To access iCloud on your PC, open the iCloud control panel and sign in with the Apple ID you use on your iPhone or iPad.
Step 2. To enable iCloud Drive, click the checkbox next to "iCloud Drive" to select it.
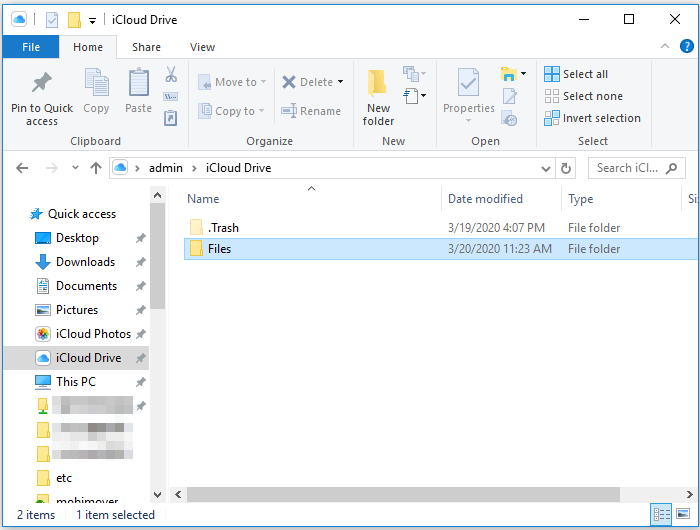
Step 3. To access your iCloud Drive on Windows, go to "This PC" and look for the "iCloud Drive" folder. If you don't see it, you can expand "Quick Access" to check if it's hidden there.
Step 4. To transfer files to iCloud Drive, copy and paste the files you want to transfer into the iCloud Drive folder.
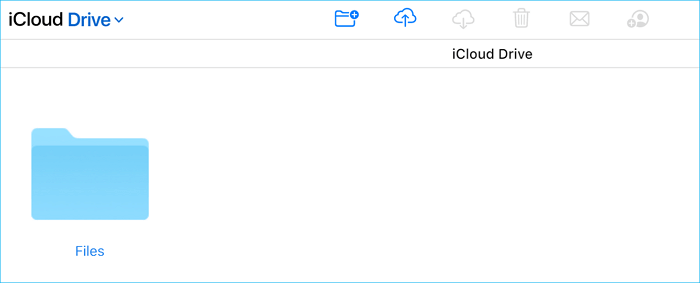
Step 5. To access iCloud Drive, open the "Settings" app on your iDevice, click on your name at the top of the screen, then select "iCloud" and finally tap on "iCloud Drive".
Step 6. Go to the Files app on your iPhone or iPad, click "Browse", then select "iCloud Drive". This will show you the items from your PC that are synced with your device.
To transfer files from Windows PC to iPhone/iPad via iCloud.com:
If you haven't installed the iCloud control panel, you can transfer files to your iPhone or iPad from the computer via iCloud.com.
Step 1. Go to iCloud.com on your PC and sign in with your Apple ID, the one you use on your iPhone or iPad.
Step 2. Choose "iCloud Drive" among the options.
Step 3. To transfer files from your computer to your iPhone or iPad, click the "Upload" button and select the files you want to transfer from your computer.
Step 4. To access iCloud Drive, open the Settings app on your iDevice, click on your name at the top of the screen, then select "iCloud" and finally tap on "iCloud Drive".
Step 5. To access your PC files on your iPhone or iPad, go to the "Files" app, click "Browse", and then select "iCloud Drive". This will show you the items from your PC that have been synced to your device.
iCloud Drive not syncing? Don't worry, you can fix it yourself or try other ways to send files from your PC to your iPhone.
Method 3. Transfer Files from Computer to iPhone/iPad with Dropbox/Google Drive
Supports: Photos, Word, Excel, PowerPoint, PDFs, HTML, Text...
In addition to iCloud, other cloud services like Dropbox and Google Drive can also be helpful for transferring files from computer to iPhone. Many of these cloud drives offer free trials or free space, with limitations that are usually acceptable, making them a good alternative choice.
To transfer files from PC to iPhone/iPad with Dropbox:
Step 1. To transfer files from one device to another, download and install Dropbox on both the source device and the target device. Next, sign in with the same Dropbox account on both devices. This will allow you to access and share files between the two devices.
Step 2. Open Dropbox on your PC, select the files you want to copy, and upload them to Dropbox. This will allow you to access the files on your iDevice.
Step 3. To check and download items from Dropbox on your iPhone or iPad, simply open the Dropbox app and access the items you want to download. This will allow you to view and save the items directly to your mobile device.
Method 4. Send Files from PC to iPhone/iPad via Email for Free
Supports: Photos, videos, music, documents...
To transfer files to an iPad or iPhone, you can simply send yourself an email with the file attached, and you're good to go. No need for a subject, just the recipient's email address is enough. This method is quick and easy, making it the best way to transfer files to your device.
Using this method, you can transfer files from PC to your iPhone/iPad, as well as transfer photos from iPhone to iPhone. However, this method has several limitations, including file size restrictions, network delays, and other issues, making it less desirable for those who want a smoother experience.
To move files from PC to iPhone or iPad:
Step 1. To transfer files from your PC to a user, create an email on your PC, add the files you want to transfer as attachments, and send the email to the recipient.
Step 2. Check your email on your mobile device by sending an email to your own account.
Step 3. Download the attachment to your device.
You can transfer files from PC to iPhone or iPad without iTunes using five different methods, which can also be applied to transferring files from Mac to iPhone/iPad if needed. Additionally, if you're using a Mac, you can also use AirDrop to transfer files to your iPhone or iPad, and for more details on transferring videos from Mac to iPhone, refer to a separate guide.
Part 3. How to Transfer Files from iPhone/iPad to PC
Transferring files between an iPhone and a PC is a common need that arises at some point. While learning to transfer files from a PC to an iPhone is useful, it's equally important to know how to do the reverse, especially if you frequently share files between your mobile device and computer.
You can transfer files from an iPhone to a PC using various methods, including AirDrop, iTunes, and iCloud, which were detailed above. Additionally, you can also use File Explorer and the Photos app on your PC to import photos and videos from your iPhone or iPad.
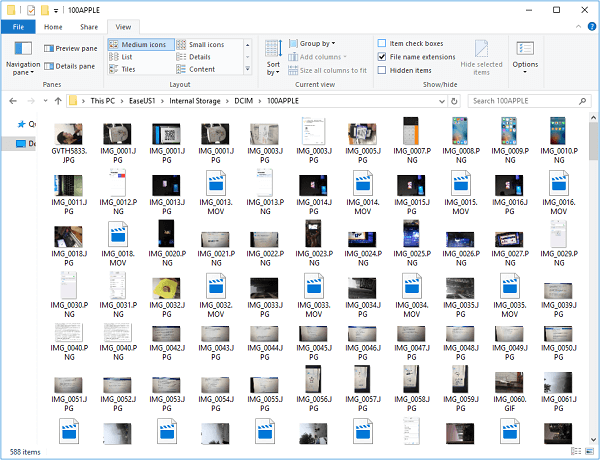
Method 1. Transfer Photos from iPhone/iPad to PC via File Explorer
Supports: Photos and videos
File Explorer allows you to directly import iPhone photos and videos to your PC using a USB cable, eliminating the need for third-party software. However, this method only supports importing photos and videos, and does not allow for the transfer of other content such as music, ringtones, or books.
Briefly, it's a good choice only when you attempt to transfer photos and videos from iPhone or iPad to PC.
To transfer data from iPhone/iPad to Windows:
Step 1. To connect your iPhone or iPad to a Windows PC, start by plugging the device into the PC using a USB cable. Once connected, you'll be prompted to trust the computer.
Step 2. To access the photos on your device, open the "This PC" window, navigate to your device's name, then select "Internal Storage", followed by "DCIM", and finally "100APPLE", where your photos are likely stored.
Step 3. Copy the items you want to transfer to the computer.
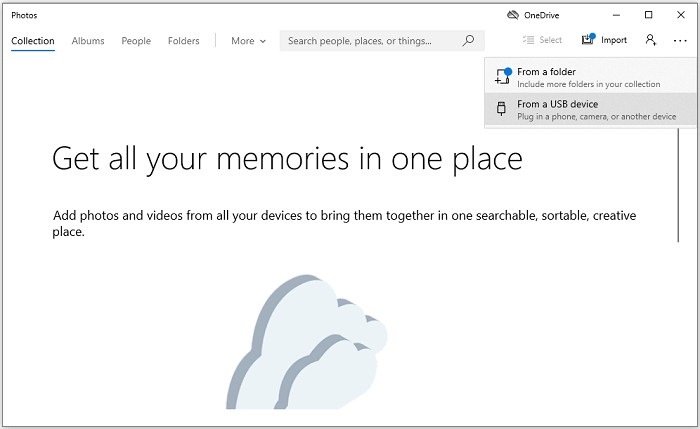
Method 2. Import Photos from iPhone/iPad to PC via Photos
Supports: Photos and videos
If you're using a PC with Windows 8 or later, the Photos app is an option. It helps manage computer pictures and allows importing photos from an external device.
When you need to transfer photos and videos from your iPhone to your PC, the Photos app can assist you with that.
To import photos from iPhone/iPad to PC using Photos:
Step 1. Connect your iDevice to the computer with a USB cable.
Step 2. To launch Photos on your device, ensure that your device is recognized by the computer. Once your device is detected, you can open the Photos app to view and manage your photos.
Step 3. In Photos, click "Import" > "From a USB Device".
Step 4. Wait for Photos to load the photos and videos from the iPhone/iPad.
Step 5. To initiate the file transfer process, select the desired items and click the "Continue" button, which will start the transfer process.
The Bottom Line
Transferring files between a PC and iPhone or iPad is a daily occurrence for many users. To facilitate this process, it's essential to know how to transfer files from a PC to an iPhone or vice versa. Fortunately, there are various workable solutions available, and the ones introduced here are the most frequently used by users. By choosing the best option for your needs, you can easily transfer files between your computer and iPhone within minutes.
Related Articles
- How to Add Ringtones to iPhone 12
- How to Convert Facebook Videos to MP4
- How to Open HEIC Files on Windows 11
- How to Fix iPod Nano Won't Sync with iTunes