Solved: iPod is disabled connect to iTunes
Applies to: iPod touch
How does 'iPod is disabled' occur
If you see the message "iPod is disabled connect to iTunes" on your iPod touch, you must have an experience of trying to unlock your iPod with a wrong passcode ten times in a row.
As a measure to protect your data security, you need to enter a passcode or use a Touch ID/Face ID to unlock an iPhone, iPad, and iPod to access its data. However, if you enter a wrong passcode more than six times without stop, you will trigger a self-protection measure on your iDevice - the iPhone/iPad/iPod locks automatically and you will need to unlock the device again after a time interval.
After six to nine incorrect attempts, you will see messages "iPod is disabled try again in [number] minute". In such a situation, you still have a chance to unlock your iPod with the corret passcode. But after a tenth incorrect trial, you will finally get a completely disabled iPod. In a case like this, you can do nothing but resetting the device.
Thus, if there is no chance for you to recall your iPod passcode or your device showing "iPod is disabled connect to iTunes", your only way out is to erase the device, which will remove all your iPod data and settings, including the passcode. Afterward, you will be able to set up your device and make it usable again.
How to fix 'iPod is disabled connect to iTunes'
There are mainly three solutions to the issue 'iPod is disabled connect to iTunes'. Carry out the way you like best to factory reset your device.
Method 1. Unlock a disabled iPad with a reliable iPhone unlocker
To unlock a disabled iPod touch without passcode, a good choice is to use an iPhone unlock tool like Qiling MobiUnlock. It helps to unlock/reset/erase a locked iPhone,iPad, or iPod without a passcode and can remove a 4-digit code, 6-digit code, Touch ID, or Face ID.
Therefore, if your iPod is disabled and says "connect to iTunes", use this tool to factory reset your device and then you can set up and use your device again.
To remove the passcode on a disabled iPod with Qiling MobiUnlock:
Step 1. Connect your iPad, iPhone, or iPod touch to the PC and run Qiling MobiUnlock. Select "Unlock Screen Passcode" from the main screen.
Step 2. Next, click "Start" to enter the process of unlocking.
Step 3. Check your device model and click "Next" to download the latest version of firmware for your device. If the firmware has been downloaded already, select the package manually.
Step 4. When the firmware is ready, click "Unlock". In a new pop-up warning window, enter the information required in the confirmation box and then click "Unlock."
Step 5. Wait for several minutes. Afterward, the issue that iPad/iPhone/iPod touch disabled connect to iTunes will be easily tackled and you can set your device up from scratch.
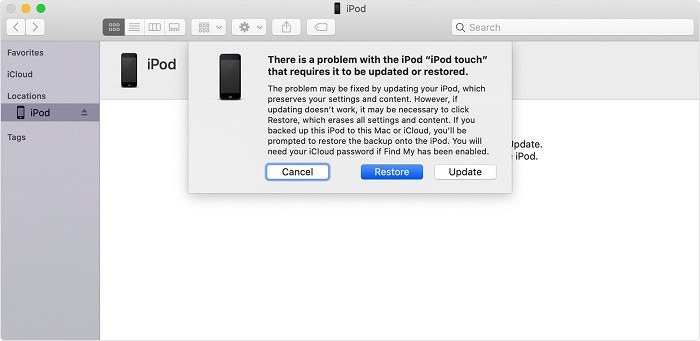
Method 2. Remove passcode on a disabled iPod using iTunes
As you may know, iTunes also helps to remove the passcode on your disabled iPod. By restoring your device to factory settings, iTunes will erase your iPod data and settings, including the passcode. Afterward, you can set up your iPod and use it as usual.
To remove iPod passcode:
Step 1. Connect your iPod to your computer.
Step 2. Press and hold the Home button (on 6th generation or earlier iPod touch) or the Volume down button (on 7th generation iPod touch) until you see the recovery mode screen.
Step 3. In iTunes, when you see a Window asking to restore or update your device, choose "Restore" > "Restore and Update".
Step 4. Wait for the downloading process to finish and your iPod to restart.
Step 5. Set up your device.
For a more detailed guide on how to fix 'iPod is disabled connect to iTunes', go to Apple's official tutorial for more information.
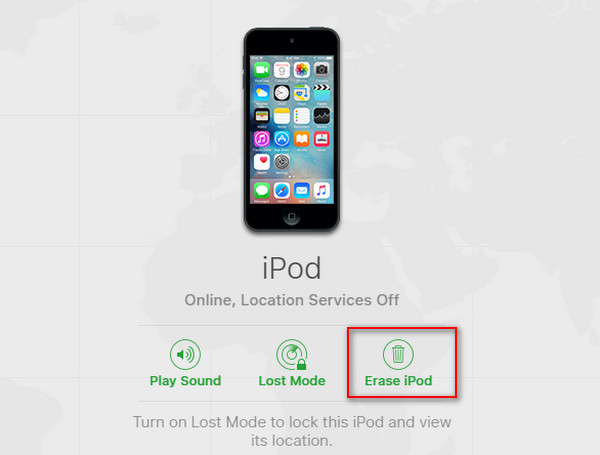
Method 3. Erase a disabled iPod without passcode via iCloud
If your iPod meets the requirements below:
- The iPod is signed in with an Apple ID.
- The Find My iPod feature is enabled on the iPod.
- There is a network connection on the device.
You can use iCloud to erase the disabled device wirelessly with the help of Find [device] feature.
To erase the disabled iPod:
Step 1. Open a browser on your computer and visit iCloud.com.
Step 2. Sign in with the Apple ID account you use on your disabled iPod.
Step 3. Choose "Find iPhone" > "All Devices" and select your iPod.
Step 4. Select "Erase iPod" to factory reset your iPod without passcode.
The bottom line
If there is no chance for you to recall your device passcode, it's inevitable that you will need to factory reset/erase your disabled iPod, which will cause data loss for sure. This should remind you of the importance of device backups. If you have made backups of your iPod before, you can restore your iPod data from the backup during the setup process. Thus, do back up your device regularly if there is important data on it. (If you need to, use the iPhone transfer software to back up your iPhone, iPad, or iPod to protect your precious files.)
Related Articles
- How to reset iPhone or iPad Without Screen Time Passcode
- How to Change/Remove Apple ID from iPad without Passcode
- How to Remove Activation Lock without Apple ID
- How to Remove Activation Lock from iPhone or iPad Without Password