How to Turn off Find My iPhone Without Password
There are times when you need to turn off Find My iPhone on your device for various reasons. You may need to turn off Find My iPhone on a second-hand iPhone you just bought to prevent it from being tracked by the previous owner. Or you simply need to turn off Find My iPhone so as to restore your iPhone with iTunes.
While you may not know the Apple ID password or get an error when disabling Find My iPhone in the Settings app. This article will show you how to turn off Find My iPhone without a password.
Part 1. What Is Find My iPhone
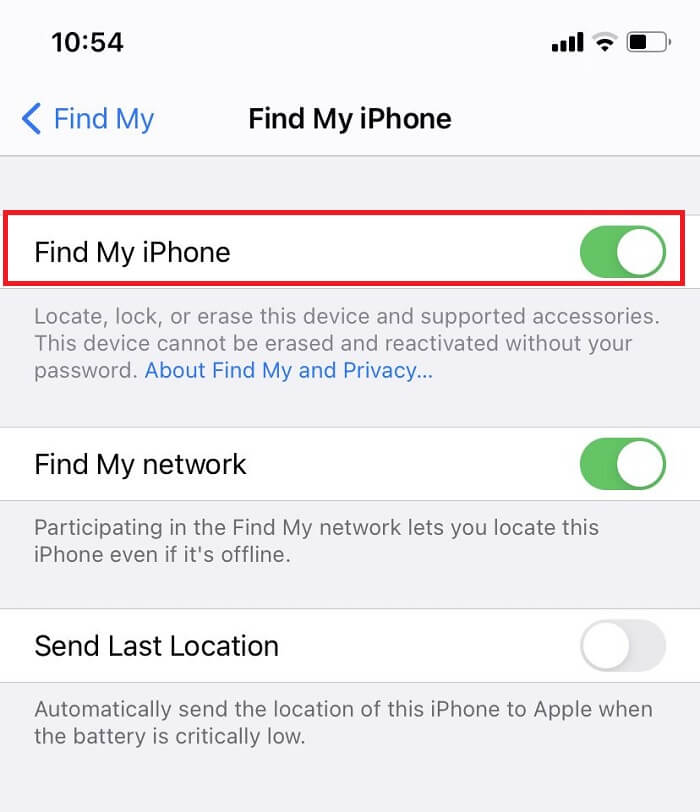
Find My iPhone is a feature that allows you to locate your iPhone, make it play a sound, or erase your iPhone remotely with the Find My app or the Find My option on the iCloud site. Find My iPhone service is extremely important and useful when your iPhone is lost or stolen. In most cases, you'd better enable Find My iPhone on your device. You can check it in the "Settings" > "[Apple ID]" > "Find My" > "Find My iPhone."
If you enable Find My iPhone and lock your iPhone, the activation lock on the iPhone will prevent other people from accessing and selling your iPhone. While, if you get a second-hand iPhone, the previous owner forgot to sign out of the iCloud account and leave the Find My iPhone on, you may get into some trouble and can't use the iPhone without risk.
Part 2. Turn off Find My iPhone Without Password with Qiling MobiUnlock
It is not easy to turn off Find My iPhone without a password as Apple is a company that values information security. If you want to disable Find My iPhone in particular cases, you can install Qiling MobiUnlock on your Windows PC or Mac to turn off the service Easily. Qiling MobiUnlock is a reliable and secure iPhone unlocker and Apple ID removal tool for Windows and Mac. It helps remove Apple ID from an iPhone/iPad. At the same time, it turns off Find My iPhone.
When you disable Find My iPhone on your iPhone with Qiling MobiUnlock, make sure there is a screen password that you know, and the two-factor authentication is enabled on the iPhone.
Full Features of Qiling MobiUnlock
- Screen unlocker - Remove screen password from iPhone, including 4/6-digital passcode, Touch ID, and Face ID
- Apple ID remover - Remove Apple ID from iPhone with Apple ID password
- Screen Time Remover - Turn off Screen Time without a passcode
- iOS password manager - Find saved passwords on iPhone, such as view Wi-Fi password on iPhone
- Remove iTunes backup encryption - Delete iPhone backup password
Note: Before proceeding with these steps, make sure you can unlock your device to trust this computer.
Step 1. Open Qiling MobiUnlock on your PC. Connect your iPhone to the PC with a USB cable. Choose "Unlock Apple ID" to continue.
Step 2. Qiling MobiUnlock will recongize your iPhone. Then please click "Start" to move to the next step.
Step 3. You will see a popup. Make sure you have read it and understand the information to avoid unwanted data loss. Input "777777" in the box and click "Unlock" to go on.
Step 4. Qiling MobiUnlock will download the fireware for your iPhone. After the firmware is ready, click "Unlock Now" to remove Apple ID from your iPhone and turn off "Find My iPhone."
Step 5. After the process is complete, you can gain access to the iPhone and sign in with your new Apple ID.
After these steps, the Find My iPhone will be off and the iPhone will restore to the factory settings and your data will be erased. If you want to keep any of your data, you can install the iPhone data transfer tool Qiling MobiMover to transfer files from iPhone to PC for backup.
Part 3. Bonus Tip - Turn off Find My iPhone with Password
If you have your Apple ID password, you can easily turn it off in the Settings app. Below are detailed steps for your reference.
Step 1. Go to the Settings app and tap on the "[Apple ID Name]."
Step 2. Tap on "Find My" and then tap on the first option - Find My iPhone.
Step 3. Tap the on/off toggle switch. Enter your Apple ID password and tap "Turn off" to disable Find My iPhone.
After the above operations, you can disable the Find My iPhone and then go ahead with the next step. You can either restore your iPhone using iTunes or sign out the old Apple ID without a password.
The Bottom Line
We have introduced a usable method to turn off Find My iPhone on your device without a password. Qiling MobiUnlock will be a handy tool to help you disable Find My iPhone fast and effectively. You may find other solutions, like using DNS bypass on iOS 7. However, these solutions are valid for low iOS versions only and may not be applicable to most iPhones.
Related Articles
- 3 Helpful Tips for iPhone Data Removal Without Apple ID Password
- How to Fix a Disabled iPhone
- How to Turn off iTunes Backup Encryption with or without Password
- How to Fix the Cannot Erase iPhone Issue