3 Ways Transfer Notes To iCloud
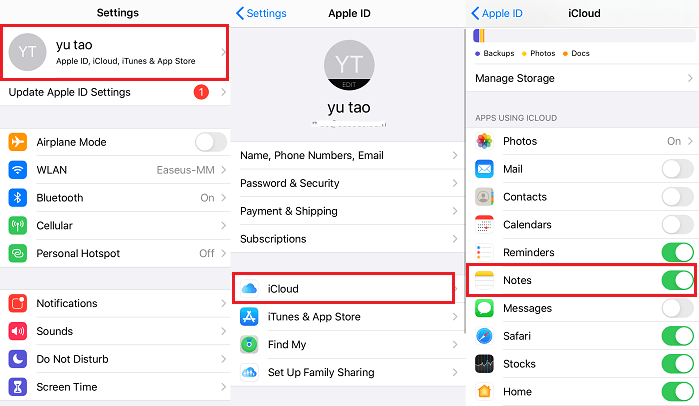
To sync your old Notes to iCloud, go to Settings > Notes > Accounts, and tap on "Add Account" to add your iCloud account. Then, go to Settings > Notes > Accounts, and select your iCloud account. Tap on "Sync" to sync your old Notes from your device to iCloud. This should transfer all your old Notes to your iCloud account. If you're using an older version of iOS, you might need to go to Settings > iCloud > iCloud Drive and toggle on "Notes" to enable syncing.
-- A question from Apple Community
To transfer your old notes to iCloud, go to the Notes app on your iPhone, tap the "Edit" button, then select the notes you want to move to iCloud, and tap "Move to iCloud" from the pop-up menu. Alternatively, you can also go to Settings > Notes > Account, and toggle on "iCloud" to enable iCloud syncing for your notes. This will automatically sync your notes across all your devices connected to the same iCloud account. If you want to move specific notes to iCloud, you can also long press on a note, then select the "Move to iCloud" option from the context menu.
- Tip 1. How to Transfer Notes to iCloud by Backing up
- Tip 2. How to Move Notes to iCloud from "On My iPhone"
- Tip 3. How to Save/Download Notes from iCloud to Computer
Tip 1. How to Transfer Notes to iCloud by Backing up
Here are the steps to transfer notes to iCloud. To move notes only to iCloud, you can use the partial backup option. This way, you can choose to back up only your notes, without backing up the whole device. To do this, go to Settings, then tap on your Apple ID, and select iCloud. From there, tap on iCloud Backup and toggle the switch to turn it on.
Step 1. Go to the Settings app on your device, then tap on your name at the top of the screen, and finally tap on iCloud.
Step 2. To access all your apps, sign in to iCloud with your Apple ID. This will display a list of all the apps you have installed and can be accessed from any device with an internet connection.
Step 3. To automatically upload all of your notes to a cloud service, tap "Notes" on your device and select the option to sync your notes to the cloud. This will allow you to access your notes from any device with an internet connection, including your computer or another iOS device, by logging into your iCloud account.
To access your iCloud backup file on a PC, you'll need to download and install a free program called iBackupExtractor. Once installed, launch the program and sign in with your Apple ID and password.
How to back up notes in a more efficient way
If you're looking to back up your notes, consider using Qiling MobiMover, a safe and reliable iPhone data transfer software that can help you transfer or export notes and other files from your iPhone. As an iOS data transfer tool, MobiMover supports transferring data between two iOS devices, such as transferring photos from iPhone to iPhone, or between an iOS device and a computer, making it a better choice for data backup.
Step 1. Connect your iPhone/iPad to your computer, launch Qiling MobiMover, unlock your device, and click "Trust" in the prompt. Choose "Phone to PC" and select "Next".
Step 2. Select the category or categories you want to transfer from your iPhone/iPad to computer. You can click the default path and then set a custom storage path for the notes to be transferred. Afterward, click "Transfer".
Step 3. After the transfer process is complete, you can access and manage your notes on your computer with ease, making it simple to view and work with the transferred data.
If you want to transfer contacts from your iPhone to your computer for backing up, please make sure to select the Contacts option along with it.
Tip 2. How to Move Notes from "On My iPhone" to iCloud
To move your locally-stored notes to iCloud, first ensure that iCloud Notes is enabled on your device. If it's not, go to Settings, tap your name, and toggle the switch next to "Notes" to turn it on. Once this is done, your notes will be synced across all your iOS devices.
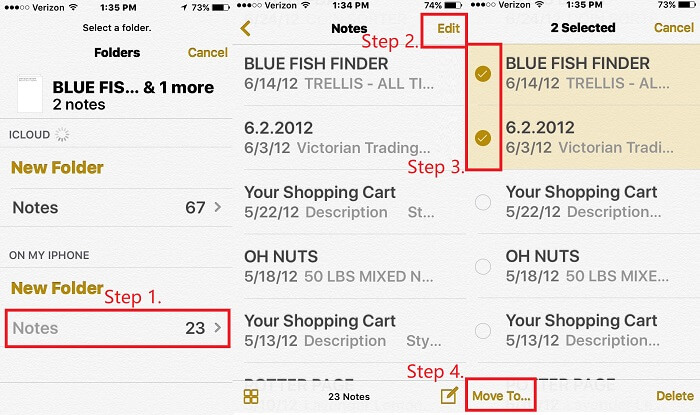
Step 1. Open the Notes app on your iPhone
Step 2. To move notes on an iPhone, tap on "Notes" under "on My iPhone", then click on "Edit" in the upper-right corner, and select the notes you want to move. Alternatively, you can select all notes by tapping "Move All".
Step 3. To move a note to iCloud, select the note you want to move, then go to "Move To" and choose a folder under "iCloud". This will relocate the note to iCloud.
To update the Notes app on your iPhone, you can double press the Home button, close the Notes app, and then reopen it again. This will allow you to see the changes you've made.
Tip 3. How to Save Notes from iCloud to Computer
iCloud offers 5GB of free storage, and exceeding this limit requires purchasing more space or managing storage by deleting unwanted data or moving notes from iCloud to a computer. To move files from iCloud to a computer, several feasible methods exist.
How to save notes from iCloud to Mac
Step 1. To access iCloud on your Mac, click on the Apple logo in the upper left corner, then select System Preference, and finally, click on iCloud.
Step 2. To sync iPhone notes with iCloud, enable the "Note" option, which will allow your device to sync with your iCloud account and download any new notes from your account.
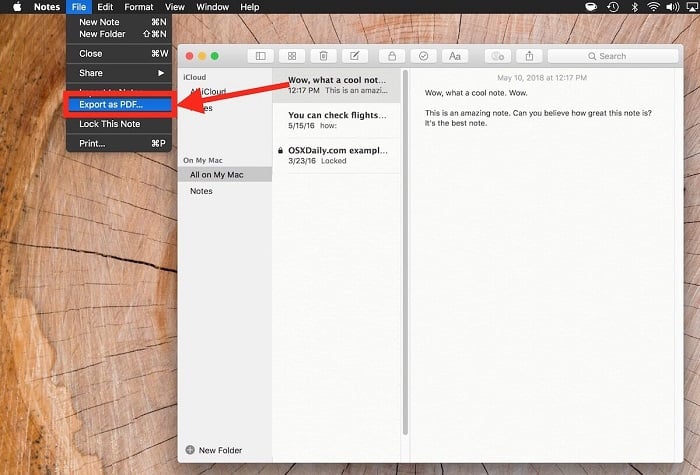
Step 3. To access the Notes app on your Mac, click on the Launchpad icon in your Dock, then search for "Notes" in the search bar. Once the Notes app appears, click on it to open it.
Step 4. To download a note to your Mac, select the note you'd like to download, click on the File menu at the top, and then select the "Export as PDF" option.
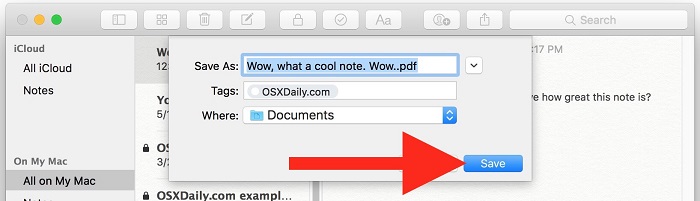
Step 5. To save notes, select a name and location, then click the "Save" button.
How to download notes from iCloud to PC
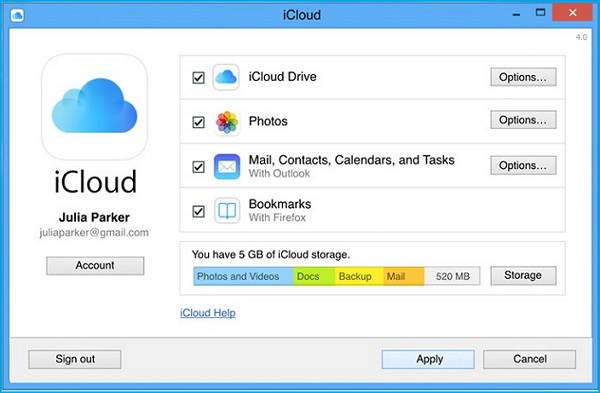
Step 1. To access your iCloud content on your computer, download and install the iCloud for Windows application, then sign in with your account credentials.
Step 2. To enable the "Mail, Contact, Calendar, and Tasks" option, click on the "Apply" button.
Step 3. To download your iCloud notes to a PC, launch the Microsoft Outlook app, go to File > Options > Advanced > Export, and follow the on-screen instructions.
The Bottom Line
Transferring notes to iCloud is a good way to backup your notes and free up iPhone space, but be aware that iCloud only offers 5GB free storage, so you may need to buy more space if you run out. Alternatively, you can use a tool like Qiling MobiMover, which not only helps you backup iPhone or iPad to your computer but also offers additional features like iOS data management and video downloader.
Related Articles
- How to Transfer Files from PC/Laptop to iPad Using USB
- How to Print Contacts from iPhone with/Without iCloud
- How to Transfer Contacts from iPad to iPhone 13/12/11
- Fix Alienware Laptop Hard Drive Failure without Reinstalling
This tutorial will show you how to solve Alienware M11x/M14x/M17x laptop hard drive failure error by migrating data to new disk without reinstalling everything.