How to Transfer Notes from iPhone to Computer With Ease
The iPhone's Notes app is a crucial tool for remembering important information, such as meeting reminders, reference numbers, birthdays, and more. To make a backup, re-edit, or print these notes, you can export them to your computer by following a simple step-by-step process.
Method 1. How to Transfer Notes from iPhone to PC via a Transfer Software
To back up or transfer one or multiple iPhone notes to a PC, use Qiling MobiMover, a reliable and versatile iPhone manager that allows you to add, delete, export, or access notes on your computer, as well as transfer other data like contacts, messages, videos, and music.
You can also use Qiling MobiMover to move data between two iOS devices, transfer WhatsApp messages, convert HEIC photos to JPG, and more.
You can download the program to your computer to explore its additional features. To transfer notes from your device to the computer, the program can be used.
Tips:Qiling MobiMover only works on iPhones running iOS 10 or earlier, and requires Notes to be stored locally, not in the cloud, to transfer notes.
Step 1. Connect your iPhone/iPad to your computer, launch Qiling MobiMover, click on "Browse & Transfer" and select "Notes" from the left pane.
Step 2. Select the notes you want to transfer to your computer, and then click "To PC" in the upper right corner.
Step 3. Once the transfer process is complete, you can easily view and manage your notes on your computer.
In addition to backing up iPhone notes to PC, you can also transfer Notes from iPad to PC.
Method 2. How to Export Notes from iPhone to PC via Email
Apart from using a third-You can transfer notes to another device without using any additional tools. Simply send an email to yourself with the notes attached, then download the notes from your email account on your computer. No extra software is needed.
The method of transferring notes one by one is only available, and it's recommended to use tools or services that support bulk transfer, such as Qiling MobiMover, when moving a large number of notes.
To export notes from iPhone to PC via Email:
Step 1. Open the Notes app on your iPhone.
Step 2. Choose a folder that contains the notes you want to transfer.
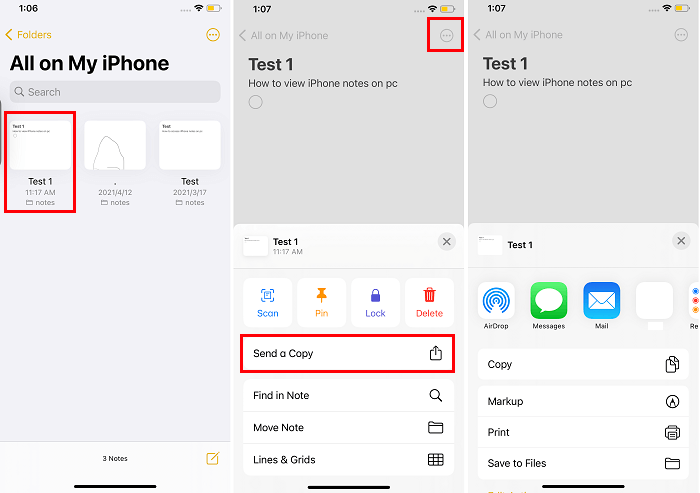
Step 3. To transfer a note, tap the note you want to move and then tap the icon with three dots inside a circle in the upper right corner.
Step 4. Select "Send a Copy," and then choose "Email."
Step 5. You can't download a note from your email account on your PC if you sent it. You can only download a note if someone else sent it to you. If you want to access the note, you can log in to your account on your PC and view it online.
Step 6. To export multiple notes, you can repeat the process described above, selecting each note individually or selecting all notes at once, and then exporting them in the desired format. This allows you to save multiple notes with their respective formatting and content.
Tips: If you're transferring files between devices, you can choose the method that suits your needs. If you're a Mac user, you can use AirDrop, while others can use Mail or other methods. Be flexible and pick the most suitable option based on your reality.
Method 3. How to View and Edit Notes on a PC via iCloud
If you want to view and edit notes on your computer, you can use iCloud, but this only allows reading and editing, not downloading. Alternatively, you can copy and paste the notes to your notepad or word.
To access and edit notes in icloud.com:
Step 1. Go to Settings > [your name] > iCloud.
Step 2. To automatically upload your notes to iCloud, go to Settings > Notes > iCloud, and toggle the switch next to "Notes" to the On position. This will enable iCloud syncing for your notes.
Step 3. Head to icloud.com on your computer, and choose "Notes."
Step 4. To save notes synced from a note-taking app as HTML on your computer, start by opening the app and accessing the synced notes. From there, select the notes you want to save, and then choose an option to export or download them as HTML files.

The Bottom Line
It's easy to export iPhone notes to a computer, and doing so can be helpful for various purposes. To transfer iPhone notes to a PC, you can try the methods listed above. If you have other iPhone data to transfer between an iPhone and a computer or between two iPhones, you can use Qiling MobiMover for a more comprehensive solution.
FAQs About iPhone Notes
Here are some frequently asked questions about transferring iPhone notes, answered in one paragraph:
1. How to transfer notes from Android to iPhone without a computer?
To transfer notes between an iPhone and an Android, you can use a Google account to sync your contacts, which is the most commonly used approach. First, make sure you have a Google account. Then, you can follow the steps to start transferring your notes. This method allows you to sync your contacts across devices, making it a convenient way to transfer notes. If you don't have a Google account, you can also use email to transfer contacts one by one, but using a Google account is the recommended method.
Step 1. To access Google settings on your Android, go to Settings and scroll down to find the "Accounts" section, then select "Google."
Step 2. To enable syncing of notes, tap on "Account Sync" and switch the toggle next to "Keep Notes" to the ON position.
Step 3. Wait for the sync process to complete, and then go to Settings on your iPhone.
Step 4. On the "Add account" page, enter the Google account information used on the Android device, then tap "Next" to proceed.
Step 5. Enable the Notes option for syncing.
2. How to share a note on iPhone?
To share a note on your iPhone, open the Notes app, select the note you want to share, tap "More" and then "Share Note", and follow the on-screen instructions to complete the process.
3. How to get a note back on your iPhone?
If you've deleted a note in the Notes app and want to recover it, you can check your "Recently Deleted" folder in the app. If the note is there, you can recover it by following these steps: tap "Recently Deleted", tap the note you want to recover, and tap "Recover Note" to move it back to your notes list. If the note is not in the "Recently Deleted" folder, it may be permanently deleted and cannot be recovered.
Step 1. Open the Notes app on your iPhone.
Step 2. To recover a note, tap on the note you want to restore and then tap on "Restore Note" to bring it back to your Notes app.
Step 3. Tap "Edit" and select the note you wish to restore.
Step 4. To restore your notes, tap "Move" in the lower-left corner and select the folder where you want to restore them.
If you can't find the Recently Deleted folder, it's likely that you didn't delete any notes, and you'll need to use additional methods to recover deleted notes on your iPhone.
Related Articles
- How to Send Photos via Bluetooth on iPhone to Computer
- 4 Tips | How to Transfer Music from iPhone to iPhone With/Without iTunes
- Upgrade Hard Drive or SSD on ASUS Eee PC 901/900/701
Learn how to do hard drive or SSD upgrade for ASUS Eee PC 901/900/701 laptop without losing personal data as well as reinstalling operating system via Qiling Disk Master. - Guide: Asus X505ZA SSD Upgrade-No Data Loss and Boot Issues
You can learn how to perform Asus X505ZA SSD upgrade and safely migrate your data and system with a powerful disk cloning software on this page.