How to Back Up iPhone Before Getting a New One
Quick Navigation:
- How to Back Up iPhone Before Getting a New One in 4 Ways
- Option 1. Back Up iPhone to iCloud
- Option 2. Back Up iPhone to iTunes
- Option 3. Back Up iPhone to Finder
- Option 4. Back Up iPhone to External Hard Drive
- The Bottom Line
When switching iPhones, it's crucial to back up your previous iPhone before reselling or giving it away, as this allows you to restore your new iPhone from the backup during setup, effectively transferring all data and settings.
If you're about to upgrade to a new iPhone but don't know how to back up your old one, don't worry. You can back up your iPhone in several ways, depending on your situation. You can back up your iPhone using iCloud, iTunes, or a third-party backup app. If you're running low on iCloud storage, you can also use iTunes or a third-party app to back up your iPhone.
How to Back Up iPhone Before Getting a New One in 4 Ways
You can make a backup of your iOS device in four main ways: using iCloud, iTunes, Finder, or third-party software.
Option 1. Back Up iPhone to iCloud
This is the most convenient way for you to back up an iPhone, iPad, or iPod touch, allowing you to back up your device wirelessly without needing a USB cable or computer.
However, to back up your iPhone to any cloud, you need to make sure:
- There is enough storage left on your iCloud account to save your iPhone backup. You can learn more about iCloud+ here.
- Your iPhone is connected to a fast Wi-Fi network.
- Your iPhone is fully charged and won't be interrupted during the backup process.
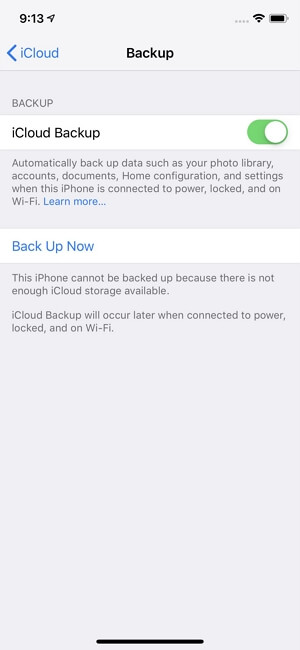
To back up your iPhone to iCloud, simply go to Settings, tap on your name at the top, and select "iCloud." From there, toggle on "iCloud Backup" and make sure it's set to "On.
Step 1. Open the Settings app on your iPhone.
Step 2. Tap [your name] and choose "iCloud."
Step 3. Tap "iCloud Backup" and then enable the "iCloud Backup" option.
Step 4. To manually back up your iPhone, click on "Back Up Now" to initiate the backup process immediately.
Option 2. Back Up iPhone to iTunes
If you don't want to spend money buying iCloud storage, you can use iTunes to back up your iPhone instead. Unlike iCloud, which stores your backup in the cloud, iTunes saves it directly to your computer's hard drive, eliminating space concerns. To get started, simply connect your iPhone to your computer using a USB cable and follow the easy steps to back up your device to iTunes. This way, you can ensure your data is safely backed up before getting a new iPhone.
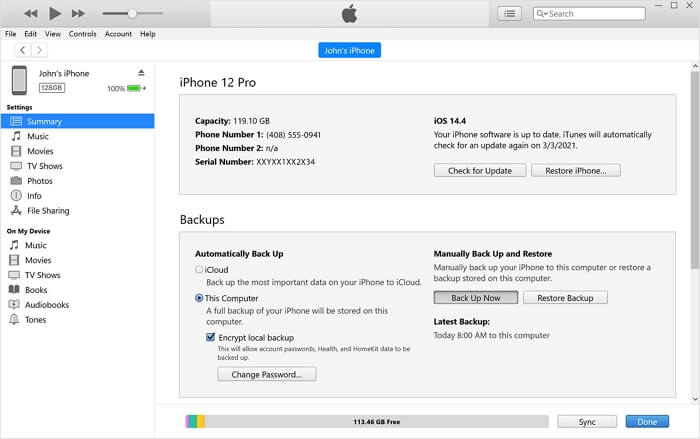
Step 1. To connect your iPhone to a computer, insert one end of a USB cable into the iPhone and the other end into the computer. Ensure your iPhone is recognized by the computer, and then you're ready to access and manage your iPhone data on the computer.
Step 2. Launch iTunes and click the device icon in the top left corner to access the summary page for your device.
Step 3. To prepare for getting a new iPhone, go to the "Summary" section in the Settings app and click "Back Up Now" to back up your current iPhone. This will ensure that your data, settings, and apps are safely stored, making the transition to your new device smoother.
Notes: You can encrypt your iTunes backup for added security, but make sure to remember the password, as it's the only way to access the data in the encrypted backup.
Option 3. Back Up iPhone to Finder
On a PC or Mac running macOS Mojave or earlier, iTunes is used for iPhone backups. However, on macOS Catalina and later, Finder takes over and saves backups on the Mac, storing them in a default folder where files cannot be read, similar to iTunes, and it's not recommended to move the backup to avoid corruption.
To back up your iPhone to Finder:
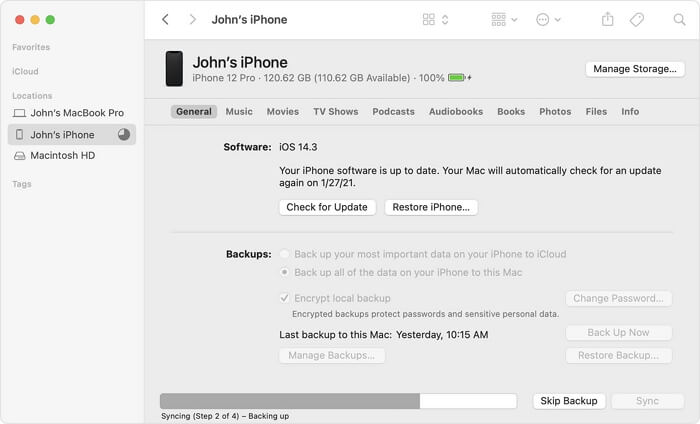
Step 1. Connect the iPhone to your Mac with a USB cable.
Step 2. Open Finder and select your iPhone from the sidebar.
Step 3. Go to the "General" tab and select the option "Back up all of the data on your iPhone to this Mac."
Step 4. Click "Back Up Now" to back up your iPhone.
Option 4. Back Up iPhone to External Hard Drive
The Apple tools allow for smooth iPhone backups before getting a new one, but they restrict customization of the backup location, unlike the iPhone data transfer and device backup tool - Qiling MobiMover.
When you back up your iPhone with Qiling MobiMover, you can choose to save the backup to a destination folder on your computer or an external storage device, such as an external hard drive, freeing up space on your computer.
To back up your iPhone:
Step 1. Run Qiling MobiMover, connect your device to the computer, select the Backup Manager pattern, and then select Backup to proceed.
Step 2. Qiling MobiMover will display all the iPhone files available for backup. Simply select all files by ticking the box next to "Select All" and click on "One-Click Backup" to proceed.
Step 3. QilingMobiMover will start to back up iPhone files to your computer immediately. Please do not suspend the USB connection while the backup is in progress.
Once you've made a backup, you can restore this backup to your device when you need it, which will erase your device and replace everything with what's in the backup. Alternatively, you can use the "Phone to PC" feature to back up your device without erasing it.
Qiling MobiMover is a feature-rich tool that not only offers data backup capabilities but also functions as an iPhone data transfer tool, efficiently transferring files to or from an iPhone, iPad, or iPod touch. It can be particularly useful when setting up a new iPhone, allowing you to transfer data from your old device.
The Bottom Line
After successfully backing up your old iPhone, you can start setting up your new one. In the Apps & Data screen, you can choose to restore your new iPhone from an iCloud backup or a backup on your computer. Alternatively, if you've already set up your new iPhone, you can erase all data and settings on your iPhone and set it up again through the Settings app, or restore it from a backup using iTunes or Finder. If you used Qiling MobiMover to back up your iPhone, simply connect your new iPhone to the computer and let the program do the rest.
Related Articles
- How to Sync Playlists to iPhone
- How to Download Free Music on iPhone 6/6 Plus
- How to Protect Sensitive Data During Computer Repair | Windows
This article explains the risks your personal files may face while in maintenance, and offers step-by-step tutorial to protect sensitive data during computer repair. - How to Restore NTFS System Partition on Hard Drive in Windows 7/8/10?
Learn how to restore NTFS (system/boot) partition table on (external) hard drive or USB flash drive without losing data after formatting Toshiba/Dell laptop in Windows 7/8/10.