How to Convert HEIC to JPG on Mac in 3 Ways
Quick Navigation:
- Why Do You Need to Convert HEIC to JPG on Mac
- How to Convert HEIC to JPG on Mac in Batch
- How to Change HEIC to JPG on Mac with Photos
- How to Convert HEIC to JPG on Mac with Preview
- The Bottom Line
Why Do You Need to Convert HEIC to JPG on Mac
HEIC, short for High Efficiency Image File Format, adopted by Apple since iOS 11, is a relatively new file format that offers improved space-saving capabilities compared to JPG files of the same quality. However, its compatibility is limited compared to the widely accepted JPG format, which is supported by most devices and programs.
Since many devices and programs don't have native support for HEIC, you will need to convert HEIC to JPG in many situations. You can convert HEIC to JPG on Mac using third-party tools or native apps, which provide easy and efficient ways to make this conversion.
How to Convert HEIC to JPG on Mac in Batch
If you're looking to change HEIC to JPG on your Mac, there are several apps available that can help you do so. However, you may also want to consider using a tool like Qiling MobiMover, which cannot only convert HEIC to JPG but also serve as a convenient iPhone data transfer tool, making it a great option for managing your device's files.
Qiling MobiMover is a versatile tool that not only converts HEIC to JPG, but also serves as an iPhone data transfer tool, video downloader, and video to MP3 converter. With its installation on your Mac or PC, you can perform a range of additional tasks, including transferring data from your iPhone, downloading videos, and converting videos to MP3 format.
- Transfer files between Mac and iPhone
- Back up iPhone data to computer
- Download YouTube videos on Mac
- Convert videos to MP3
If you prefer a more capable tool that will be helpful in many other situations, Qiling MobiMover is a handy choice for you.
To convert HEIC to JPG with Qiling MobiMover:
Step 1.Launch Qiling MobiMover on your Mac, go to "HEIC to JPG," and then click "Browse" to start the conversion process.
Step 2.Select the HEIC files you want to convert and click "Open."
Step 3.To convert HEIC to JPG on your Mac, click the "Convert" or "Start All" button to initiate the file conversion process. Once the conversion is complete, click the "View" button to check the converted JPG photos on your device.
How to Change HEIC to JPG on Mac with Photos
The native tools on a Mac, such as the Photos app, allow you to convert HEIC files to JPG by exporting them and selecting JPEG as the target format, making it a convenient option for converting HEIC to JPG.
Here are the details:
Step 1. Open the Photos app and go to "Library" > "Photos."
Step 2. Select the HEIC files you want to convert.
Step 3. To export a photo from the application, go to the "File" menu, select "Export", and then choose either "Export 1 Photo" or "Export [number] Photos".
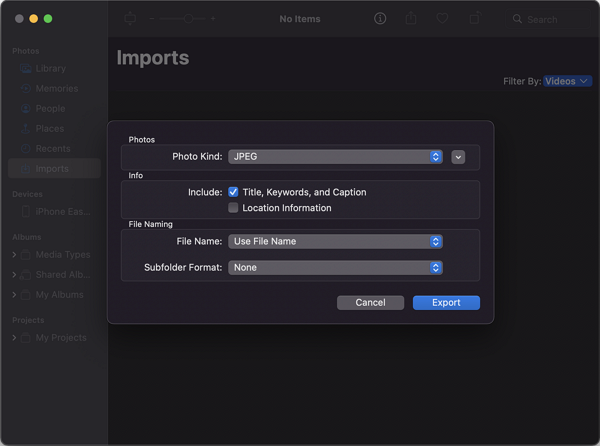
Step 4. Select "JPEG" as the target format and click "Export."
Step 5. Select a folder to save the JPG files and click "Export" to proceed with the process.
Step 6. Go to the select folder to check the JPG files.
How to Convert HEIC to JPG on Mac with Preview
Preview is a native Mac app that can convert HEIC to JPG, but it's less convenient than Photos for bulk conversions. If you need to convert multiple HEIC photos, consider using an alternative.
To convert HEIC to JPG on Mac with Preview:
Step 1. Open the Photo you'd like to convert with Preview.
Step 2. Click "File" > "Export."
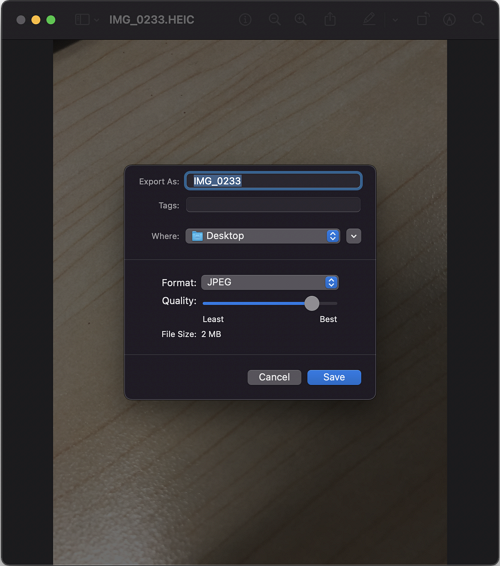
Step 3. To save a file in JPEG format, select JPEG from the Format section, choose a storage path, and click Save.
Step 4. Go to the destination folder to check the JPG file.
The Bottom Line
Besides Photos and Preview, Mac's default app Automator can also be used to convert HEIC to JPG, although it's more complicated to use and not necessary to try. Alternatively, you can simply import iPhone photos to your Mac via Photos, and then drag and drop them from your photo library to the desktop, which will automatically convert the HEIC files to JPG during the process.
You can freely open JPG files with most programs on various operating systems or use them in your project. It's easy! Don't forget to share this with your friends if it helps.
Related Articles
- How to Back Up iPhone Without iCloud
- Fix Volumes Larger Than 2088958 Megabytes Cannot Be Protected
Learn the workaround to fix the error that volumes larger than 2088958 megabytes cannot be protected in Windows Server 2008 or 2008 R2 Backup. - Volume(s) OS Have an Unsupported File System-3 Ways to Fix
Learn the three different methods to fix the volume(s) OS have an unsupported file system error received when trying to backup dell computer. The last one is safer. - What's Taking Up Space on My Hard Drive in Windows 10? Here are 14 Fixes!
This article answers what is taking up space on my hard drive in Windows 10 and provide 14 solutions to free up disk space. Please read on.