How to Transfer Voice Memos from iPhone to Computer in 4 Ways
Quick Navigation:
- Method 1. Transfer Voice Memos from iPhone to Computer Without iTunes for Free
- Method 2. Transfer Voice Memos from iPhone to Computer with iTunes
- Method 3. Download Voice Memos from iPhone via the Share Sheet
- Method 4. Transfer Voice Memos from iPhone to PC with iCloud
- The Bottom Line
Transferring voice memos from your iPhone to a computer is a useful way to free up storage space and back up your recordings. Whether you want to save important voice notes, edit them on your computer, or share them with others, this guide will show you four effective methods to get your voice memos off your iPhone.
Method 1. Transfer Voice Memos from iPhone to Computer Without iTunes for Free
Transfers voice memos in bulk
If you're wondering how to transfer voice memos from your iPhone to your computer without using iTunes, there's a simple solution: using a professional iPhone transfer tool like Qiling MobiMover. This tool allows you to easily transfer your voice memos from your iPhone to your computer, making it a convenient alternative to iTunes.
- Transfer files between an iPhone/iPad and a computer
- Share data between two iDevices
- Manage your WhatsApp messages by backing up and transferring
You can transfer a variety of data from your old iPhone to your new one, including photos, videos, music, contacts, messages, books, and voice memos.
To download voice memos from iPhone:
Step 1. Connect your iPhone to the computer, then open Qiling MobiMover. On the main screen, click "Content Management", then select "Audio" and finally "Voice Memo".
Step 2. Select the desired voice memos, click the settings button, and set a location on your PC to store the transferred items.
Step 3. To initiate the transfer process, click on "Transfer to PC" and ensure that the connection between your iPhone and the PC remains uninterrupted until the process is complete.
After transferring voice memos from your iPhone to your computer, you can delete the items from your iOS device and edit the audio files from the computer.
Method 2. Transfer Voice Memos from iPhone to Computer with iTunes
Transfer all memos
To move multiple or all voice memos to your PC or Mac, use iTunes. First, ensure you have the latest version of iTunes downloaded on your computer, then follow these steps to begin the transfer process.
Step 1. Connect your iPhone to the computer via a USB cable.
Step 2. Open iTunes.
Step 3. Click on your device icon.
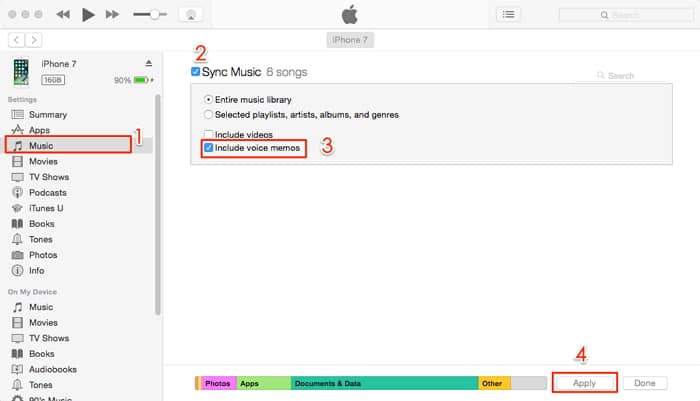
Step 4. Select the "Music" option from the sidebar.
Step 5. Check the "Sync voice memos" box if it is not already checked.
Step 6. Select "Include Voice Memos."
Step 7. Click on the "Apply" button to confirm.
Once the process completes, your voice memos are saved in a Voice Memos folder on your computer in .m4a or MP4 audio format, where you can open them using iTunes or other media players.
Method 3. Download Voice Memos from iPhone via the Share Sheet
Transfers voice memos one by one
On your iPhone, you can share individual voice memos via the Share feature, sending them to services like Mail, Google Drive, or OneNote, and receive them on any device by signing into the account. Alternatively, you can transfer voice memos to AirDrop-supported iOS devices like Macs, iPads, or iPhones.
To get voice memos off iPhone via the Share Sheet:
Step 1. Open the Voice Memos app on your iPhone, select the voice memo you want to export, and click the 'Share' icon to export it.
Step 2. Now you can see more options under the item, click the three dots and select "Share."
Step 3. You can send memos via various methods such as email, AirDrop, or Google Drive.
Step 4. Later, you can go to check the voice memos on your target device and download them. Alternatively, click "Accept" on the target iOS device to start transferring the voice memo on iPhone to another device.

Important Notice:
- You can transfer only one voice memo at a time.
- To use a service, you need to have its app installed on your phone.
Method 4. Transfer Voice Memos from iPhone to PC with iCloud
With iCloud Drive enabled, you can share documents and files across devices over WiFi, but you'll need to add each item individually, which can be time-consuming for large quantities, making this tip more suitable for transferring a few voice memos from iPhone to PC.
To copy voice memos from iPhone to computer:
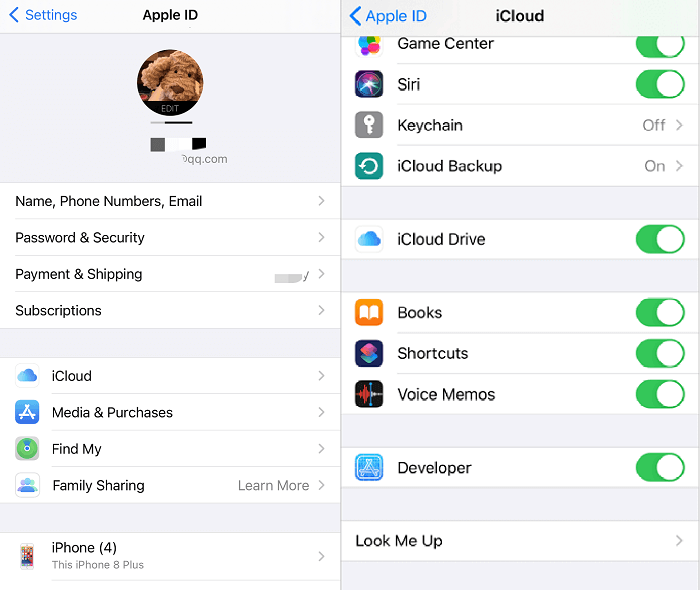
Step 1. To enable Voice Memos, go to your iPhone's "Settings", then tap on your name at the top, followed by "iCloud", and finally toggle the switch next to "Voice Memos" to the "on" position.
Step 2. To sign in on your PC, open a browser and enter the Apple ID you use on your iPhone. This will allow you to access your iPhone's data and perform various tasks on your PC.
Step 3. To access your iPhone's Voice Memos, select the "Voice Memos" option, allowing you to view the audio files recorded on your device.
Step 4. Download the voice memo from your iPhone to your PC.
The Bottom Line
To move voice memos from an iPhone to a computer, you can use the "Share" feature on your iPhone. Open the Voice Memos app, select the memo you want to share, and tap the "Share" icon.
Transferring files between Apple devices is convenient, but the method depends on the number of files. For multiple items, Qiling MobiMover or iCloud is the best choice. If you only need to transfer one or a few files, using email or AirDrop is the quickest solution.
Use the method you prefer to download voice memos from your iPhone with ease.
Related Articles
- Best iPhone File Manager You Can't Miss
- How to Connect iPhone to PC in Every Way
- 2 Ways: Upgrade RAID 5 Drives to Larger Capacity without Data Loss
How to upgrade RAID 5 drives to larger capacity? Here you can find the methods to expand RAID 5 disk size effectively. - How to Comment on Backups for Clear Distinction
A backup comment enables you to distinguish a backup image from other easily. Qiling Disk Master allows you to create a backup with a note within several steps.