How to Transfer Music from iPhone to Computer in 4 Ways
Quick Navigation:
- Method 1. How to Transfer Non-purchased Music from iPhone to Computer or Mac All at Once
- Method 2. How to Transfer Purchased-music from iPhone to PC with iTunes
- Method 3. How to Copy Music from iPhone to PC via Apple ID
- Method 4. How to Transfer Music from iPhone to Computer with Cloud Services
If you have a large collection of purchased or non-purchased songs on your iPhone, you may want to back them up on your computer or burn them onto a CD. Unfortunately, iPhone users can only sync music from their PC to their iPhone using iTunes, not the other way around. To copy music from your iPhone to your computer, you'll need some additional tools, and in this article, we'll explore four ways to do so, including transferring both purchased and non-purchased songs.
Method 1. How to Transfer Non-purchased Music from iPhone to Computer or Mac All at Once
Applies to: Non-purchased songs and playlists
If you have many non-purchased songs on your iPhone and want to copy them to your PC, you can use iPhone data transfer software like Qiling MobiMover to achieve this. Qiling MobiMover allows you to transfer music from your iPhone to your PC, and even copy your playlist from iPhone to PC.
Qiling MobiMover allows you to transfer music from your iPhone to your computer, and also enables the transfer of other file types, such as photos, videos, podcasts, contacts, messages, notes, calendars, voice memos, and PDF files, between your iPhone/iPad/iPod and PC/Mac. You can also use it to transfer music from one iPhone to another. With MobiMover, you can transfer multiple file types at once, making it a convenient tool for managing your device's content.
Step 1. Connect your iPhone/iPad to your PC and run Qiling MobiMover. Tap "Trust" on your device's screen and then click "Allow" on the program to grant access. Go to "Content Management" > "Audio" and select "Music" or the items that include your songs.
Step 2. Select the songs you want to transfer from your iPhone/iPad by clicking on the "Music" category. To save the transferred songs on your PC, click "Settings" at the top right corner and select a secure location.
Step 3. Click "Transfer to PC" to finish the process.
The app also offers a video downloader feature, allowing you to download online videos from popular sites like YouTube, Vimeo, Facebook, and more, and save them to your computer or iPhone/iPad for offline viewing.
Download Qiling MobiMover today to start transferring music from your iPhone to your computer with ease.
Method 2. How to Transfer Purchased-music from iPhone to PC with iTunes
Applies To: Purchased Music
You can sync purchased music from your iPhone to your PC using iTunes, but only for songs you've purchased through iTunes. If you want to transfer all your songs, including those from other sources, to your PC, you'll need to use both iTunes and a third-party tool like Qiling MobiMover. This will allow you to transfer all your songs, including purchased and non-purchased tracks, to your PC or Mac.
To transfer purchased music from your iPhone to your PC, you can follow these steps: first, connect your iPhone to your PC using a USB cable; next, open iTunes on your PC and select your iPhone from the top left menu; then, click on the "Music" tab and select the music you want to transfer; finally, click on the "Sync" button to transfer the music to your PC. Alternatively, you can also use the "File Explorer" on your PC to transfer the music by going to "This PC" or "Computer", then selecting your iPhone from the list, and finally copying and pasting the music files to your desired location on your PC.
Step 1. Download and install the latest version of iTunes on your PC, then connect your iPhone to your computer via a USB cable.
Step 2. To unlock your iOS device, simply press and hold the sleep/wake button on the top right side of your device until the "Slide to power off" or "Slide to power on" option appears. Then, release the button and slide your finger across the screen to unlock it.
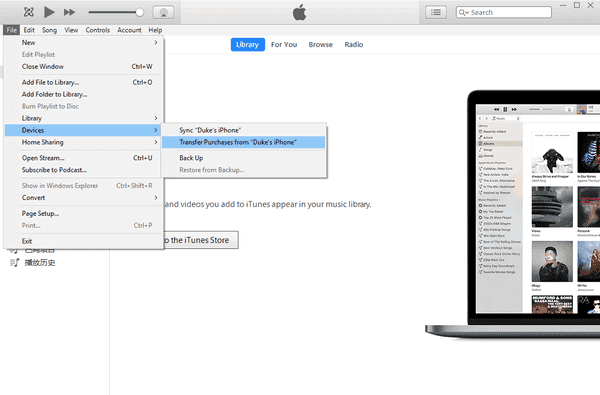
Step 3. To transfer purchased songs from a device to iTunes, go to the "File" menu, select "Devices", and click on "Transfer Purchases from [Device name]". This will sync the purchased songs to your iTunes library.
Step 4. The transferred music will be displayed in the iTunes Library under the "Songs" section. You can then click the iCloud download button to save them to your PC.
Note: To get your computer authorized, go to "Account" > "Authorisations" > "Authorise This Computer".
Method 3. How to Copy Music from iPhone to PC via Apple ID
Applies To: Purchased Music
If you want to copy purchased songs from your iPhone to PC, you can simply re-download them from the iTunes Store without needing to connect your iPhone to the PC.
Step 1. Open iTunes and go to "Account" from the menu bar.
Step 2. Choose "Sign In" and enter your Apple ID that you used to buy the songs.
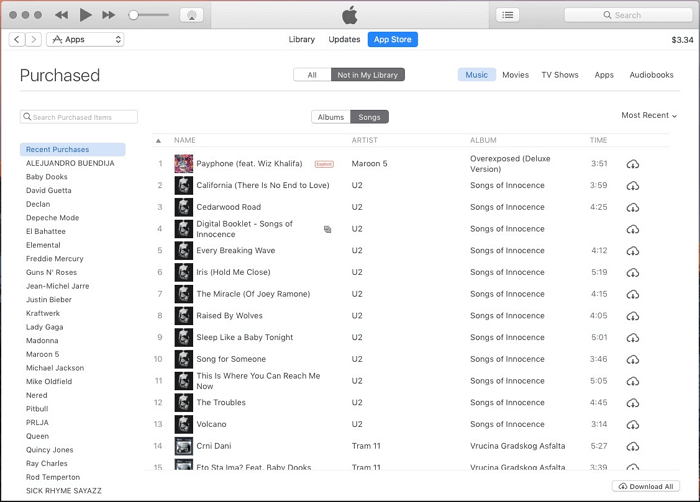
Step 3. Go to "Account" > "Purchased" > "Music."
Step 4. To see the purchased items, go to the "Not in My Library" tab.
Step 5. To save the songs to your computer, click the Cloud download button.
Method 4. How to Transfer Music from iPhone to Computer with Cloud Services
Applies To: Non-Purchased Songs
Transferring your iPhone music to a PC or Mac can also be done using cloud services. Cloud storage allows you to share files across devices that use the same account, making it easy to transfer music from iPhone to computer or vice versa. This method is convenient for sharing files between devices.
You can copy songs from your iPhone to PC or Mac using common utilities like Dropbox, Google Play Music, and Amazon Music. For instance, Dropbox allows you to transfer songs from your iPhone to your computer.
To transfer music from iPhone to PC:
Step 1. To use Dropbox, you need to download and install the Dropbox app on both your iOS device and your computer. On your iOS device, simply download the Dropbox app from the App Store. On your computer, go to dropbox.com to download and install the Dropbox software. This will allow you to access and share your files across both devices.
Step 2. To use Dropbox, sign in to the same account on all your devices, allowing you to access your files and data from anywhere.
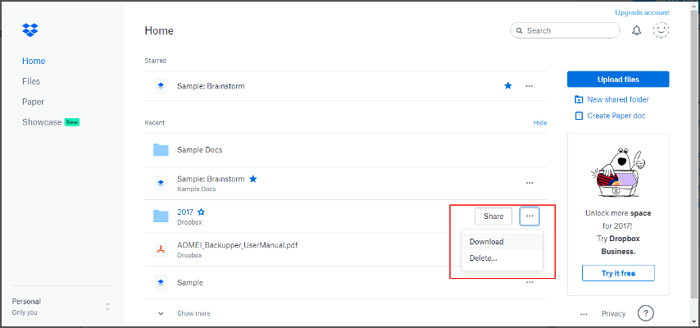
Step 3. To transfer songs from your iPhone to Dropbox, upload the songs you want to transfer to Dropbox from your iPhone. You can do this by opening the Dropbox app on your iPhone, tapping the "+" icon, and selecting the songs you want to upload.
Step 4. After using the app to convert your iPhone music to a compatible format, you can access and download the music from Dropbox to your computer, allowing you to transfer the music to your PC or Mac.
While all four methods allow you to transfer music from your iPhone to your computer, they differ in what they can copy.
- Qiling MobiMover allows for the transfer of non-purchased songs and playlists from an iPhone to a PC or Mac in one go, and also enables the import of songs from a PC to enrich the iPhone's music library, while also supporting the transfer of other types of content.
- iTunes can be a helpful tool for transferring purchased songs from an iPhone to a computer.
- Dropbox allows you to access your non-purchased music on all of your devices that use the same Dropbox account wirelessly.
Transferring music to PC is easier with this solution, allowing you to manage your iOS content more effectively. You can get started with it right away to transfer your music to PC.
Related Articles
- How Do I Convert iPhone Photos to JPEG
- How to Turn on AirDrop on iPhone
- Download Vevo Videos Easy and Free
- Backup and Restore Windows 11 Image to New Hard Drive Easily (3 Ways)
Backups are very important to protect your system and data just in case you need to restore Windows 11 image to new hard drive for a quick disaster recovery.