How Do I Convert iPhone Photos to JPEG
Quick Navigation:
- Why Do You Need to Convert iPhone Photos to JPEG
- How to Convert iPhone Photos to JPEG
- Method 1. Change iPhone Photos to JPEG via the Files App
- Method 2. Convert iPhone Photos to JPEG via an iOS App
- Method 3. Convert iPhone Pictures to JPG via a Desktop Converter
- How to Save iPhone Photos as JPG
- The Bottom Line
Why Do You Need to Convert iPhone Photos to JPEG
Since iOS 11, HEIC has been the default format for iPhone photos, offering storage-saving benefits and 16-bit color capture. However, this format is currently exclusive to Apple devices, making it incompatible with Windows computers and Android devices. As a result, you may need to convert iPhone photos to JPEG, also known as JPG, to easily open them on most devices.
How to Convert iPhone Photos to JPEG
When converting iPhone photos to JPG, you can either do it directly on your iPhone using the Files app or third-party HEIC converters from the App Store, or use a computer with a desktop tool that offers more features.
Method 1. Change iPhone Photos to JPEG via the Files App
Copying photos from the Photos app to the Files app saves them as JPEG files automatically, making it the fastest way to convert HEIC to JPEG.
To convert iPhone photos to JPEG via the Files app:
Step 1. To convert photos to JPEG, go to the Photos app and select the pictures you want to convert.
Step 2. Tap the "Share" icon and select "Copy Photos."
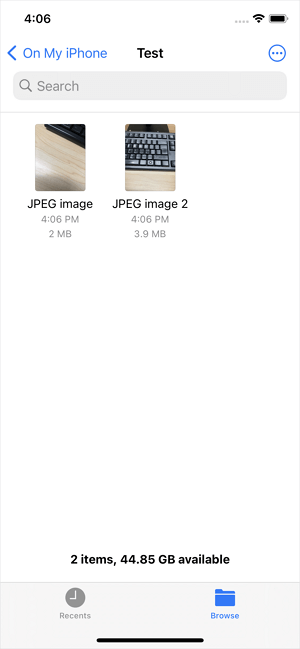
Step 3. To access files stored on your iPhone, go to the Files app, tap on "Browse" and then select "On My iPhone" from the menu.
Step 4. To paste an item, press and hold any part of the blank area and tap "Paste."
The photos you took are now saved as JPEG images on your iPhone.
Method 2. Convert iPhone Photos to JPEG via an iOS App
To save iPhone photos as JPG, you can use the built-in Photos app to export them in JPG format, or use a third-party HEIC converter app from the App Store to convert them.
Method 3. Convert iPhone Pictures to JPG via a Desktop Converter
To convert HEIC files to JPG on a computer, you can use a desktop converter after transferring photos from your iPhone. This allows you to open and view HEIC files on Windows, which is not possible otherwise. The converter can process multiple files at once, making it a convenient solution for bulk conversions.
To convert iPhone photos to JPG, you can use Qiling MobiMover, a free iPhone data transfer tool and HEIC converter. This tool can help you when you need to transfer photos from your iPhone to a computer or convert them to JPG format for easier sharing or editing.
- Transfer files to or from an iPhone/iPad/iPod touch
- Convert HEIC to JPG
- Convert live photos to JPG
- Convert videos to MP3
To convert iPhone photos to JPG:
Step 1. Launch Qiling MobiMover on your PC and click "HEIC to JPG" on the navigation panel.
Step 2. To select and add one or multiple HEIC photos, click "Browse" to choose from your PC, or simply drag and drop the photos to import them into Qiling MobiMover.
Step 3. Click "Convert" or "Start All" to convert HEIC photos to JPG, and once the conversion is complete, click "View" to check the converted JPG photo on your PC.
How to Save iPhone Photos as JPG
You can save your iPhone photos as JPEG instead of the default HEIC format by changing your camera settings in the Settings app. This allows you to save your photos in a more widely compatible format.
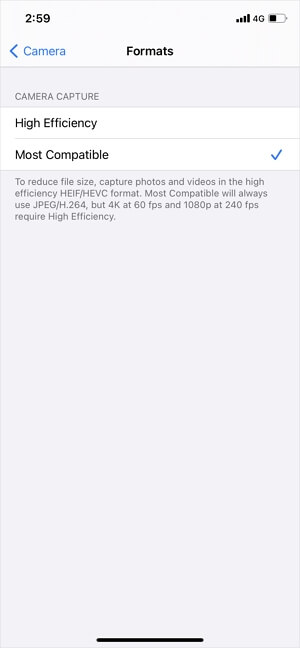
Step 1. Go to Settings and tap "Camera."
Step 2. Tap "Formats" and choose "Most Compatible."
Step 3. The photo you took with your iPhone camera is saved in JPEG format, which is a widely used image format that allows for high-quality compression and storage of digital images. This format is suitable for most everyday images and is compatible with a wide range of devices and software.
The Bottom Line
Now you know how to convert iPhone photos to JPEG using different methods. This is useful if you need to open HEIC files on a PC or Android device, or if you're using a Mac running an OS earlier than macOS High Sierra, which can't natively view HEIC files. The tips provided should be helpful to you.
Related Articles
- How to Transfer Text Messages from iPhone to Computer for Free
- Free iPhone Transfer Software: Transfer iPhone Data Without iTunes
- Data Transfer Software from PC to iPhone
- How to Do Dell Factory Restore in Windows 7 Command Prompt
This tutorial shows you how to do Dell factory restore in Windows 7 Command Prompt and provides an alternative way to perform Dell factory restore efficiently.