How to Add Reminders on iPhone/iPad
The Reminders App on your iPhone or iPad is a convenient tool that allows you to add reminders for important or trivial tasks by creating a to-do list. You can set reminders based on time or location, giving you flexibility in how you stay organized. By following the steps to use this app, you can easily add reminders to your device and stay on top of your tasks.
How to add reminders on iPhone or iPad
1. Go to Reminders App on your iPhone/iPad.
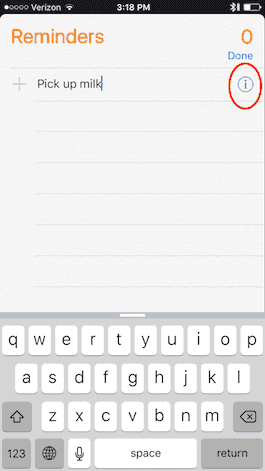
2. To add a reminder, click the Plus sign. If you want to create a reminder in an existing list, tap on the list's name and then click the Plus sign.
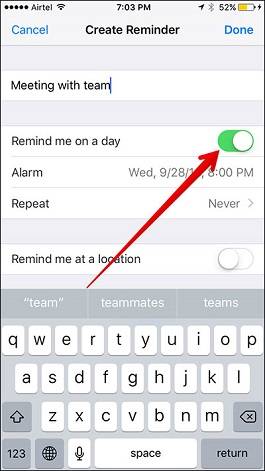
3. To set a reminder, tap on "Remind me on a day", set the alarm and repeat options as desired, or choose "Remind me at a location" and enter the location, requiring location services to be enabled.
4. Scroll down to set the other 3 options (Priority, List, Notes) and click "Done". A reminder will be added to your list.
5. To mark a reminder as completed, click the empty circle next to the reminder. This will check all the completed reminders, which can be viewed by tapping on "Show Completed".
Notes:
If you want to adjust a reminder, you need to:
1. Tap on the name of the reminder, re-enter its name.
2. To change other options, tap on the "i" icon next to the reminder and set the options again and click "Done".
If you want to delete a reminder, you need to:
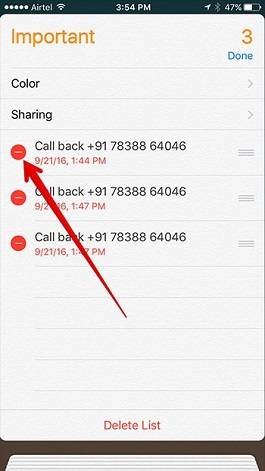
1. Click "Edit" at the top right corner of the screen.
2. To delete a reminder, tap on the minus sign next to it, select "Delete" from the options, and then click "Done" to confirm the removal.
Related Articles
- How to Add/Remove Google Account on iPhone
- How to Repair Windows 7 without Losing Data?
Try 6 solutions provided in this article to repair Windows 7 without losing data, it's easy to troubleshoot Windows 7 problems with the guide. - How to Make Partition Bootable in Windows 7 Effortlessly
To start a system normally, you should first make the relevant partition bootable. This article provides three methods to make partition bootable in Windows 7. - NTLDR is Compressed – Fixed it in Windows 7/8/10/XP
In this article, you will find the 5 simple ways to fix NTLDR is compressed or missing problem, and 1 tip for you to prevent the Windows system failure error in Windows XP, Vista, 7, 8, 10.