How to Delete Photos from iPhone but Not iCloud
Quick Navigation:
- Can You Delete Photos from iPhone But Not iCloud
- How to Delete Photos from iPhone But Not iCloud
- Option 1. Turn Off iCloud Photos
- Option 2. Use Another iCloud Account
- Option 3. Try iCloud Alternatives
- Option 4. Back Up iPhone Photos to Computer
- Option 5. Download iCloud Photos to Computer
- The Bottom Line
Can You Delete Photos from iPhone But Not iCloud
With iCloud Photos enabled on your iPhone, all your photos are synced to iCloud, and changes to your iPhone photos also update iCloud. This means deleting photos from your iPhone will also remove them from iCloud, potentially deleting your backup.
To delete photos from iPhone but not iCloud, disable iCloud Photos on the iOS device, allowing you to delete photos from iPhone without deleting them from iCloud, and use other practical methods.
How to Delete Photos from iPhone But Not iCloud
Here are some tips to delete photos from your iPhone but not in iCloud, as well as alternative ways to back up your iPhone photos: You can delete photos from your iPhone but not in iCloud by going to Settings > [your name] > iCloud > Photos, and turning off the "iCloud Photo Library" switch. Alternatively, you can back up your iPhone photos by connecting your iPhone to a computer and using iTunes or Finder to transfer your photos to your computer. You can also use a third-party app to back up your iPhone photos.
Option 1. Turn Off iCloud Photos
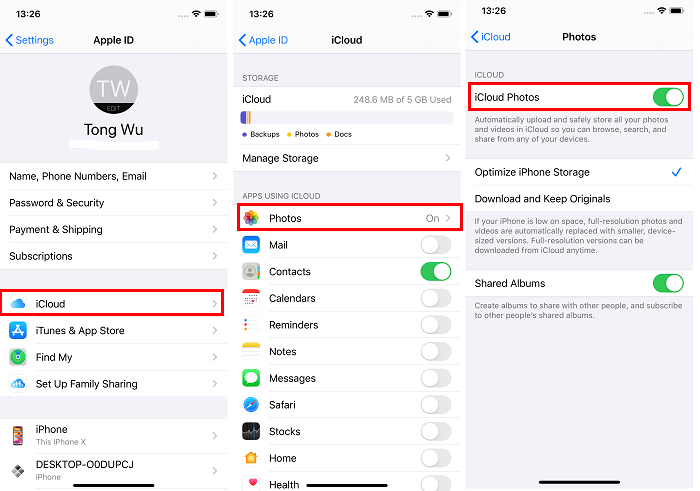
To turn off iCloud Photos on an iPhone, go to Settings > [your name] > iCloud > Photos, then toggle the switch next to "iCloud Photos" to the "off" position. Alternatively, you can also go to Settings > [your name] > iCloud > iCloud Storage > Manage Storage > Photos, then toggle the switch next to "iCloud Photos" to the "off" position. This will stop syncing your photos to iCloud, but you can still access them on your device.
Step 1. Go to the Settings app on your iPhone.
Step 2. Tap your name and choose "iCloud."
Step 3. To disable iCloud Photos, go to the "Photos" tab, toggle off "iCloud Photos," and select what to do with the items in iCloud Photos.
Step 4. Now that you've decided to delete photos from your iPhone, go ahead and do so as you want to.
Option 2. Use Another iCloud Account
The primary condition for photos to sync between your iPhone and iCloud is that you're using the same account. If you switch to a different iCloud account on your iPhone and delete photos, these changes won't be mirrored to iCloud that uses another account.
To change iCloud account on iPhone:
Step 1. Go to the Settings app.
Step 2. Tap your name and scroll down to click "Sign Out."
Step 3. Choose the copy you'd like to keep, tap "Sign Out" and click "Sign Out" again to confirm.
Step 4. To sign in to your iPhone, go to Settings, select "Sign in to your iPhone," and enter your Apple ID.
Step 5. Enter the passcode and tap "Next."
Step 6. To access your iPhone, enter the verification code if prompted, followed by your lock screen passcode.
Step 7. Choose whether to merge your iPhone data with iCloud.
Step 8. To delete photos from your iPhone but not iCloud, go to the Photos app.
Option 3. Try iCloud Alternatives
If you back up your iPhone photos to cloud storage services like Google Photos or Google Drive, deleting the photos from your device won't remove them from the cloud. This means you can delete photos from your iPhone without losing them in the cloud, as long as you're using services like Dropbox, Google Drive, or Google Photos.
Option 4. Back Up iPhone Photos to Computer
If you back up your iPhone photos to a computer, you won't have to worry about changes made on your iOS device syncing to the computer. To back up your iPhone photos all at once or selectively, you can use the iPhone transfer software Qiling MobiMover, which allows you to transfer your photos to your computer with ease.
- Transfer files between an iPhone/iPad/iPod and a computer
- Transfer data from one iDevice to another
- Back up and restore photos, videos, music, ringtones, contacts...
- Back up and restore WhatsApp data
You can either transfer photos from your iPhone to your computer or make a backup of your iPhone photos to your computer, allowing you to keep a copy of your photos.
Step 1. Connect your iPhone to your computer using a USB cable, then launch Qiling MobiMover. Select "Phone to PC" to back up all your iPhone photos to the computer at once, and click "Next" to proceed.
Step 2. Select the categories you'd like to back up. It's a good idea to make a copy of all supported file types on your iPhone using the data transfer feature, allowing you to back up your iPhone data to your desktop or customize the storage path.
Step 3. Click the "Transfer" button to start backing up your iPhone photos to your computer without using iCloud. The transfer process is high-speed, making it quick and efficient.
Option 5. Download iCloud Photos to Computer
To keep a copy of photos you want to delete, you can download them from iCloud to your computer, ensuring a backup remains even if you delete them from your iPhone and iCloud.
To download iCloud photos to PC:
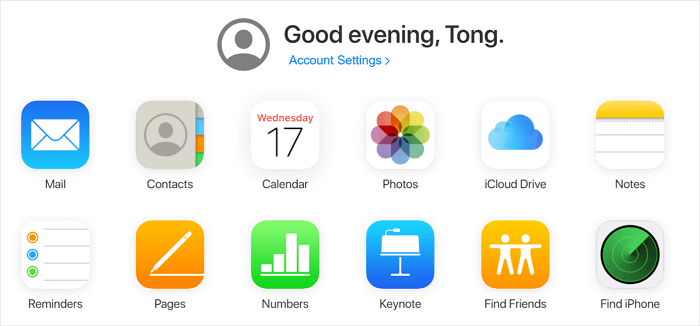
Step 1. Go to visit iCloud.com and sign in with your account.
Step 2. Choose "Photos" and you will see all your iCloud photos.
Step 3. Select the items you want to download and click the "Download" icon.
Step 4. Go to the "Downloads" folder to check the iCloud photos.
To download iCloud Photos to PC, you can follow these steps: first, open the iCloud for Windows app on your PC, then sign in with your Apple ID, select the photos you want to download, and choose the folder where you want to save them. Alternatively, you can use the Photos app on your PC to access and download your iCloud Photos.
The Bottom Line
To delete photos from your iPhone without removing them from iCloud, consider using alternative backup methods such as Google Photos, OneDrive, or an external hard drive. This way, you can remove photos from your iPhone's storage without affecting your iCloud backup.
Related Articles
- Download Vevo Videos Easy and Free
- How to Sync Contacts from iPhone to Mac Using iCloud
- How to Transfer WhatsApp from iPhone to iPhone in 5 Ways
- How to Download Myspace Videos for Free