How to Transfer Music from iPad to iPhone/iPhone to iPad
Whether you're transferring music from an iPad to an iPhone or vice versa, the solutions are the same. You can use AirDrop, iPhone transfer software, Dropbox, or Apple Music to share or transfer music between your iDevices, with the best method varying depending on your needs and available tools.
| Workable Solutions | Step-by-step Troubleshooting |
|---|---|
| Part 1. Transfer Music via USB | Connect your iPhone to computer with a USB cable and...Full steps |
| Part 2. Transfer Music Wirelessly | Turn on AirDrop on your iPhone and iPad...Full steps |
Part 1. How to Transfer Music from iPad to iPhone/iPhone to iPad with iPhone Transfer Software
Also supports: Photos, videos, ringtones, contacts, books, and more
You can easily transfer music between an iPad and an iPhone using iPhone transfer software like Qiling MobiMover, which allows you to transfer music, ringtones, photos, videos, and more between two iDevices or between an iPhone/iPad/iPod and a computer.
If you need to share music from your iPad to iPhone or transfer songs from iPhone to iPad, this tool can help. It also serves as a video & audio downloader, allowing you to download online video or audio files to your computer or iDevice using a URL. For more details on downloading music, you can check the guide on how to download music from SoundCloud.
To transfer music from iPad to iPhone or vice versa:
Step 1. Connect your iPhone and iPad to your computer and launch Qiling MobiMover. Tap "Trust" on both devices and click "Allow" on the software. Then, go to the "Phone to Phone" section, select the transfer direction (e.g., from iPhone to iPad), and click "Next" to proceed.
Step 2. Select "Music" on your source iPhone or iPad. Qiling MobiMover will automatically load and select all supported files on your device. Expand "Audio" and choose the music you want to transfer.
Step 3. Click the "Transfer" button to begin moving music from the source device to the target device. Once the transfer process is complete, open the Music app on the target device to play the transferred music.
Part 2. How to Transfer Music from iPhone to iPad Wirelessly
If you don't have a computer or USB cable, you can transfer music from iPhone to iPad or vice versa wirelessly. You can use AirDrop to share music, sync music through Apple Music or iTunes Store, or copy music using cloud-based services like Dropbox.
Method 1. AirDrop Music from iPhone to iPad
AirDrop is a built-in file sharing service available on both iPhone and iPad, allowing you to share songs between devices wirelessly.
When transferring music from an iPhone to an iPad or vice versa using AirDrop, the actual shared content is the song's information, not the music file itself. Additionally, the shared song must be from Apple Music, and the target device must also have an active Apple Music subscription to access the shared music.
To transfer music from iPhone to iPad, don't use AirDrop, instead, follow the steps in Part 1 to copy music between your devices.
To AirDrop music from iPhone to iPad or vice versa:
Step 1. Turn on AirDrop on both your iPhone and iPad.
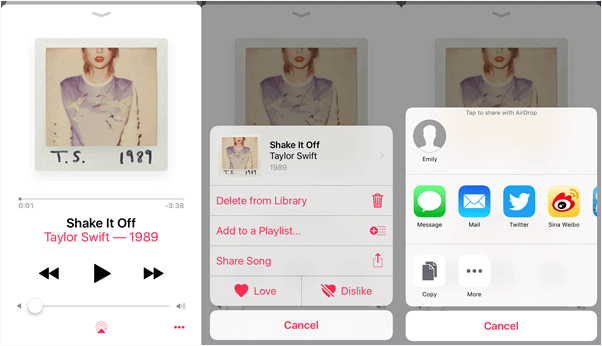
Step 2. On the source device, go to the Music app and play the song you want to transfer, then put the device in AirPlay mode, and select the target device as the AirPlay receiver. This will allow the song to be streamed to the target device, where it can be saved or played from the Music app.
Step 3. Click the "More" option and choose "Share Song".
Step 4. Tap "AirDrop" and choose the name of the target device.
Step 5. Open the link in a web browser on the target iPhone or iPad, and click "Install" to install the Profile.
Method 2. Transfer Music from iPad to iPhone Using Apple Music
If you're using the same Apple ID on both devices and have Apple Music, you can sync music across devices by turning on Sync Library on your iPhone and iPad.
To share music from iPhone to iPad:
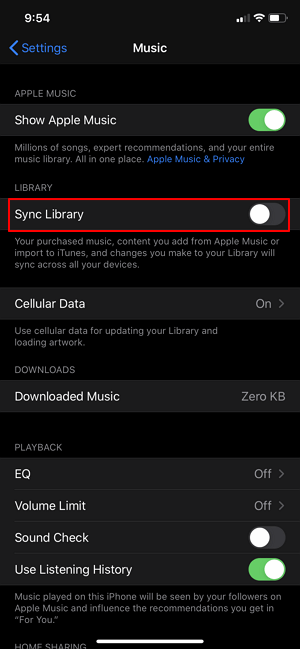
Step 1. To access settings on both the iPhone and iPad, go to the Settings app.
Step 2. Tap "Music".
Step 3. Toggle on "iCloud Music Library" or "Sync Library".
Method 3. Share Music from iPhone to iPad via iTunes Store
If you've purchased music from the iTunes Store, you can transfer it between your iPad and iPhone without a wired connection, as long as you're using the same Apple ID on both devices.
To share music from your iPhone to your iPad or vice versa via the iTunes Store, follow these steps: Open the Music app on your iPhone and select the song or album you want to share. Tap the "Share" icon, which looks like a box with an arrow coming out of it, and select "Add to Library" or "Share Song" depending on your preference.
Step 1. On the target iPhone or iPad, open the iTunes Store.
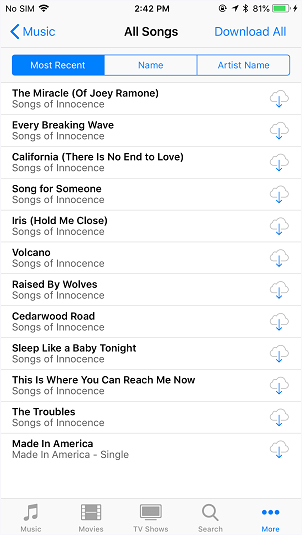
Step 2. To find music not on your iPhone, go to the "More" tab, select "Purchased", then choose "Music" and finally "Not on This iPhone".
Step 3. To download all songs from the music library to your iPhone or iPad, tap the "All Songs" option and select the "Download All" button. This will initiate the download process, making all songs available offline on your device.
Method 4. Transfer Music from iPhone to iPad Wirelessly using File Sharing Services
Cloud-based services allow you to transfer music from your iPhone to your iPad wirelessly over Wi-Fi, which also lets you transfer music without an Apple Music subscription. Alternatively, you can use services like Dropbox's iOS app to transfer music from your iPhone to your iPad over Wi-Fi.
To use a cloud storage service, ensure you have sufficient storage space to save the content and are using the same account across all devices.
The Bottom Line
Transferring music from an iPad to an iPhone or vice versa is a straightforward process. You can use various methods, including transferring music without a computer, using a USB cable, or other common solutions, to get your music from one device to the other. Whether you're looking to move music from your iPad to your iPhone or the other way around, you now know the steps to take to get your music transferred successfully.
Transferring music from iPhone to iPad using iTunes is not recommended as it involves backing up the source device and then restoring the target device from the backup, which also copies other content.
Related Articles
- How to Download Videos from Websites in 3 Ways
- How to Transfer Music from iPhone to Computer for Free
- 4 Methods to Transfer Notes from iPhone to iPhone or Computer
- Fixed: Transcend SSD Scope Not Working for System Clone
What if Transcend SSD Scope is not working for system clone in Windows 11, 10, 8, 7? here is the solution and better Transcend SSD clone tool.