How to Transfer Camera Roll to PC | Newly Updated
What Is Camera Roll on iPhone
The Camera Roll is the location where all your iPhone photos and videos are stored, including those taken with the camera and screenshots captured, making it a valuable and precious space for you. As a result, you likely want to import the Camera Roll to your PC.
You can eliminate data loss worries by making a backup of your iPhone camera roll, then delete files on your iPhone to free up space.
Can You Transfer Camera Roll to PC
On an iPhone, you can only access the DCIM folder via USB connection, which contains photos and videos, unlike Android devices where you can access any file.
You're in luck because the content you want to transfer is exactly what you need to move now. In addition to Windows' built-in features and apps, there's also professional iPhone data transfer software that effectively imports camera roll to a PC, making the process smoother.
4 Tips to Import Camera Roll to PC
Transferring iPhone photos to a PC is no longer a challenging task, thanks to the following proven tips. The best method for you depends on your preference, but each one is effective in its own way.
Option 1. Transfer Camera Roll to PC with File Explorer
To import photos from an iPhone to a PC, you can use File Explorer to manually transfer the camera roll using a USB cable. This method works on Windows 10, Windows 11, and earlier Windows versions.
A drawback to consider is that File Explorer only displays the camera roll by folder, organized by date, which may not be ideal for those who prefer to transfer iPhone albums to PC.
Step 1. Connect your iPhone to the PC with a USB cable.
Step 2. Unlock your iPhone and trust the computer to make sure your iPhone is recognized by the PC.
Step 3. To view your iPhone photos, open File Explorer and navigate to "This PC" > "Apple iPhone" > "Internal Storage" > "DCIM." This will display all the folders containing your iPhone pictures.
Step 4. Copy them to your computer.
If you're having trouble with iPhone photos not showing up on your PC, there are some reliable solutions you can try to resolve the issue.

Option 2. Import Camera Roll to PC with Photos
Compared to File Explorer, Photos offers more flexible transfer options, including importing all, new, or selected photos, and even allows you to delete original items after import. However, this flexibility comes with a drawback - the app categorizes iPhone pictures by date, making it impossible to transfer iPhone albums.
Step 1. To connect your iPhone to your PC, start by plugging the iPhone into the PC using a USB cable. Make sure the cable is securely connected to both the iPhone and the PC.
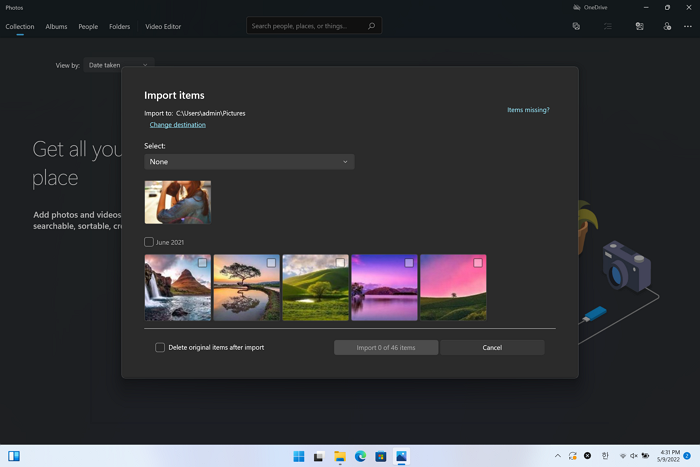
Step 2. Open the Photos app and click "Import" > "From a connected device."
Step 3. Wait for Photos to load photos on your iPhone.
Step 4. Select the desired items and click the "Import Photos" button to initiate the transfer process.
If you're experiencing issues with Microsoft Photos not working when transferring pictures, you can refer to the troubleshooting guide to resolve the problem and then proceed with the transfer process.
Option 3. Transfer Photos from iPhone to PC with Qiling MobiMover
The iPhone content manager - Qiling MobiMover allows you to transfer and manage various file types between your iPhone, iPad, iPod touch, and computer, including photos, videos, music, ringtones, and books.
If you want to transfer photos from your PC to your iPhone without using iTunes, Qiling MobiMover is the best option, as both File Explorer and Photos are unable to assist with this task.
Step 1. Connect your iPhone to a PC running Windows 7 or later, then run Qiling MobiMover. Choose the "Phone to PC" option and click "Next" to proceed.
Step 2. Check the category/categories you want to transfer. You can copy other supported files together with photos from your iPhone to PC all at once. You can also customize the storage path for the exported photos, or MobiMover will save them on your desktop.
Step 3. Click the "Transfer" button on MobiMover to start the process without using iTunes. This method is a safe way to backup your photos and avoid data loss.
Option 4. Sync Camera Roll to PC with iCloud
You can transfer your iPhone photos to your PC wirelessly using iCloud, as long as you have enough iCloud space. To do this, download and install iCloud for Windows on your PC, and then follow the steps to transfer your camera roll to your PC via Wi-Fi.
Step 1. To enable iCloud Photos on your iPhone, go to the Settings app and turn it on.
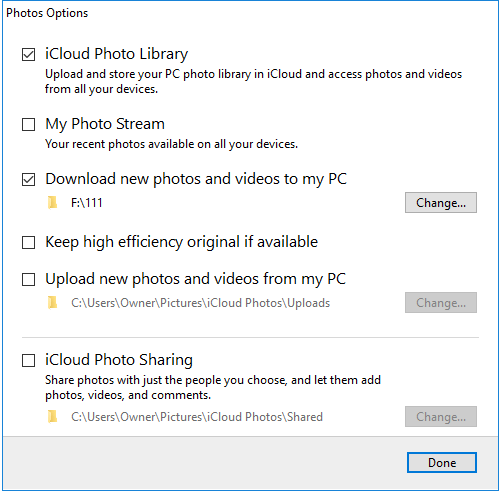
Step 2. To set up iCloud Photo Library on your PC, run the iCloud for Windows application and click on the "Options" button next to "Photos". Then, enable the "iCloud Photo Library" feature. This will allow your Windows PC to sync with your iCloud account and access your photos across all your devices.
Step 3. Turn on "Download new photos and videos to my PC" and change the location if you need to.
Step 4. Wait for the data syncing to complete.
Frequently Asked Questions
When transferring your iPhone camera roll to your PC, you may have questions such as how to access the photos, what file format they will be in, and how to organize them on your computer.
How do I transfer my camera roll to my computer?
You can transfer your camera roll to your computer using File Explorer, Photos, iCloud, or iPhone data transfer software. To do this with File Explorer, connect your iPhone to the computer and visit the DCIM folder from your iPhone's internal storage. From there, select all folders using 'Ctrl-A', copy them with 'Ctrl-C', and then paste them to your PC using 'Ctrl-V' to copy your iPhone camera roll to your computer.
Why can't I transfer photos from iPhone to PC?
If you're having trouble transferring photos from your iPhone to your PC using a USB cable, try switching to a different USB cable and port to rule out any issues with the hardware. Additionally, ensure your iPhone is unlocked and that you've trusted the computer in the prompt on the device. This should resolve the problem.
How do I transfer photos from iPhone to computer using bulk?
You can transfer photos from your iPhone to a computer in bulk using the methods introduced here. Options include transferring specific photos or all photos, allowing you to choose the approach that best suits your needs.
Related Articles
- How to Back Up Photos from iPhone with Ease
- How to Transfer All Data from One Surface Pro to Another
Got a new Surface Pro and want to transfer from one Surface Pro to another? Scroll down to find the best PC transfer tool and a stepwise guide. - Solved: Hard Drive Won't Initialize in Windows 11, 10, 8, 7
Hard drive won't initialize via Disk Management in Windows 11, 10, 8, 7? Here you can find out why you are unable to initialize hard drive, and effective ways to solve it. - Unable to Mount Clonezilla Image to Restore Single File
How to mount and explore Clonezilla image to solve unable to mount Clonezilla image to restore single files in Windows? Get the 3 solutions below.