How to Transfer Photos from iPad to SD Card
Quick Navigation:
- How to Transfer Photos from iPad to SD Card with a Computer
- How to Transfer Photos from iPad to SD Card Without Computer
- The Bottom Line
To free up space on your iPad, you can transfer photos to an SD card, which can be inserted into your iPad or connected via a reader. You can use the Photos app to select the photos you want to transfer, and then use the "Share" option to save them to the SD card. Alternatively, you can use a third-party app to transfer photos to the SD card. This will help to declutter your iPad and make it run faster.
How to Transfer Photos from iPad to SD Card with a Computer
Transferring photos from your iPad to an SD card can be easily done on a computer. You can use the Photos app or File Explorer to import photos from your iPad to your SD card without the need for third-party software. Alternatively, you can also use reliable iPhone data transfer software to share files between the SD card and your iPad.
If you prefer to use Photos or File Explorer, you can transfer photos from your iPad to PC by changing the target location from a folder on your PC to a folder on the SD card, as described in the guide on how to transfer photos from iPad to PC.
If you want to transfer photos between your iPad and an SD card, you're limited to using Photos and File Explorer to move photos from your iPad to the SD card, but not the other way around. To overcome this limitation, you can use the iPhone transfer software Qiling MobiMover, which allows you to transfer photos between your iPad and SD card in both directions.
This tool allows for the transfer of various files between an iPhone/iPad/iPod and a computer or external storage device, or between two iDevices. It also functions as a video downloader, enabling users to download online videos to their computer or iDevice for offline viewing.
To transfer photos from iPad to SD card:
Step 1. Connect your SD card and iPad to your computer. Next, run Qiling MobiMover, select "Phone to PC", and click "Next" to proceed.
Step 2. Select "Pictures" and MobiMover will save the exported files on your desktop by default. You need to click "Custom Path" to set the SD card as the destination.
Step 3. Click the "Transfer" button after selecting the photos you want to transfer. Once the process is complete, you can verify the transferred items on the SD card.
How to Transfer Photos from iPad to SD Card Without Computer
You can transfer photos from your iPad to an SD card without a computer using an SD card reader for iPhone/iPad. The process involves using the SD card reader to export photos from your iPad to the SD card, following general steps that include using the reader to connect your iPad to the SD card, selecting the photos you want to transfer, and completing the transfer process.
Step 1. To insert the SD card into the SD card reader, first locate the SD card reader on your iPad. Then, take the SD card and insert it into the SD card reader, making sure it clicks into place.
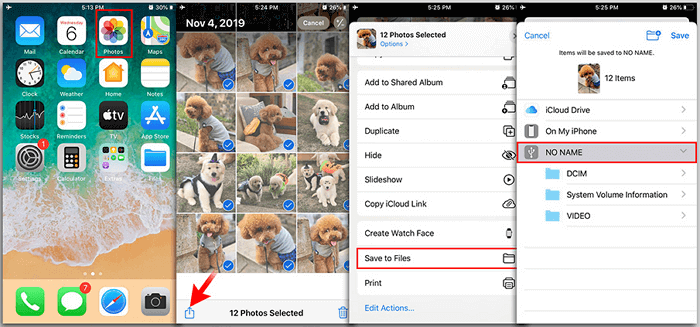
Step 2. To move photos from your iPad, go to the "Photos" app and select the photos you want to move.
Step 3. Click the "Share" button and choose "Save to Files".
Step 4. To save the items to the USB device, select it and choose a folder to store the photos.
The SD card reader method provides a convenient way to transfer photos from your iPad to an SD card directly, without needing a computer as an intermediary.
The Bottom Line
You can transfer photos from iPad to SD card using a corresponding solution, whether you have a computer available or not. Specify your need and apply one of the tips to move photos from iPad to SD card with ease. If you want to transfer photos from an SD card to an iPhone someday, you can use one of the solutions in the guide on how to transfer photos from SD card to iPhone.
Related Articles
- Best YouTube to MP3 Converters for iPhone and iPad
- How to Transfer AVI Files to iPad/iPhone without iTunes Easily
- How to Transfer Data from iPhone 6 to iPhone 8 in 3 Easy Ways
- Fixed: "Windows Cannot Be Installed to This Disk MBR" on Windows 11
This article provides two solutions to the error of 'Windows cannot be installed to this disk MBR' on Windows 11, and you can also find the best backup software there.