How to Transfer Photos from PC to iPhone in 6 Ways
Quick Navigation:
- Part 1. How to Transfer Photos from PC to iPhone With USB
- Method 1. Transfer Photos from PC to iPhone with iPhone Transfer Software
- Method 2.How to Transfer Photos from PC to iPhone with iTunes
- Part 2. How to Transfer Photos from PC to iPhone Wirelessly
- Method 1. Transfer Picturesfrom Computer to iPhone Using iCloud
- Method 2. Import Photos from PC to iPhone via Google Photos
- Method 3. Copy Photos from PC to iPhone via Dropbox
- Method 4. Get Photos from PC to iPhone using OneDrive
- Part 3. How to Transfer Photos from iPhone to PC
- The Bottom Line
Transferring photos between an iPhone and a computer is a common task, and knowing how to do it is essential. Whether you're using a Mac or a PC, you can easily transfer photos between your devices, making it simple to share pictures between them. This allows you to access and view your photos on any device, making it a convenient feature to have.
Given that, here we provide six proven ways to copy photos from a computer to your iPhone. Whether you want to transfer photos from PC to iPhone with or without iTunes, you will find a method that works for you.
Part 1. How to Transfer Photos from PC to iPhone With USB
Transferring photos from PC to iPhone with USB can be done using iTunes or an iPhone data transfer tool like Qiling MobiMover. However, Qiling MobiMover is a better option, offering a more user-friendly interface, support for a wider range of file types, and advanced data management capabilities, making it a more compatible and efficient choice.
- Intuitive interface. The app has an intuitive user interface that presents all its features in a clear and organized manner, making it easy to find the desired functionality without having to search for hidden features.
- Various kinds of files are supported. You can easily transfer various types of data, including contacts, messages, videos, audio, photos, and more, from your iPhone/iPad/iPod to your computer and vice versa.
- Excellent data management ability. This service allows users to transfer files between devices, including iOS devices, and between devices and computers, providing a convenient way to share and move files.
- Good compatibility. The tool supports all models of iOS devices and works well with both Windows and macOS.
Qiling MobiMover is a good choice for transferring files, especially for those who have a lot of files to transfer or want to get rid of iTunes' synchronization. It can be used to transfer photos from a PC to an iPhone, making it a convenient alternative to iTunes.
Method 1. Transfer Photos from PC to iPhone with iPhone Transfer Software
This software is compatible with PC running Windows 7 or later, and Mac running OS X 10.7 and later.
Qiling MobiMover is a reliable iOS data transfer software that helps users transfer files between iPhone and Mac/PC or between two iOS devices without causing data loss on the target device, making it a safer alternative to iTunes.
Other features of Qiling MobiMover:
- iPhone Backup & Restore - Back up and restore iPhone without iTunes or iCloud
- WhatsApp Backup & Restore - To back up WhatsApp messages and attachments, open WhatsApp and go to Settings > Chats > Chat Backup. Tap on "Back Up Now" to create a local backup.
- Video Download - You can download videos from YouTube and other sites directly to your computer or iPhone/iPad using various tools. These tools allow you to save videos in different formats, such as MP4, AVI, and more, and even convert them to different resolutions.
To import photos (and videos) from PC to iPhone:
Step 1. Connect your iPhone to your PC, launch Qiling MobiMover, select "PC to Phone" and choose "Select Files" to continue.
Step 2. With MobiMover, you can transfer photos from your PC to your iPhone, as well as other data types, by selecting them and clicking "Open" to load the files.
Step 3. MobiMover will display the selected files on the screen. If an item is missed, you can click "Add Contents" to import more files. Then, click the "Transfer" button to initiate the transfer process.
To check the photos on your iPhone, open the Photos app, which is usually located on the home screen. You can also use Spotlight search to find the app if you can't see it.
This tool allows you to transfer various file types from your iOS device to a computer, including photos, videos, audio files, contacts, and messages. It also enables file management, allowing you to access, delete, or add content to your iPhone or iPad from your computer. Additionally, it facilitates transferring files from a PC to an iPad.
To gain more control over your iPhone, iPad, and iPod, download and install Qiling MobiMover to take advantage of its features.
Method 2. How to Transfer Photos from PC to iPhone with iTunes
Transferring photos from a computer to an iPhone using iTunes is the traditional method, but it only supports transferring folders, not individual photos. To use this method, you'll need to disable iCloud Photos first, which can be done by going to Settings > [your profile] > iCloud > iCloud Photos and toggling it off. This approach allows you to copy pictures to an iOS device from a PC, but it's not ideal for transferring specific photos.
To sync photos from computer to iPhone with iTunes:
Step 1. Connect your iPhone to your PC using a USB cable, and if iTunes doesn't launch automatically, open it manually.
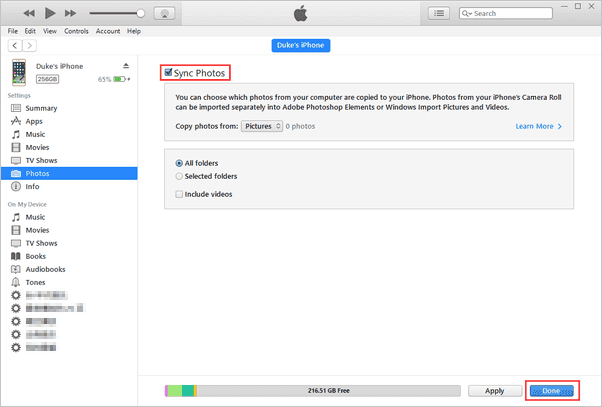
Step 2. Click the "Device" tab and select "Photos."
Step 3. To sync photos, check the box next to "Sync Photos" and then select the option to copy photos from a specific source, such as a computer or a cloud storage service.
Step 4.To transfer photos, click "Choose folder..." and select a folder containing the desired photos.
Step 5. Click "Apply" to start syncing photos from your computer to your iPhone or iPad.
To copy photos from PC to iPhone using iTunes, follow these steps: connect your iPhone to your PC, open iTunes, select your device, and click on "Photos" to sync your photos. However, this method won't work if iCloud Photos is enabled on your iPhone, so make sure to turn off iCloud Photos on your iOS device before transferring photos.
Part 2. How to Transfer Photos from PC to iPhone Wirelessly
If you prefer a wireless way to transfer photos from PC to iPhone, you can consider using iCloud or third-party cloud services like Google Photos, Dropbox, or OneDrive.
Method 1. Transfer Pictures from Computer to iPhone Using iCloud
If you prefer to wirelessly transfer photos from your PC to your iPhone, using iCloud is a good choice. You can choose from two sync options, depending on whether you've had iCloud for Windows installed on your computer.
If you've installed iCloud for Windows on your computer, you can move photos from your PC to your iPhone by turning on the iCloud Photo Library, which uploads pictures from your PC to iCloud and syncs them to your iPhone when connected to WiFi.
Here are the detailed steps:
Step 1. Go to "Settings" > [your name] > "iCloud" on your iPhone.
Step 2. Scroll down to choose "Photos" and toggle on "iCloud Photo Library."
Step 3. Open iCloud for Windows on your computer.
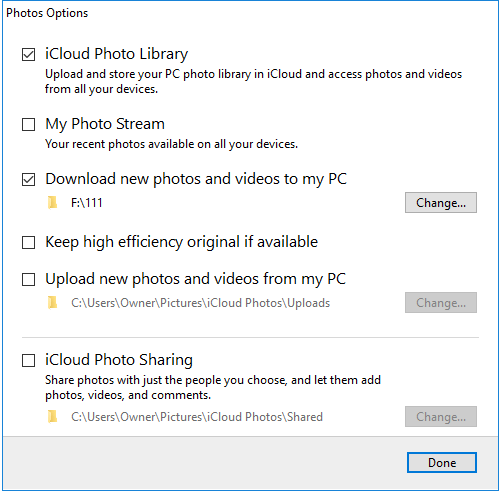
Step 4. Click "Options" next to Photos and enable "iCloud Photo Library."
Step 5. Ensure that "Upload new photos and videos from my PC" is turned on, then tap on "Change" to select the folder containing the photos you want to transfer from your PC to your iPhone.
If you don't have iCloud installed on your computer, you can upload the pictures on your PC to iCloud via iCloud.com, and by enabling iCloud Photo Library on your iPhone, these images will be synced to your device when connected to WiFi.
Step 1. To enable iCloud Photo Library, go to the "Settings" app, select your name, then tap on "iCloud" and finally toggle the switch next to "Photos" to the right, turning it on. This will allow your photos to be synced across all your Apple devices.
Step 2. Visit iCloud.com from your computer and enter your Apple ID and password.
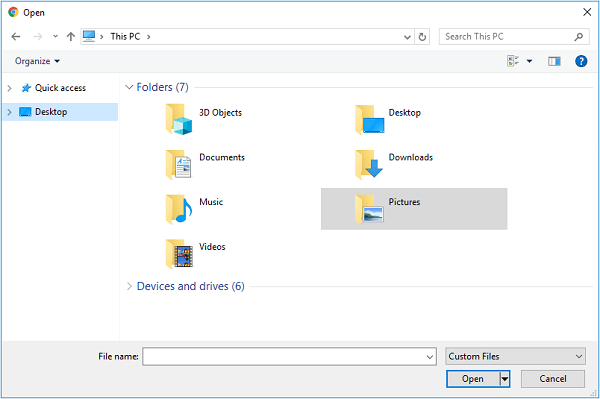
Step 3. To upload photos, select the "Photos" option from the menu, then click the "Upload photos" button located in the top-right corner of the screen.
Step 4. Select the pictures you want to copy to your iPhone from your PC and click "Open."
Step 5. Wait for the photos to be uploaded to iCloud.
iCloud allows for wireless transfer of photos from computer to iPhone, but it comes with limited free storage space (5GB), which may not be sufficient for everyone, requiring a paid upgrade for additional storage.
Method 2. Import Photos from PC to iPhone via Google Photos
In addition to iCloud, other cloud storage services such as Google Photos, Dropbox, and OneDrive enable you to automatically sync photos from your computer to your iOS device.
To add photos to iPhone or iPad via Google Photos:
Step 1. To visit Google Photos and log in with your account, go to the Google Photos website and enter your Google account credentials, such as your email address and password, to access your photos and albums.
Step 2. To make copying images easier, you can create a new album and add a title to it. Alternatively, you can directly upload photos from your computer.
Step 3. To add new photos to Google Photos from a computer, go to Google Photos, click on "Add photos", then select "Select from computer" and choose the desired folders from the computer to upload the photos.
Step 4. To download Google Photos on your iPhone or iPad, go to the App Store and search for Google Photos. Once you find it, tap the "Get" button to download and install the app.
Step 5. To access Google Photos on your computer, sign in with the account you use on Google Photos. This will allow you to view, edit, and manage your photos and videos from your computer.
Step 6. Select and download the photos to your iPhone or iPad.

Method 3. Copy Photos from PC to iPhone via Dropbox
Dropbox allows users to store and access files across all devices linked to the same account, supporting a wider range of content types than Google Photos, including photos, audio files, documents, and more, making it easier to transfer data from a PC to an iPhone.
To send photos from PC to iPhone with Dropbox:
Step 1. To sync your files across devices, download and install Dropbox on your PC and iPhone, then sign in with the same account.
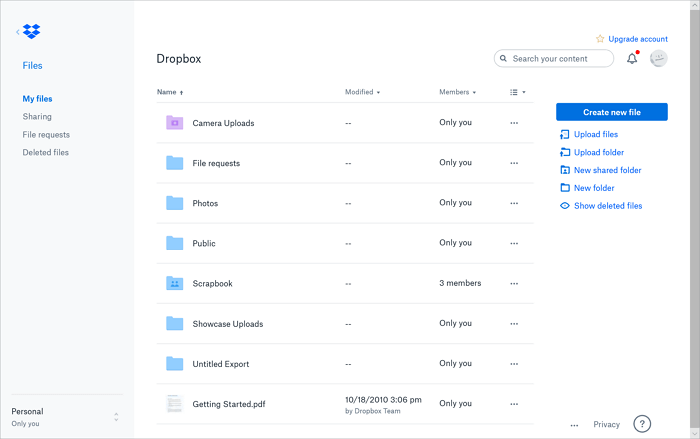
Step 2. To upload pictures from your PC to Dropbox, go to Dropbox, click on "Files", then select "My files", and finally click on "Upload files" to add pictures from your PC to Dropbox.
Step 3. After syncing, access the Dropbox app on the iOS device to view the synced photos from your computer.
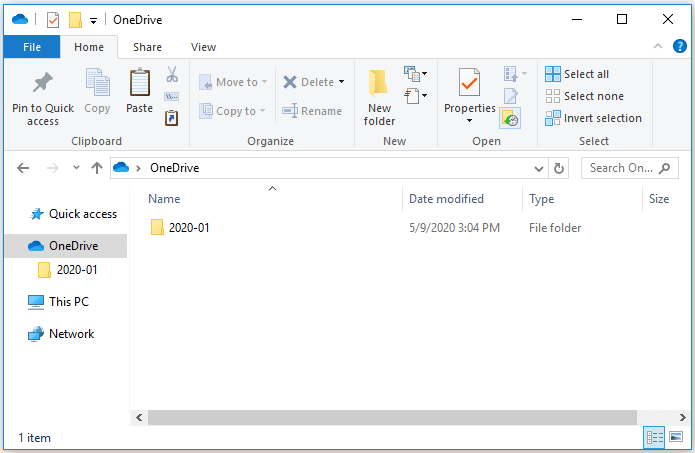
Method 4. Get Photos from PC to iPhone using OneDrive
OneDrive is a built-in cloud storage service from Microsoft that allows users to add photos to their iPhone from a PC. It utilizes file synchronization on Windows and is also available for iOS.
To transfer photos from PC to iPhone with OneDrive:
Step 1. Set up OneDrive on your PC.
Step 2. Copy the photos you want to transfer to your iPhone to the OneDrive folder on your PC.
Step 3. Download and install the OneDrive app on your iPhone, then sign in with the account you use on your PC.
Step 4. Wait for the process to complete, then check the OneDrive app on your device for the pictures from your PC.
Cloud storage services, like iCloud, have limited space, which can lead to a long syncing process if you have a large number of images to transfer.
You can transfer photos from PC to iPhone without iTunes using the methods mentioned above. The first method involves connecting your iPhone to a computer with a USB cable, while the other four methods require a WiFi connection to transfer photos. You can choose the method that suits you best.
Part 3. How to Transfer Photos from iPhone to PC
In addition to using iTunes, all the methods detailed above are also applicable to transferring photos from iPhone to PC. Apart from these tips, you can also use Windows File Explorer to import photos from iPhone to PC.
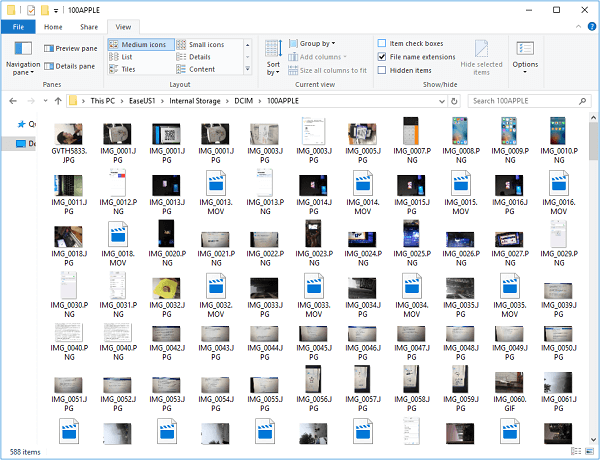
To transfer photos from iPhone to PC:
Step 1. Connect your iPhone to your PC using a USB cable, and then trust the computer on your iPhone. This will allow your PC to access your iPhone's data and perform the necessary actions.
Step 2. After your iPhone is recognized by the computer, go to "This PC" and click on your iPhone's name, then navigate to "Internal Storage", followed by "DCIM" and finally "100APPLE".
Step 3. To transfer photos and videos from your iPhone to your PC, simply open the iPhone camera roll and copy the items you want to transfer. Then, paste them into a folder on your PC where you can access and view them.
The Bottom Line
You can transfer photos from your computer to your iPhone (or iPad) using various methods, including iPhone data transfer software, iCloud, Google Photos, Dropbox, OneDrive, and iTunes.
- Qiling MobiMover: Put photos to iPhone without data loss.
- Transferring photos from your computer to your iPhone or iPad using iTunes may result in data loss.
- Cloud storage services allow you to transfer photos from your PC to your iOS devices via WiFi, making it easy to access and share your photos across devices.
Whether you want to transfer photos from Windows 10 to iPhone or import photos from PC to iPhone 12, iPhone 11, or earlier iPhones, you can apply one of the methods above to get things done, which includes using a USB cable, iCloud, Google Photos, or a third-party app to transfer photos from Windows 10 to iPhone. Just carry out the one best suited to your needs.
Mac users can also transfer photos from their Mac to iPhone or iPad using one of the previous tips. Alternatively, Mac users can use AirDrop to transfer photos, and for more information on this method, they can refer to the guide on transferring photos from Mac to iPhone.
Related Articles
- How to Transfer Large Videos from iPhone to PC in Detail
- How to Transfer Text Messages from iPhone to Computer with/without iTunes
- Create Windows 10/8/8.1/7 Bootable USB with Qiling Disk Master
Windows To Go Creator can help you make a bootabe USB from Windows 11/10/8/8.1/7 ISO/ESD file. In other words, it can install Windows 10/8/8.1/7 onto a USB flash drive. After that, you can boot Windows 10/8/8.1/7 from it anywhere and anytime. - Wipe Seagate External Hard Drive Safely on Windows 10/8/7
Wipe Seagate external hard drive securely to prevent your data from being compromised or recovered by others. There are 2 methods to help you clean hard drive completely.