How to Transfer Photos from USB Flash Drive to iPhone
With the five methods provided in this guide, you can transfer photos from USB to iPhone/iPad easily and quickly.
A portable storage device like a USB flash drive is commonly used to store frequently used files, such as photos, documents, and more. Transferring files between a USB and a computer or other devices is also a common practice.
According to the information collected, one of the data transfer needs related to a USB is to transfer photos from a USB to iPhone/iPad. Given that, here I'd like to show you five proven ways how to transfer photos from USB to iPhone/iPad, either with or without iTunes.
- Part 1. Transfer Photos from USB to iPhone Without iTunes in 3 Ways
- Part 2. Copy Photos from USB to iPhone Using iTunes
- Part 3. Transfer Photos from Flash Drive to iPhone Without Computer
Part 1. How to Transfer Photos from USB to iPhone Without iTunes
To transfer photos from a USB flash drive to your iPhone or iPad without syncing, you can use a third-party app or a USB adapter that connects your flash drive to your device. This method allows you to transfer photos without syncing your device with iTunes, which can result in data loss. Instead, you can use an app like iMazing or PhoneView to transfer photos from your flash drive to your iPhone or iPad, or use a USB adapter that connects your flash drive to your device and allows you to transfer photos directly. This way, you can safely transfer your photos without losing any data.
Method 1. How to Put Photos from USB to iPhone with iOS Data Transfer Software
To transfer photos from a USB flash drive to an iPhone without using iTunes, you can use software specifically designed for iOS data transfer, such as Qiling MobiMover. This tool allows you to easily move photos and other data from your flash drive to your iPhone, providing a convenient alternative to using iTunes.
- Transfer files between an iPhone/iPad and a computer
- Transfer data from one iPhone/iPad to another
- Manage iOS content from the computer
- To download videos from YouTube or other sites to a computer or iPhone/iPad, you can use a video downloader software or app. Some popular options include 4K Video Downloader, YouTube Video Downloader, and Video Downloader Pro.
To transfer files between an external storage device, such as a USB flash drive, memory card, or external hard drive, and an iPhone or iPad, you can use Qiling MobiMover. This tool allows you to connect an external device to your computer, making it easy to transfer files like photos, videos, music, and more between the two devices.
To transfer photos from a USB device to an iPhone or iPad without using iTunes, you can use the Photos app on your iOS device. Simply connect the USB device to your iPhone or iPad using a Lightning to USB adapter, and then open the Photos app.
Step 1. To transfer files from your computer to your iPhone or iPad, connect your USB and device to your computer, either a Mac or PC. Launch Qiling MobiMover, select "PC to Phone", and click "Select Files" to begin the transfer process.
Step 2. To import photos from your computer to your iPhone or iPad, go to your flash drive on the computer, select the images you want to import, and click the "Open" button to proceed. You can import one or multiple photos at once.
Step 3. When you select a folder to transfer files to your iPhone/iPad, MobiMover will automatically load all supported file types. Check the desired category/categories and click the "Transfer" button to start the transfer process. Once finished, head to your iOS device's "Photos" app to verify the transferred items.
You can copy photos from a USB to your iPhone or iPad using a USB cable, and any other supported items on the USB can also be copied without any data loss.
Qiling MobiMover allows you to transfer iPhone photos to a computer or external storage device, making it easy to back up your photos.
Apply the steps above to arrange the pictures on your iPhone or iPad as desired. This allows you to customize the layout and organization of your photos to suit your preferences.
Method 2. How to Get Photos from USB Flash Drive to iPhone with iCloud
Cloud storage services like iCloud, Dropbox, and Google Photos allow you to share files between devices, including phones, tablets, and computers. This means you can transfer files between a USB flash drive and an iPhone/iPad by using a computer as an intermediary, leveraging cloud services to facilitate the transfer.
iCloud syncs files across devices via Wi-Fi, but it requires the same Apple ID to be signed in on each device, and a stable network connection for smooth operation.
To transfer photos from a flash drive to an iPhone or iPad, you can use the camera roll app on the device. First, connect the flash drive to the device using a USB adapter.
Step 1. Connect the USB flash drive or other external storage devices to your computer with a USB cable.
Step 2. To upload photos from a USB drive to iCloud on a PC, insert the USB drive into your computer. Open the Photos app and select the photos you want to upload. Alternatively, you can also use the File Explorer to navigate to the USB drive, select the photos, and then drag and drop them into the Photos app. Once the photos are selected, click on the "Upload to iCloud" button in the Photos app.
- If you have iCloud for Windows installed, go to the iCloud settings, select "Photos", and enable "iCloud Photo Library" and "Download new photos and videos to my PC". Then, under the latter option, click "Change" to specify the folder on your USB where you want to transfer the images.
- If you didn't install iCloud, go to iCloud.com, sign in with the Apple ID you use on your iPhone, choose "Photos", and click the "Upload photos" icon to select the photos on your USB to upload.
Step 3. To enable iCloud Photos on your iPhone or iPad, go to Settings, tap your name, select iCloud, and then toggle on iCloud Photos. This may take some time to sync, but once complete, your photos will be accessible in the Photos app on your mobile device.
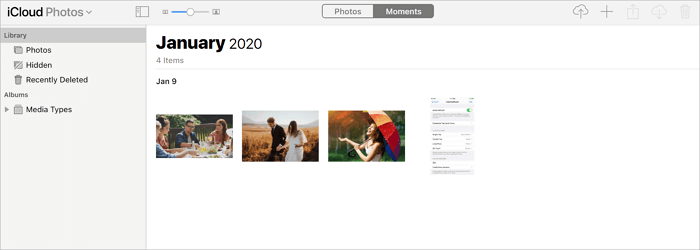
If iCloud Photos are not syncing on your iPhone, learn how to fix it from the guide.
You need to download and install software on your devices, then upload photos to the cloud service from a USB drive using a computer, and finally, download the items from the cloud service to the target device.
Method 3. How to Transfer Photos from USB to iPhone via Email
You can transfer photos from a USB to your iPhone or iPad by sending yourself an email with the photos as attachments, without needing to connect your device to a computer or download any software. This method allows for a free and easy way to import photos wirelessly.
Step 1. To transfer photos, create an email and add the desired photos as attachments. This method allows you to share multiple images at once, making it efficient for large collections or shared albums.
Step 2. Send the email to your account.
Step 3. Open the email on your iPhone or iPad and click on the attachments to download them to your device.
Transferring pictures via email can be a convenient option, but it's not ideal for large quantities, as it can be time-consuming. However, for a small number of items, using an email is a good choice.
Part 2. How to Transfer Photos from USB to iPhone Using iTunes
If data syncing is acceptable for you, you may prefer to import photos from USB to your iPhone using iTunes. This method allows you to transfer photos from your computer to your iPhone, and it also syncs any changes you make to the photos on your iPhone with the original files on your computer.
To transfer photos from a flash drive to an iPhone or iPad using iTunes, simply connect the flash drive to your computer, open iTunes, select the device you want to transfer photos to, click on the 'Photos' tab, and select the photos you want to transfer from the flash drive. Once you've selected the photos, click 'Sync' to transfer them to your iPhone or iPad.
Step 1. Connect your iPhone/iPad and the USB to your computer.
Step 2. Run iTunes if it doesn't open automatically.
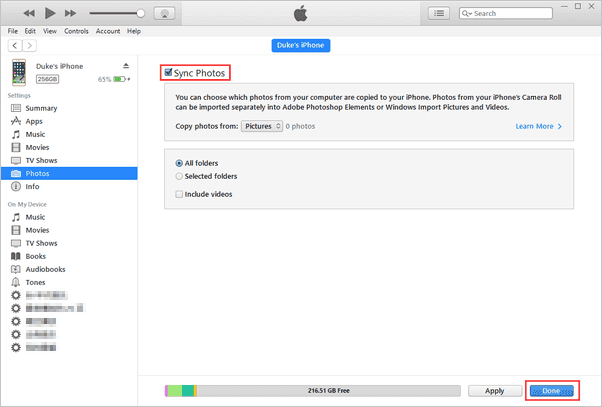
Step 3. If your iPhone is not connecting to iTunes, you need to solve the problem before you continue, then click the "Device" tab and select "Photos" to sync your iPhone photos with your computer.
Step 4. Check "Sync Photos" and select the photos you want to transfer on your USB from the option "Copy photos from".
Step 5. To sync photos from a USB flash drive to your iPhone or iPad, click the "Apply" button to initiate the process.
Part 3. How to Transfer Photos from USB to iPhone Without Computer
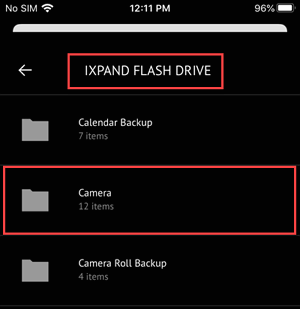
If your USB flash drive has a Type C hub, you can transfer photos directly to your iPhone without a computer by downloading an app that supports data sharing on your iPhone.
The app you need to use a USB flash drive on an iOS device depends on the specific drive you have, such as the SanDisk iXpand, which requires the iXpand Drive app to be downloaded and installed.
Fortunately, the process of transferring photos from a USB device to an iPhone is relatively straightforward, regardless of the app being used, and involves similar steps.
To transfer photos from a USB drive to an iPhone without a computer, you can use the Camera app or the Photos app on your iPhone. First, insert the USB drive into your iPhone using a USB adapter or a Lightning cable.
Step 1. Download and install the data transfer app on your iPhone.
Step 2. Connect the USB flash drive to your iPhone directly.
Step 3. When you see the options to transfer data, select to copy files from the USB. This will allow you to transfer all the data from the USB to your computer.
Step 4. Select the type of content you want to transfer, namely photos in this case.
Step 5. Select the pictures you need to copy and click "Copy to iPhone" to move photos from USB to iPhone.
The Bottom Line
Here are the five proven ways to transfer pictures from USB to iPhone or iPad in a short paragraph:
- Qiling MobiMover allows you to transfer all pictures from a USB flash drive to an iOS device without needing to install iTunes.
- Cloud storage services like iCloud allow you to send photos wirelessly, eliminating the need for cables or physical transfers.
- Using an email is quite convenient for small export jobs, as it allows for easy and quick communication of a few items.
- If you don't mind syncing your data, iTunes is also an option.
- A USB flash drive for iPhone allows you to transfer photos from the drive to your iPhone without needing a computer.
If you need to transfer photos from your computer to your iPhone, you can use the Photos app on your computer and select the photos you want to transfer. Alternatively, you can use a cloud service like Google Photos or iCloud to upload your photos to the cloud and then access them on your iPhone.
FAQs
1. How to transfer photos from iPhone to computer without USB?
If there is no USB available, you can use cloud services like iCloud or Google Photos, upload your photos to them, sign in on your computer, and then download the synced pictures.
2. How do I transfer files from Windows to iPhone?
Transferring files from Windows to iPhone can be done through various methods, including iTunes, iPhone data transfer software, or cloud services. Each option has its advantages and disadvantages, allowing you to choose the best fit based on your specific needs.
3. How to transfer music from USB to iPhone without a computer?
You can transfer music from a USB to an iPhone without a computer by using cloud services like Dropbox, Amazon Music, or Google Play Music. Simply connect your USB to your computer, upload the music files, and then access the cloud service on your iPhone to sync the data.
Related Articles
- 5 Best iTunes Alternatives for iPhone Data Management
- How to Transfer Music from iPhone to Computer in 4 Ways
- How to Wipe Seagate External Hard Drive Securely in Windows 10, 8, 7?
Need to wipe Seagate external hard drive to protect sensitive data from leakage? Here comes the best software to secure erase Seagate external hard drive. - How to Write Zeros to a Hard Drive Effortlessly?
This tutorial presents how to write zeros to a hard drive with two efficient solutions and dwells on the Write Zero method for erasing data.