How to Transfer Videos from iPad to Computer in 4 Ways
Transferring videos from your iPad to your PC can be done easily with four simple methods. Firstly, you can use the built-in iTunes to sync your iPad and PC, allowing you to transfer videos and other files between devices.
Users can transfer videos from PC to iPad or vice versa using various methods such as iTunes, iCloud, or third-party software like AnyTrans or iMazing. These tools allow users to export videos from their iPad to a computer, making it convenient for data transfer and online video editing.
If you're unsure about how to transfer videos from your iPad to your computer, don't worry - I've got you covered. There are four simple ways to do this without using iTunes.
- Transfer Videos from iPad to PC with Qiling MobiMover
- Get Videos from iPad to Computer with Windows File Explorer
- Upload iPad Videos to Computer with iCloud
- Transfer Videos from iPad to Computer via VLC
Method 1. How to Transfer Videos from iPad to PC with Qiling MobiMover
Qiling MobiMover is a software that allows for flexible video transfer from iPad to computer, providing solutions for transferring videos taken by the iPad camera, downloaded movies, and saved TV shows. This data transfer tool enables users to easily get their iPad videos onto their computer.
Qiling MobiMover can be used to transfer data between iOS devices, transfer data from iOS device to computer, and transfer data from computer to iOS device. It can also be used to transfer data from Android device to computer, and transfer data from computer to Android device. Additionally, it can be used to transfer data from iOS device to Android device, and transfer data from Android device to iOS device.
- Transfer files between an iPhone/iPad/iPod Touch and a computer
- Transfer files from one iPhone/iPad/iPod Touch to another
- Organize and access various digital content, including photos, videos, music, e-books, contacts, messages, and more, directly from a computer.
The device also features video download capabilities, allowing users to download online videos/music from popular platforms like YouTube, SoundCloud, Twitter, and Facebook, and save them to a computer or iPhone/iPad.
To transfer videos from iPad to PC (or Mac) with Qiling MobiMover, simply connect your iPad to your computer using a USB cable. The software will automatically detect your device and display a user-friendly interface.
Step 1. To connect your iPad to your PC, start by clicking "Trust" in the pop-up on your iPad to trust the computer. Then, launch Qiling MobiMover and navigate to "Content Management" > "Videos" > "Movies/TV/Music Video".
Step 2. When transferring files from an iDevice to a computer, they are initially stored on the desktop. If you'd like to save them to a custom location, go to the "More" option, then "Settings" and select the desired path.
Step 3. Select the desired videos on your iPad, then choose the "Transfer to PC" option, which will instantly transfer the selected videos from your iPad to your computer. Once the transfer is complete, you can check the copied items in the selected folder on your computer.
To upload iPad videos to your computer, follow these steps: open the TV, Videos, or Movies app, select the video you want to upload, and choose "Save to Files" or "Save Video" to save it to your iPad's Files app. From there, you can access the video through the Photos app on your iPad, or use the "Pictures" option to upload the video to your computer. Alternatively, if you saved the video in the Photos app, you can choose "Pictures" instead of "Videos" to upload the video to your computer.
Method 2. How to Transfer Videos from iPad to Computer via File Explorer
To transfer files from iPad to PC via USB, you can use the Windows File Explorer on your PC to connect and access your iPad's files, allowing you to easily move videos from the Photos app on your iPad to your PC.
By connecting your iOS device to a Windows PC, you can access and read your iPad's internal storage, allowing you to view and import photos and videos from your iPad to your PC using drag-and-drop or copy-and-paste methods.
To transfer videos from iPad to computer with File Explorer:
Step 1. Connect your iPad to the computer with a USB cable.
Step 2. Unlock your iOS device and trust the computer.
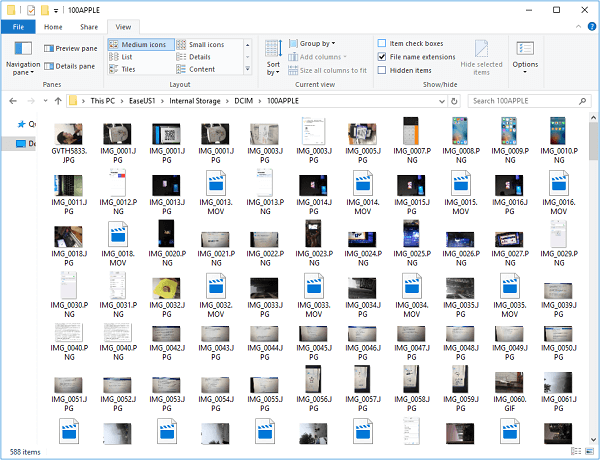
Step 3. To view the photos and videos on your iPad, go to "This PC" and then click on "Apple iPad" under the "This PC" section. Next, navigate to "Internal Storage" and then select "DCIM".
Step 4. To transfer videos from an iPad to a PC, you can simply drag and drop or copy and paste the desired videos into a folder on your computer.
This method is also a solution to transfer photos from iPhone to PC without iTunes.
If you're using Windows 8 or later, you can import videos from your iPad to your computer using the Photos app. You can follow the steps outlined in the guide on transferring photos from an iPhone to a computer, which also applies to importing videos from an iPad.
Method 3. How to Get Videos from iPad to Computer using iCloud
If you don't have a USB cable available, you can transfer videos from your iPad to your computer wirelessly over Wi-Fi using iCloud. This cloud storage service allows you to access your files from all your devices, including your PC, making it easy to share and transfer videos between your iPad and computer.
You can't selectively sync videos from your iPad to your computer using iCloud, as it syncs all photos and videos.
To upload iPad videos to computer via iCloud:
Step 1. On the iPad, go to Settings, then tap on your name, followed by iCloud, then Photos, and finally enable iCloud Photos.
Step 2. On a Windows PC, you have two ways to transfer videos from your iPad to your computer.
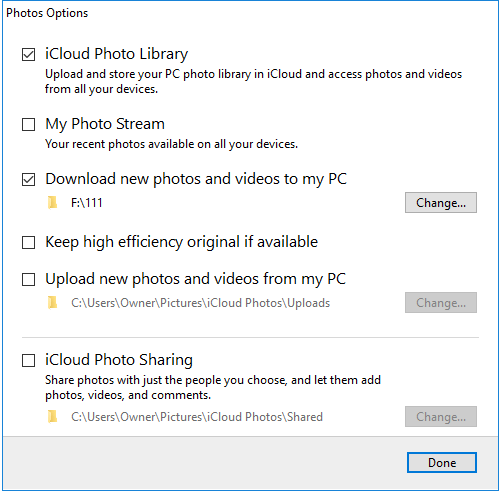
- If you have iCloud for Windows installed, go to the iCloud settings and select the option to download new photos and videos to your PC, and they will be automatically saved to the folder you've chosen.
- If you don't have iCloud for Windows, go to iCloud.com, sign in with your Apple ID, select "Photos", and download the videos from your iPad to your computer.
iCloud is also helpful for transferring files from iPad to PC, but there are other cloud storage options available, such as Dropbox, OneDrive, and Google Drive, that can also be used to transfer videos from iPad to computer.
Method 4. How to Upload iPad Videos to Computer with VLC
VLC, a media player, is available on multiple platforms, including Windows, iOS, and Android. The VLC mobile app on an iPad allows for wireless file transfer between iPad and iPhone, or vice versa, as long as devices are connected to the same network.
The steps for this method are relatively complicated compared to the last three methods. However, since it's completely free and VLC works well for transferring videos from a Windows PC to an iPhone or iPad, you may still prefer this solution.
To transfer videos from iPad to computer via VLC:
Step 1. Download and install the VLC mobile app on your iPad from the App Store.
Step 2. To transfer videos, go to the "Photos" app and select the videos you want to move.
Step 3. To save a video to your iPad using VLC, click the "Share" button and select "Save to Files" > "On My iPad" > "VLC".
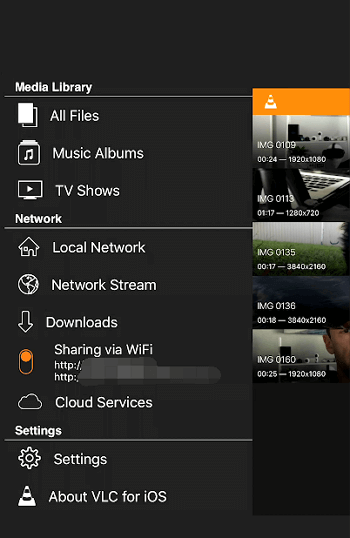
Step 4. Open the VLC app and click the VLC icon in the top left corner to enable "Sharing via WiFi", remembering the IP address that appears under the option.
Step 5. To access shared videos from your iPad on your computer, open a browser and enter the IP address of your iPad. This will display the shared videos available for viewing.
Step 6. To download videos from your iPad to a computer, click to play the video, right-click the video playing window and select "Save Video as" to save the video to your computer.
The Bottom Line
The main difference between using Qiling MobiMover and the other three methods is that it allows you to transfer videos from the Photos app, movies, TV shows, and music videos, whereas the others only support transferring videos from the iPad camera roll. You should choose the method that best fits your needs.
Related Articles
- How to Transfer Calendar from iPhone to Mac in 2 Ways
- How to Transfer Music from iPhone to Mac for Free
- Best Free Alternative to XXClone for Windows 10/8/7
You will find the best alternative to XXClone and XXClone Pro alternative, just see the details to clone hard drive to SSD without losing data in Windows 10, 8, 7. - Best XXCopy Alternative for Windows 11/10/8/7 [Free]
Looking for XXCopy similar software in Windows? Read this article carefully to get the best free alternative to XXCopy and detailed steps of using it.