How to Transfer Contacts from iPhone to Mac with or Without iCloud
Quick Navigation:
- Way 1. Import Contacts from iPhone to Mac without iCloud via Qiling MobiMover
- Way 2. Sync iPhone Contacts from iPhone to Mac with iCloud
- Way 3. Import Contacts from iPhone to Mac via iTunes/Finder
- Way 4. Get Contacts from iPhone to Mac Using AirDrop
- Way 5. Transfer Contacts from iPhone to Mac via Gmail
- The Bottom Line
"How do I transfer my contacts from iPhone to Mac?"
Your iPhone stores important contacts for family, friends, colleagues, or business partners. To prevent losing this crucial information, you may want to make a copy of them on a computer, whether it's a Mac or PC, so you can easily retrieve them if data loss occurs.
If you're wondering how to import contacts from your iPhone to your Mac, don't worry - we've got you covered. We've already detailed the ways to get iPhone contacts to PC, and now we're sharing five ways to transfer contacts from iPhone to Mac. Whether you're looking for a solution to your own question or just want to know your options, this article will provide the answers you need.
Way 1. Import Contacts from iPhone to Mac without iCloud via Qiling MobiMover
Syncing contacts from iPhone to Mac can be done without using iCloud, especially when it's not working or has storage limits. A convenient alternative is using Qiling MobiMover, a software that allows iOS data transfer. With it, you can easily import contacts from iPhone to Mac.
- Transfer files from iPhone/iPad to computer
- Copy files from computer to iPhone/iPad
- Transfer data from one iPhone/iPad to another
- Batch convert HEIC pictures to JPG
Qiling MobiMover supports various file types, including contacts, photos, videos, music, ringtones, messages, and books, making it a versatile tool for syncing and transferring data between devices. Whether you need to sync contacts from iPhone to Mac without iCloud or transfer photos from one iPhone to another, MobiMover can help.
To import contacts from iPhone to Mac without iCloud:
Step 1. To use Qiling MobiMover for Mac, launch the software on your computer, connect your iPhone to your Mac, unlock your iPhone and click "Trust" to allow the connection, then select the "Phone to Mac" option and click "Next" to proceed.
Step 2. To transfer contacts from an iPhone or iPad to a Mac, go to "Contacts" on your Mac, click on the default storage path, select a custom path to store the contacts, and then click "Transfer" to start the transfer process.
Step 3. When the transfer process is complete, you can view the contacts on your Mac. The contacts will be saved as an HTML, CSV, or VCF file, depending on your settings.
Way 2. Sync iPhone Contacts from iPhone to Mac with iCloud
To transfer iPhone contacts to Mac using iCloud, set up iCloud on your iPhone by going to Settings, then tapping on your name and selecting "iCloud". On your Mac, go to System Preferences, then click on Apple ID, and select "iCloud". Make sure the "Contacts" option is enabled. This will sync your iPhone contacts to your Mac, allowing you to access them on your computer.
To sync all iPhone contacts to your Mac via the iCloud application, follow these steps:
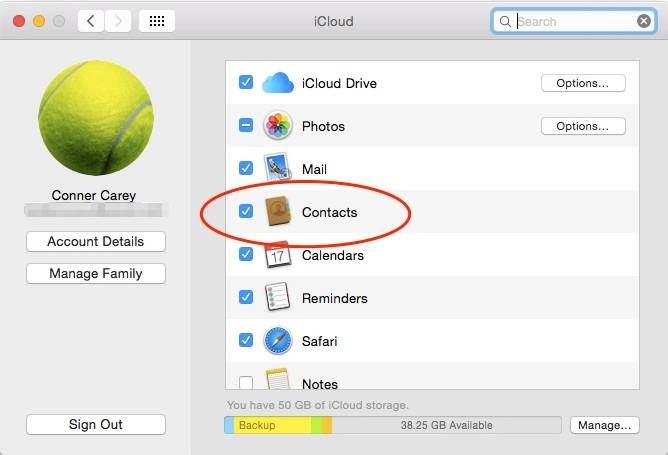
Step 1. To sync your iPhone contacts with iCloud, go to Settings > [your name] > iCloud and toggle the switch next to "Contacts" to the right, enabling it.
Step 2. To enable iCloud on your Mac and sync it with your iPhone, click the Apple menu and select "System Preferences", then choose "iCloud" and sign in with the same Apple ID used on your iPhone.
Step 3. Check "Contacts" and click "Manage." This will import contacts to your Mac, and once finished, you can view them in the Contacts app on your Mac.
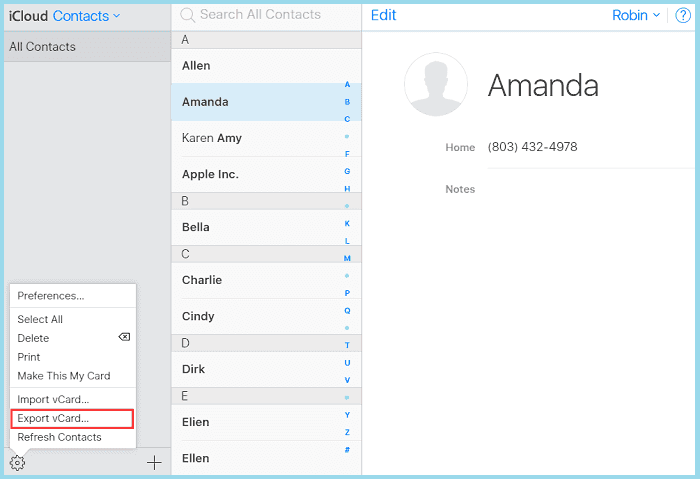
You can transfer specific iPhone contacts to your Mac via the iCloud website by following these steps: Sign in to your iCloud account on the website, select the contacts you want to transfer by checking the boxes next to them, and then click the "Select" button. Once selected, click the "Share" button and choose the "Export vCard" option.
Step 1. Enable iCloud Contacts on your iPhone.
Step 2. To access your iCloud account on your Mac, visit iCloud.com and sign in with the same Apple ID you use on your iOS device.
Step 3. Choose "Contacts" among the options.
Step 4. To sync contacts from your iPhone to your Mac, select the contacts you'd like to sync and go to "Settings" > "Export vCard."
Note: Syncing iPhone contacts with Mac can be problematic due to issues such as unstable network connections, insufficient iCloud storage, or improper iCloud settings. If you're experiencing problems, there are tips available to help you resolve the issue.
Way 3. Import Contacts from iPhone to Mac via iTunes/Finder
Here are the steps to sync contacts from iPhone to Mac using iTunes or Finder: On macOS Mojave and earlier, open iTunes, select your iPhone, and click on "Info" tab. Then, select "Sync Contacts with" and choose your Mac. On macOS Catalina or later, open Finder, select your iPhone, and click on "Info" tab. Then, select "Sync Contacts with" and choose your Mac. Follow the on-screen instructions to complete the sync process.
To sync contacts from iPhone to Mac with iTunes:
Step 1. Connect your iPhone to your Mac via a USB cable.
Step 2. Open iTunes on your Mac.
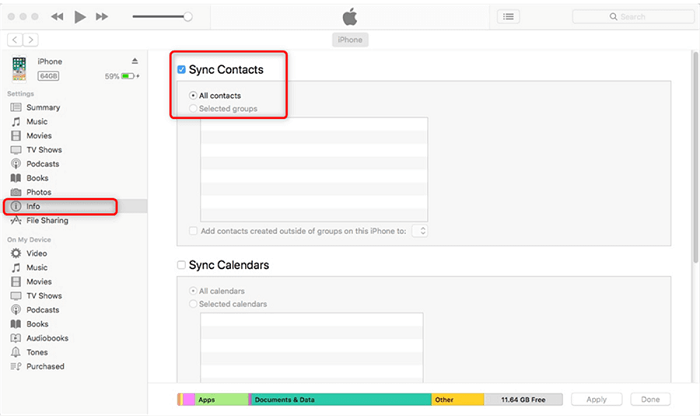
Step 3. Click "Info" in the sidebar.
Step 4. Tick the box next to "Sync Contacts."
Step 5. Click "Apply" to start syncing.
To sync contacts from iPhone to Mac with Finder:
Step 1. Connect your iPhone to your Mac and launch Finder.
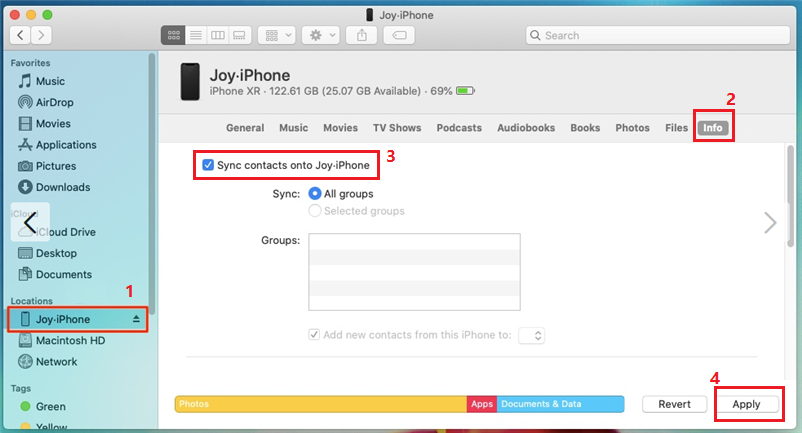
Step 2. From the left sidebar, click on your iPhone name.
Step 3. Click on trust both in the Finder window and on your iPhone.
Step 4. To sync contacts onto your iPhone, go to the "Info" section and select the box next to "Sync contacts onto [your iPhone's name]" and then click "Apply."
Way 4. Get Contacts from iPhone to Mac Using AirDrop
AirDrop is a pre-AirDrop is a feature that allows users to share files between Apple devices, such as iPhones, iPads, iPods, and Macs, without the need for cables or software installation.
Now, make sure both Wi-To transfer contacts from iPhone to Mac, ensure that Bluetooth and Wi-Fi are working properly on both devices. Then, follow these steps: use AirDrop to share your iPhone contacts with your Mac.
Notes: AirDrop only allows one-to-one contact syncing, making it impractical for transferring multiple contacts at once. For a more efficient experience, consider using Qiling MobiMover to transfer multiple items simultaneously.
To get iPhone contacts to Mac:
Step 1. Make sure your devices are within both Bluetooth and Wi-Fi range. Your phone, tablet, or computer needs to be close enough to the speaker or device you're trying to connect to for the Bluetooth and Wi-Fi signals to reach it.
Step 2. Turn on AirDrop on your iPhone.
- To open the "Control Center" on your iPhone, swipe up from the bottom of the screen or down from the top of the screen.
- Enable Bluetooth and Wi-Fi on your device, then turn on AirDrop to share files.
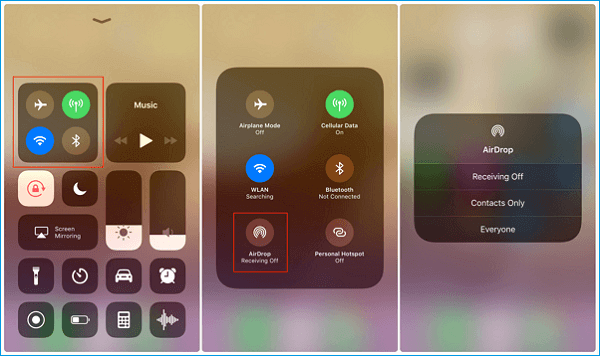
Step 3. Turn on AirDrop on Mac.
- Go to "Finder" > "Go" > "AirDrop".
- In the AirDrop window, select the option to be discovered by either "Contacts Only" or "Everyone."
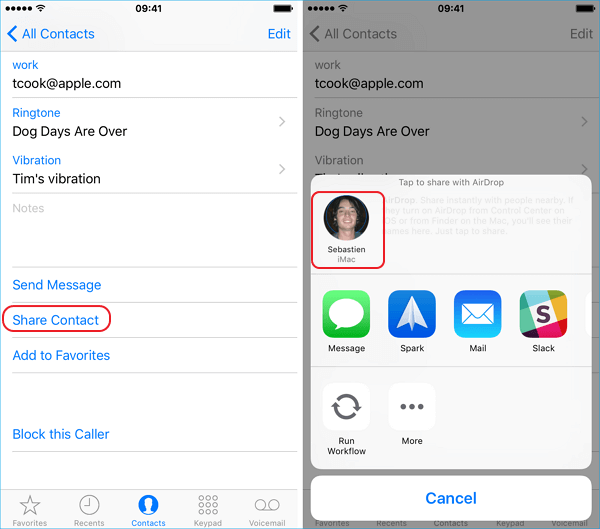
Step 4. Send contacts from iPhone to Mac.
- Open the "Phone" app and click "Contacts."
- To share a contact, tap the contact you want to share and choose "Share Contact."
- In the prompt, choose "AirDrop" > [your Mac's name].
- On the Mac, click "Accept" to receive the item.
To check the contact in Contacts on your Mac, open the Contacts app, click on the "Contacts" tab, and look for the contact you want to verify. You can search for the contact by name, email, or phone number.
Way 5. Transfer Contacts from iPhone to Mac via Gmail
Transferring contacts from iPhone to Mac can be done by syncing iPhone contacts to Gmail and then exporting contacts from Google Contacts to your Mac. This method may not be straightforward, but it is a workable way to sync contacts from iPhone to Mac.
To transfer contacts from iPhone to Mac :
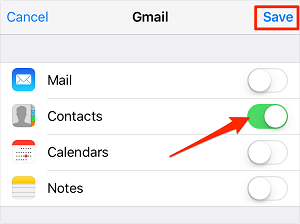
Step 1. Go to the "Settings" app on your iPhone.
Step 2. Scroll down to choose "Passwords & Accounts."
Step 3. Click "Add Account" and tap on "Google."
Step 4. Enter the information required to add your Gmail account and click "Next."
Step 5. Once your account is successfully verified, click "Save."
Step 6. To sync your iPhone contacts to Gmail, turn on "Contacts" and then save the changes.
Step 7. Sign in to Google Contacts with your account credentials, which are the same credentials you use on your iPhone. This will allow you to access your contacts on Google and sync them with your iPhone.
Step 8. To export contacts from your device, select the contacts you want to import to your Mac and choose "Export."
Step 9. To export iPhone contacts to Mac, open a new window, select "Selected contacts" and choose the desired format, then click "Export" to transfer your contacts.
The Bottom Line
Syncing contacts from iPhone to Mac is easy, with five ways to choose from. Whether you want to import contacts without using iCloud or get iPhone contacts to Mac wirelessly, there's a solution for you. You can apply the one that best suits your needs to transfer contacts from your iPhone to your Mac with just a few clicks.
Related Articles
- How to Transfer Photos from iPhone to Flash Drive on Mac
- How to Transfer Contacts from One Apple ID to Another
- How to Transfer Text Messages from iPhone to Computer for Free
- How to Transfer Music from Mac to iPhone With or Without iTunes