Want to Invert Colors on iPhone 8/8 Plus? Easy Way Here!
To make your iPhone 8 or iPhone 8 Plus more eye-friendly, you can invert colors or enable Dark Mode in iOS 11. This can be achieved by following a few simple steps, which are detailed in this blog. Additionally, common problems such as a non-working touch screen are also addressed, providing solutions to help you cope with these issues. By following the steps outlined, you can easily invert colors or turn on Dark Mode on your iPhone or iPad, making it more comfortable to use.
How to invert colors on iPhone 8/iPhone 8 Plus
To turn on Dark Mode in iOS 11, go to Settings App on your iPhone/iPad, and follow the same steps as turning on iMessages. The Invert Color option in iOS 11 is different from the option in iOS 10, and to invert colors on your iPhone 8/8 Plus, follow the steps to apply the changes.
Step 1: Go to the Settings App on your iPhone 8/iPhone 8 Plus and choose General.
Step 2: Tap on Accessibility and click Display Accommodations in VISION section.
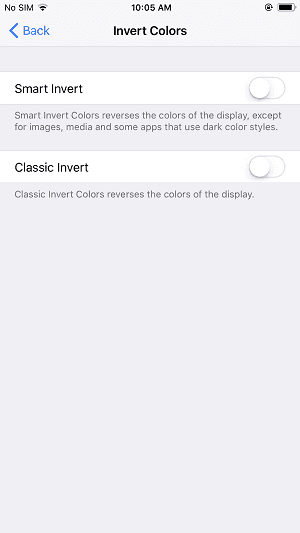
Step 3: Tap on Invert Colors and you will see two options, Smart Invert and Classic Invert.
Step 4: The Smart Invert feature reverses the colors of the display, except for images, media, and some Apps that use dart color styles, while the Classic Invert reverses the colors of the display.
Step 5: To invert colors on your iPhone 8/iPhone 8 Plus, toggle on Smart Invert or Classic Invert according to your needs. This is the final step to invert colors on your iPhone 8/iPhone 8 Plus.
Notes:
Want to sync data to your new iPhone 8 or iPhone 8 Plus from computer or other iDevices? MobiMover Free, a completely free iOS data transfer software, can help you transfer files between iOS devices or between iOS device and computer without any cost. With MobiMover installed on your PC, you can transfer photos, movies, TV shows, music, ringtones, audiobooks, contacts, messages and more, and also use it as a free iPhone content manager to manage your files. This software can also serve as a backup solution to prevent data loss by backing up the data on your old iPhone. Check the guides on how to transfer data from one iPhone to another or from old iPhone to new iPhone without iCloud.
Step 1.Connect two iPhones to your computer using compatible USB cables and tap "Trust This Computer" on each device. Run Qiling MobiMover, select "Phone to Phone", and determine the transfer direction. Click "Next" to proceed.
Step 2.With MobiMover, you can transfer various types of files from one iPhone to another without using iCloud, including photos, videos, music, contacts, notes, and messages. To transfer data, simply choose the desired files, click "Transfer", and the process will be completed without any hassle. However, if you encounter data types that are not allowed to be transferred, such as contacts, notes, or messages, please turn off the iCloud service for these apps first.
Step 3.Wait for the syncing process to complete, then check the content in the related apps.
Related Articles
- iPhone Playlists Not Showing up in iTunes? Fixed Here!
- Practical Fixes | iPhone Videos Won't Play on Windows 10 PC
- How to Solve Convert to Basic Disk Greyed Out Question?
When you use Disk Management, you'll find the option Convert to Basic Disk is greyed out. How to convert dynamic disk to basic? Here you can find the solution. - Effective Ways to Repair Invalid Dynamic Disk without Data Loss Using CMD
How to repair invalid dynamic disk without data loss using CMD in Windows 7/8/10/11? Effective ways are provided in this article for you to reactivate invalid dynamic disk.