iPhone Playlists Not Showing up in iTunes? Fixed Here!
Quick Navigation:
- How to fix iPhone playlists not showing up in iTunes
- Bonus Tips: How to transfer playlist songs from iPhone to computer without iTunes
The issue you're experiencing is due to the way Apple handles playlist syncing between iTunes and an iPhone. When you create a playlist on your iPhone, it's stored locally on the device and not synced with iTunes. This is because the playlist is created using the iPhone's Music app, which has its own database of playlists that are separate from the ones stored in iTunes. On the other hand, when you create a playlist in iTunes and transfer it to your iPhone, it's synced with the iPhone's Music app, which is why you see it in both iTunes and your iPhone. However, when you add new songs to that playlist on your iPhone, it's not synced back to iTunes, which is why you don't see the updated playlist in iTunes. To resolve this, you can try syncing your iPhone with iTunes and then selecting the "Update" option to sync the playlists.
If you're having trouble seeing your iPhone playlists in iTunes, you can try syncing your iPhone with iTunes, updating iTunes to the latest version, or checking your iPhone for any software updates. You can also try selecting the correct playlist library in iTunes, or using a third-party app to transfer your playlists. Additionally, you can try deleting and re-adding the playlist on your iPhone, or checking the playlist settings on your iPhone. If none of these solutions work, you can try restoring your iPhone to its factory settings. However, this should be a last resort and you should back up your data before doing so.
How to fix iPhone playlists not showing up in iTunes
Having trouble seeing your iPhone playlists in iTunes? Don't worry, this issue is more common than you think, and there are some easy fixes to resolve it.
1.Connect your iPhone to the computer. To sync music in iTunes, open the app and ensure it's set to sync music. Then, apply all settings and click the Sync button.
2. 1) Open iTunes. 2) Click "Check for updates..." in the top menu. 3) Once the update is complete, click "iTunes" in the top menu and select "Preferences".
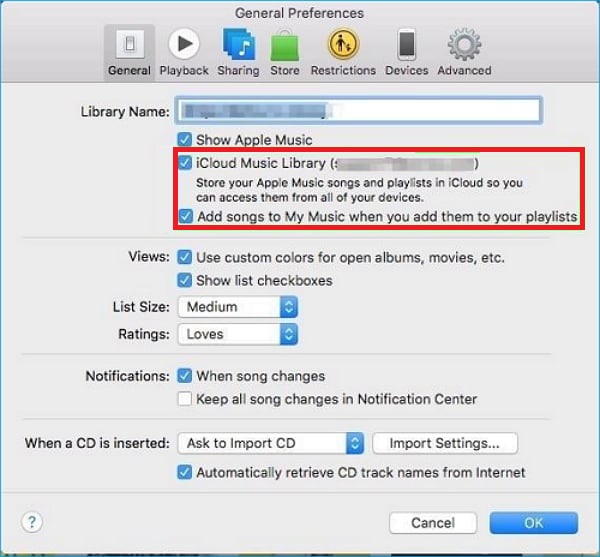
3. To enable iCloud Music Library, go to Settings > Music, then click "General" and select "iCloud Music Library" (Your Apple Music account) and "Add songs to My Music when you add them to your playlist".
4. To finish the settings, click "OK" and then return to the main interface of iTunes.
5. To access your iPhone playlists in iTunes, click the iPhone device button, which will allow you to view your playlists under the "My Music Playlists" section.
Bonus Tips: How to transfer playlist songs from iPhone to computer without iTunes
iPhone playlists contain your favorite songs, and it's essential to back them up to your computer on a schedule using a free iPhone data transfer tool to avoid losing them in case of an accident. You can use Qiling MobiMover Free, a popular and reliable software that allows you to transfer data from iPhone to PC without iTunes, and supports transferring playlists, as well as other files such as contacts, messages, notes, calendars, voice mails, books, Safari bookmarks & history, photos, movies, videos, music, ringtones, and audiobooks.
Step 1.To transfer music from your iPhone to your PC/Mac, connect your iPhone to your computer and run Qiling MobiMover. Tap "Trust" on your iPhone if prompted, then click on "Content Management" and select "Audio" followed by "Music".
Step 2.To transfer your desired songs, select them first, then choose a safe location on your PC to transfer them to. Alternatively, navigate to a new and secure location on your PC to transfer and save the selected songs by clicking "Settings" at the top right corner.
Step 3.To complete the process, click "Transfer to PC" and then wait until the transferring process is finished.
Related Articles
- Complete Guide | How to Delete Books from iBooks on iPhone/iPad and Mac
- Workaround | Samsung Laptop Recovery Not Working in Windows
You can try alternatives to restore system when your Samsung laptop recovery not working due to deleted or damaged recovery partition. - Cannot Convert Partition Between Primary and Logical
Situations that a partition cannot be converted to primary/logical. - Can not Merge Partitions
Solution for cannot merge partitions