How to Fix iOS 12/11 Screen Recording Not Working/Saving
Apple's iOS updates often bring new features, some of which can be significant breakthroughs. One such feature is the screen recording function, which allows users to record their iPhone's screen without time limits, capturing everything from Snapchat to in-app operations. However, many users have reported issues with the screen recording feature not working properly, including no sound, on iOS 11 and iOS 12. If you're experiencing these problems, follow the guides below to troubleshoot and get the feature working on your iPhone 6/6S/6S Plus/7/7 Plus/8/8 Plus/X and other devices.
- To fix the issue of no sound when screen recording on an iPhone running iOS 11, try restarting your iPhone, checking that the app you're recording is playing sound, and making sure that the microphone is not muted or set to "Do Not Disturb". Additionally, ensure that the "Record" button is pressed while the app is playing sound, as the recording will only capture audio if the button is pressed. If the issue persists, try updating your iPhone to the latest iOS version or resetting all settings to their default values.
- If you're experiencing issues with screen recording not working or saving on your iOS 11/12 device, here are some potential solutions to try:
- Screen recording not saving
- iPhone getting hot when screen recording
- Screen recorder crashes
How to fix iOS 12/11 screen recording (audio) not working
Part 1How to fix iOS 12/11 screen recording no sound on iPhone/iPad
Method 1. Turn on the Microphone Audio
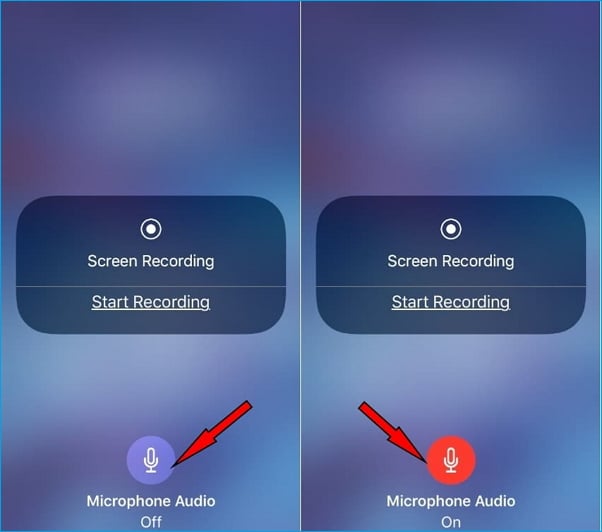
If Screen Recording isn't capturing audio, check if you've turned off microphone audio.
Step 1: Go into the Control Centre and find the Screen Record icon.
Step 2: Press & hold on the Screen Recording button until you see a pop-up with Microphone audio option.
Step 3: Tap Microphoneicon to turn Audio On in red color.
If the microphone is on and screen recording no sound still, you can try to turn it off and on for several times. If the problem can't be solved in this way, try to restart your computer. If the problem still can't be solved, please check your microphone settings or contact the customer service for further assistance.
Method 2. Restart your iPhone/iPad
If the screen recording is still not working after ensuring it's turned on, try restarting your device to resolve the iOS 11/12 screen recording not working issue.
Restart iPhone 8/iPhone 7: To turn off your iPhone, press and hold the Side button until the slider appears. Then, drag the slider to the right to turn off your iPhone. Wait for 30 seconds, then press and hold the Side button again until the Apple logo appears. This will turn your iPhone back on.
Restart iPhone X: To turn off your iPhone X, press and hold the Side button and either volume button simultaneously until the slider appears. Then, drag the slider to the right to turn off your iPhone. Wait for about 30 seconds and press and hold the Side button again to turn it back on. The Apple logo will appear on the screen.
Method 3. Reset All Settings
Resetting All Settings on iPhone/iPad can be a helpful troubleshooting step in various situations, such as when the iPhone 8 or X touch screen is not working. This action resets all settings to their default values without erasing any data or apps, allowing users to start fresh and potentially resolve issues like a non-functional touch screen.
To reset your iPhone, go to Settings, then General, followed by Reset, and finally select Reset All Settings. This will restore your iPhone's default settings for notifications, Touch ID, brightness, and other features, without deleting any existing data.
Method 4. Restore your iPhone/iPad
- Connect your iPhone/iPadto your computer via a USB cable.
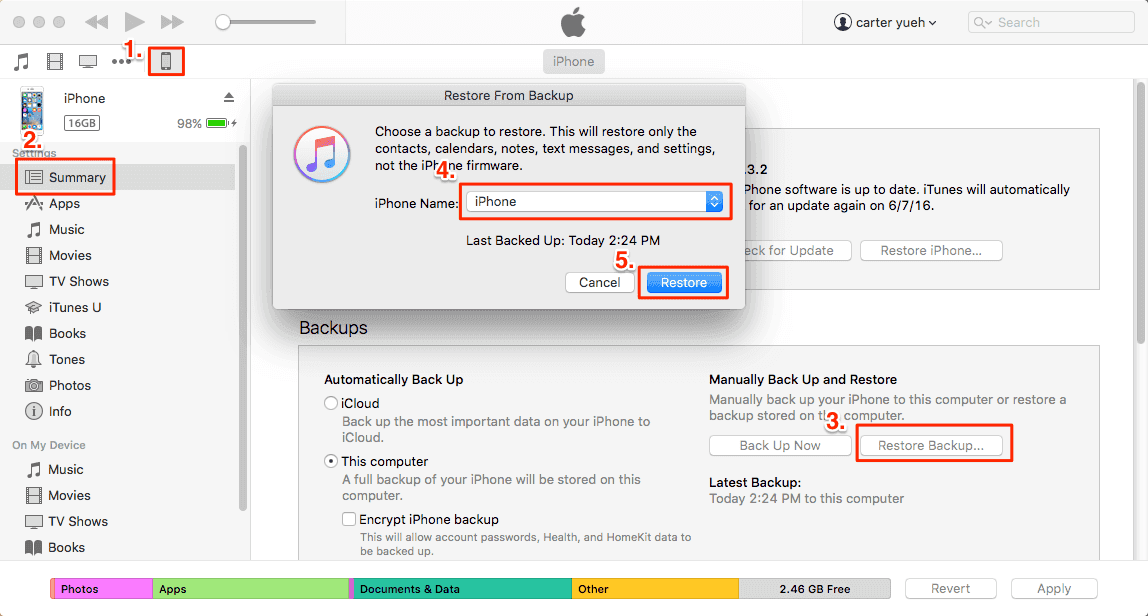
- Launch iTunes and click on the device icon in the top left corner of iTunes.
- To restore an iPhone from a previous iTunes backup, click "Restore Backup" in iTunes and select the most recent backup. If the backup is encrypted, enter the password to access it. Then click "Restore" to begin the restoration process.
- Warning
- Restoring your iPhone or iPad requires a backup, which will erase previous files on your device. To avoid data loss, it's essential to back up your iPhone regularly using iTunes, iCloud, or a free iPhone data transfer tool like Qiling MobiMover Free, which allows you to transfer various types of files, including photos, videos, audios, books, contacts, and messages, from your iOS device to a Windows or Mac computer with just a click.
Part 2How to solve other iPhone screen recording not working problems
1. Screen recording not saving on iOS 12/11
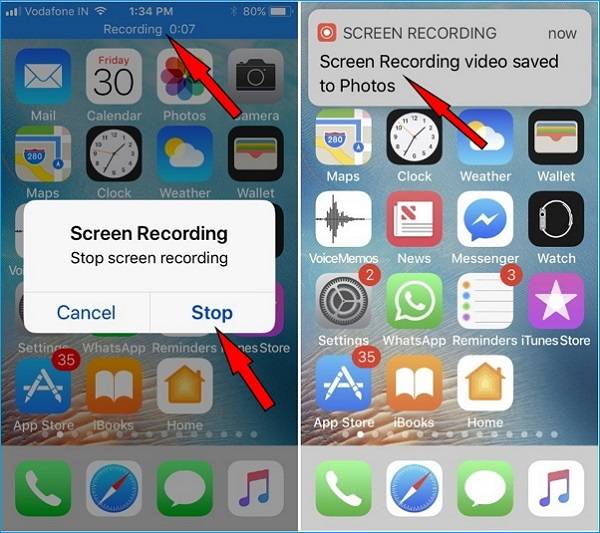
After stopping the screen recording, a notification will appear stating that the video has been saved to the Photos app. However, if the iPhone runs out of space, the recording won't be saved, requiring you to free up space by deleting unnecessary files or transferring them to a computer for backup.
Go to Settings > General > iPhone Storage, and delete unwanted apps or files as needed.
2. iPhone getting hot when screen recording
One issue with iOS 11 screen recording not working is that the iPhone can get too hot, but this is a normal occurrence when recording, watching videos, or playing games. However, you can take small steps to improve this status, such as using certain tips to reduce the heat.
- You can turn off some important heating applications like Bluetooth, games, videos, and GPS service to conserve battery life while recording.
- To avoid any potential issues with your iPhone's battery or charging system, it's recommended to unplug the device from the charger while you're recording the screen. This will help prevent any unexpected shutdowns or glitches during the recording process.
3. Screen recorder crashes on iOS 12/11
If your iPhone or iPad is outdated, like iPhone 5 or iPad 4th generation, updating to iOS 11 or 12 may cause issues. However, you can still downgrade to iOS 10 or 10.3.3 if you've updated to iOS 11 or 12 Beta. Proceed with caution.
See More: How to export screen recording videos from iPhone to computer
After fixing the iOS 11 screen recording not working problem, you'll save more screen recording videos on your iPhone or iPad, which will eventually run out of space. To free up space, you'll need to export and transfer these videos to your PC. I recommend using Qiling MobiMover Free, a 100% free iPhone data transfer software that allows you to transfer contacts, messages, notes, and more to your PC or laptop with a single click. This software also works in the vice versa, allowing you to transfer files from PC to iPhone safely and easily.
Step 1. Connect your iPhone to your computer, tap "Trust" on your iPhone screen, and then run Qiling MobiMover. Choose "Phone to PC" and select "Next" to continue.
Step 2. Set a custom storage path if needed, then click "Transfer" to proceed with the process.
Step 3. Once the transfer process is complete, you can access and view the videos on your computer.
Related Articles
- How to Properly Force Restart iPhone 8/8 Plus/X
- Dynamic Disk Manager
Qiling Dynamic Disk Manager, a feature-rich dynamic volume management and powerful disk converter for Windows PCs and Servers. - Hard Disk Partition Management with Windows PE Bootable Rescue CD/USB
Creating a bootable CD/USB based on Windows PE might be the best way to manage your disk and partition when your OS failed to boot. - Merge Full and Incremental Backups Easily with Qiling Disk Master
Qiling Disk Master can help you consolidate multiple incremental backups with initial full backup to build a new full merged backup.