How to Transfer Data from iPhone 6/6s to iPhone X in 3 Ways
The iPhone 6 and 6s are classic models that are no longer compatible with the latest iOS system, making it necessary to upgrade to a newer iPhone like the iPhone X, 11, or 12. To transfer data from the old iPhone to the new one, you can use Qiling MobiMover, a fast and efficient iPhone data transfer software that doesn't require iTunes. Alternatively, you can use iTunes or iCloud for traditional data migration methods.
Part 1: How to transfer files from iPhone 6/6s to iPhone X with Qiling MobiMover
Key features of Qiling MobiMover:
- Transferring data between devices has become seamless with the help of various tools and methods. Users can now easily transfer data from an iPhone or iPad to a PC, from a PC to an iPhone or iPad, or even between two iOS devices, all without the need for iTunes.
- The iOS transfer tool allows for the transfer of various types of files from an iOS device, including contacts, messages, notes, photos, calendars, Safari bookmarks, music, audios, videos, and more, with the capability to transfer over 10 different types of files.
- Export or import iPhone or iPad data with simple one-click
- Provide smart iOS file management solutions, including adding, editing, deleting, and refreshing items, to help users effectively manage their files on their mobile devices.
- Download videos from the Internet via URLs
- 24 hours technical support is offered after upgrading to the MobiMover Pro version.
Tech specification:
- Compatible with Windows 7, 8, 8.1 and 10
- Support iPhone or iPad running iOS 9 or later
- Support the most iPhone, from iPhone 4s to iPhone 12
Qiling MobiMover allows you to transfer various data types from one device to another, including contacts, notes, books, bookmarks, photos, videos, and audios, with a simple one-click process, and also supports transferring data between different Apple devices.
Unlike using iTunes to sync data, Qiling MobiMover allows you to transfer data from an old iPhone to a new one without overwriting existing data, reducing the risk of data loss.
To transfer files from your iPhone 6/6s to iPhone X/11/12, click the button to download and install Qiling MobiMover on your computer, then follow the guide.
Step 1. Connect your old iPhone and new iPhone X/8 to your computer with compatible USB cables. Tap "Trust This Computer" on both devices. Run Qiling MobiMover, select the "Phone to Phone" mode, choose the direction from the old iPhone to the new iPhone, and click "Next".
Step 2. MobiMover will automatically read and load all the files on your iPhone. Choose the desired type of files and click "Transfer" to start the transfer process.
Step 3. MobiMover will now transfer selected data from your iPhone to your iPhone X/8 directly and efficiently. Do not disconnect your devices until the transfer process is complete. The data will be sent to its corresponding application, such as photos to Photos, songs to Music, and movies to Videos, and so on.
If you are using an iPhone 8 or iPhone 8 Plus device, you can transfer files from an old iPhone to your new iPhone 8 or iPhone 8 Plus by following the steps outlined in the guide for transferring files from an old iPhone to an iPhone X, with the necessary adjustments for your device.
Part 2: How to sync data from iPhone 6/6s to iPhone X with iCloud
To restore your iPhone X from an iCloud backup, you'll need to connect both your iPhone 6 and iPhone X to the same Wi-Fi network, ensure you have sufficient iCloud storage, and follow the steps below. This process allows you to transfer files and data from your old iPhone 6 to your new iPhone X using iCloud.
Step 1. Open the Settings App on your iPhone 6.
Step 2. If you're using iOS 10.2 or earlier, go to iCloud, then select Backup. If you're using iOS 10.3 or later, go to iCloud, then select your name, followed by iCloud and iCloud Backup.
Step 3. To backup your iPhone via iCloud, go to Settings > [your name] > iCloud > iCloud Backup, toggle the switch to the "on" position, then click "Back Up Now" to initiate the backup process. Ensure your iPhone remains connected to Wi-Fi until the backup is complete.
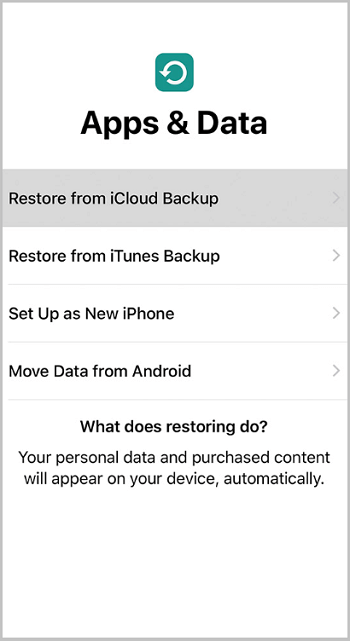
Step 4. To restore your iPhone 6 to the iPhone X, go to the Apps & Data screen on your new iPhone and select "Restore from iCloud Backup." This will allow you to restore your data from your old iPhone 6 that was backed up to iCloud.
Step 5. Sign in with your Apple ID and password, then choose the backup you created, and the data from your iPhone 6 will be synced to your new iPhone X once the process is complete.
Part 3: How to move data from iPhone 6/6s to iPhone X with iTunes
To transfer data from your iPhone 6 to iPhone X, you can either use the "Move Data from iPhone" feature or restore your new iPhone X from the iTunes backup of your iPhone 6. To do the latter, connect your iPhone X to your computer, open iTunes, and select "Restore iPhone" from the Summary tab. Then, select the backup of your iPhone 6 from the list of available backups, and click "Restore" to transfer the data.
Step 1. To fix the issue, update your iTunes to the latest version, then connect your iPhone 6 to your computer and launch iTunes.
Step 2. Tap on the "Device" button and click "Summary."
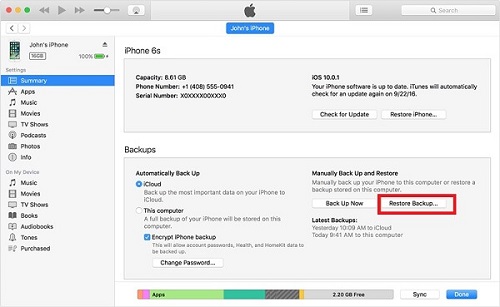
Step 3. To back up your iPhone 6/6S, click "Back Up Now" in iTunes, which will create a copy of your phone's data on your computer. Once the backup is complete, you can verify it by going to iTunes > Preferences > Devices, where you'll see a list of all your backups, including the one you just created.
Step 4. When setting up your iPhone X, click on "Apps & Data" and then select "Restore from iTunes Backup" and click "Next".
Step 5. Connect your iPhone X to the computer that you used to back up your iPhone 6 and run iTunes on that computer.
Step 6. In iTunes, choose your iPhone X and click"Restore Backup".
Step 7. Go to the Google Drive folder, select the backup you just created, and wait for the restore process to complete.
Now that you've learned three ways to set up your new iPhone X/11/12 with data from your iPhone 6/6S, you can choose the method that suits you best. If you're new to the iPhone X, either method will work. However, if you've already used your iPhone X for a while and want to keep your existing data, we recommend using Qiling MobiMover to transfer data from your iPhone 6/6S to your iPhone X, as it won't overwrite your current data and cause any loss.
Related Articles
- How to Transfer Contacts from iPhone to iPhone via Bluetooth
- How to Delete Photos from iPhone but Not iCloud