How to Transfer Files from Mac to iPhone with/Without iTunes
Transferring files between Mac and iPhone can be easy, with several methods available. You can use iTunes, which has its advantages and disadvantages, or choose from other options. Regardless of whether you have iTunes or not, you can find a suitable method to get the job done, with the right choice depending on your specific needs and preferences.
- Part 1. How to Transfer Files from Mac to iPhone Without iTunes
- Part 2. How to Transfer Files from Mac to iPhone with iTunes
Part 1. How to Transfer Files from Mac to iPhone Without iTunes
We will introduce five ways to transfer files from Mac to iPhone without iTunes, each with its pros and cons, allowing you to choose the one that suits your needs.
Option 1. Via Qiling MobiMover
If you need to transfer files, especially large ones, a reliable transfer tool is essential to save time and money. Qiling MobiMover is an effective solution that allows you to transfer various types of iPhone data between two iOS devices or between iOS and Mac, back up iPhone to Mac, manage your device, and even download videos from any site.
Are you interested in this powerful tool? If you are, just download it on your Mac to have a try.
Step 1. Connect your iPhone to your Mac, click "Trust" on your iPhone when prompted, then run Qiling MobiMover and select "Mac to Phone" to transfer data from your Mac to your iPhone. Next, click on "Select Files" to begin the transfer process.
Step 2. To transfer files, go to the files you want to transfer, select them, then click "Open".
Step 3. You can preview selected files on the right pane, showing detailed file names and sizes. To add more items, click "Add Contents" or drag files/folders from your Mac to the designated area. Once you're ready, click "Transfer" to start moving content from your computer to your iPhone, ensuring your iPhone remains connected throughout the transfer process. MobiMover allows you to transfer large amounts of data at once without any size or quantity limitations.
Option 2. Via iCloud
iCloud is Apple's recommended way to transfer files, allowing you to sync all files across different iOS devices with the same Apple ID. If you're experiencing issues with iCloud Drive not syncing, you can learn how to fix it first.
Step 1. Turn on iCloud Drive on your iPhone and Mac.
To enable iCloud Drive on your iPhone, go to Settings, then tap on your name, followed by "iCloud", and finally scroll down to toggle on "iCloud Drive".
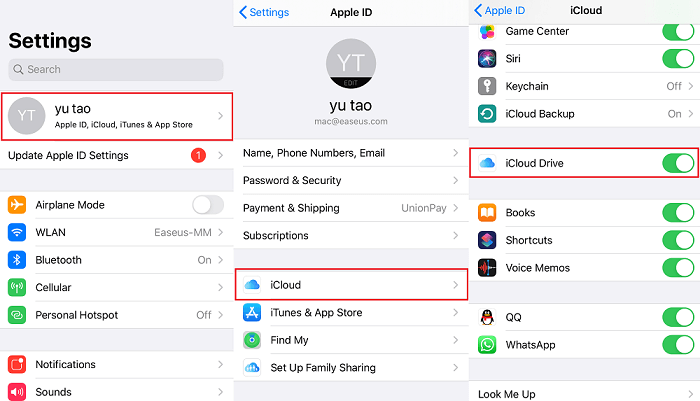
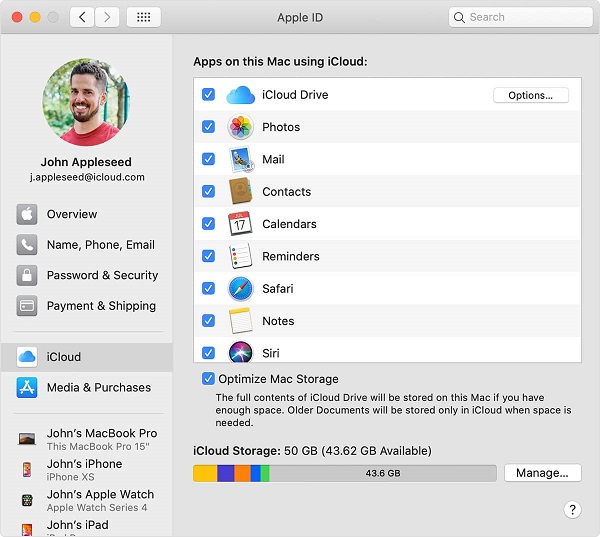
To access iCloud Drive on a Mac, go to the Apple menu and select "System Preferences," then click on "iCloud" and choose "iCloud Drive."
Step 2. Open icloud.com on your Mac and sign in with your Apple ID.
Step 3. To upload files to iCloud Drive, simply drag them from your Mac's desktop or a folder onto the iCloud Drive window or a folder icon within it. This allows you to easily move files to the cloud for access across all your devices.
Step 4. Then, the files will be synced to your iPhone.
Option 3. Via AirDrop
You can wirelessly send files to nearby iDevices on the same Wi-Fi network using AirDrop, eliminating the need for a USB connection. To do this, simply turn on AirDrop on your Mac and iPhone, then follow the instructions to complete the transfer. Note that AirDrop does not support photo transfer, so you may need to use alternative methods to transfer pictures from your Mac to your iPhone. However, with AirDrop, you can easily share files between devices without the need for a physical connection.
- Make sure your Bluetooth and Wi-Fi have been turned on.
- Put both devices together.
- To be able to use the app, your device needs to be running iOS 7 or later, or a Mac computer running OS X Yosemite.
After learning about the necessary prerequisite to use AirDrop, you can follow the steps to share files from your Mac to your iPhone.
Step 1. Turn on AirDrop on your iPhone and Mac.
Step 2. Open the document you'd like to transfer, press Control and click on it, then select "Share" from the drop-down menu.
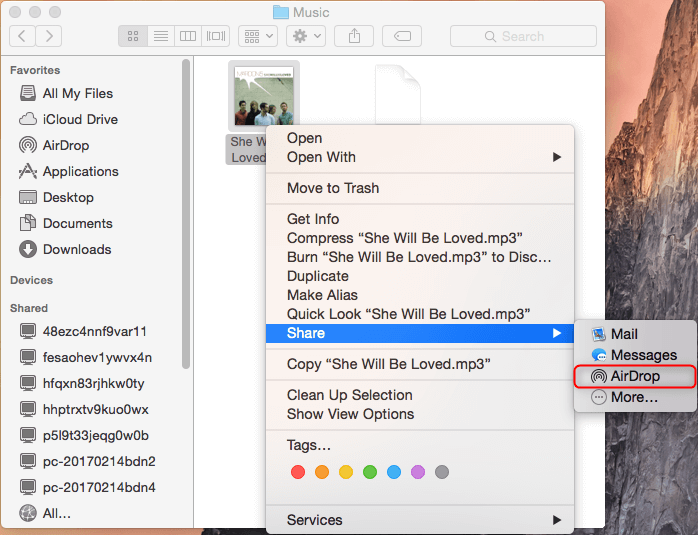
Step 3. From the "Share" menu at the top of the screen, select "Send a copy."
Step 4. Choose "AirDrop."
Step 5. Select your iPhone as the recipient.
Step 6. On your iPhone, tap "Accept" to receive the file.
Option 4. Via Email
Sending files between a Mac and iPhone can be easily done using Email, which is a convenient, fast, and free option. However, it also has its downsides, such as the risk of email messages containing viruses and the slow transfer of large files like photos and videos.
The process of transferring files via email varies depending on the email service used, and for detailed steps, users can follow the instructions provided by each email service.
Option 5. Via Cloud Services
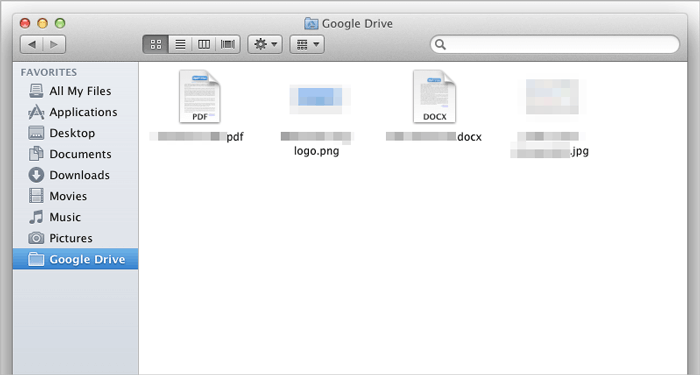
You can transfer files from your Mac to your iPhone using cloud services like Google Drive, OneDrive, and Dropbox, with Google Drive being the most recommended option, offering up to 15GB of free online storage that can be expanded to 16TB on premium versions.
Step 1. Download and install Google Drive on your Mac and iPhone.
Step 2. Log in to Google Drive with the same Google account.
Step 3. Upload files from Mac to Google Drive.
Step 4. To download files from Google Drive on your iPhone, open the Google Drive app, navigate to the file you want to download, tap the three vertical dots on the top right corner of the file, and select "Download" from the menu. You can also long press on the file to bring up the menu and select "Download".
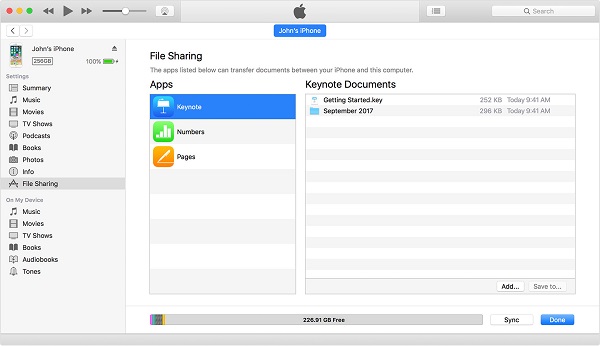
Part 2. How to Transfer Files from Mac to iPhone Use iTunes File Sharing
File Sharing is one of iTunes's features that enables you to quickly and easily transfer files between computer and iOS devices. To use this method, you need to prepare:
- The latest version of iTunes on your Mac.
- The latest version of macOS.
- To use the Google Drive app, you need an iPhone or iPad running the latest version of iOS or iPadOS.
- iOS or iPadOS apps that work with File Sharing.
Step 1. Open iTunes on your Mac.
Step 2. Connect your iPhone to your Mac using a USB cable.
Step 3. Click your device icon in iTunes.
Step 4. Click "File Sharing" in the left sidebar.
Step 5. To transfer a file, click on the "Add" button, select the desired file, and click on "Add" again.
Step 6. When the process completes, you can check the files in the corresponding app or location.
The Final Words
You can easily transfer files from a Mac to an iPhone using various methods, making sharing between iOS devices straightforward. If this guide has been helpful, consider bookmarking it for quick reference in the future. Additionally, this page will be updated with new and more information.
Related Articles
- How to Print Text Messages from iPhone for Free
- How to Transfer Photos from PC to iPhone 11/12/13 in 5 Ways