How to Sync iPhone Photos to iCloud Easily and Quickly
Quick Navigation:
- Part 1: How to sync iPhone photos to iCloud
- Part 2: How to back up/sync your iPhone photos without iCloud (FREE)
This information applies to iPhone XS/XS Max/XR, iPhone X, iPhone 8, iPhone 7, and iPad in iOS 11.
With the help of iCloud, you can upload your iPhone photos to iCloud Photo Library, allowing you to access and view them on all your devices. This feature is useful for backing up your iPhone or sharing content across devices, which is why many users are looking to transfer their iPhone photos to iCloud. To do this, you can follow the detailed steps outlined in this article.
Part 1: How to sync iPhone photos to iCloud
Backing up your iPhone photos to iCloud is a straightforward process, but to ensure a smooth upload without issues like "iPhone not uploading to iCloud", you need to follow the necessary steps. These steps include ensuring your iPhone is connected to Wi-Fi, making sure your iCloud storage is sufficient, and possibly increasing your iCloud storage if needed, as well as checking for any software updates on your iPhone and iCloud. By following these steps, you can upload your iPhone photos to iCloud without any problems.
- Connect your iPhone to a stable and reliable Wi-Fi network.
- Make sure your iPhone battery is charged.
- Make sure you have enough iCloud storage to copy all your iPhone photos to iCloud. If you don't have enough storage, free up space on iCloud or buy more storage from Apple.
Then follow the steps below to sync your iPhone photos to iCloud.
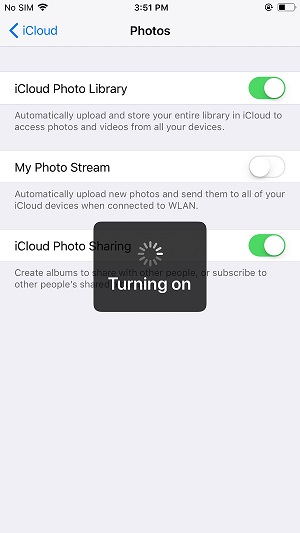
Step 1: Go to Settings App on your iPhone in iOS 11.
Step 2: Choose [your name] > iCloud > Photos.
Step 3: To start uploading your iPhone photos to iCloud, toggle on iCloud Photo Library.
Want to speed up your iCloud backup process? Here are some tips to help you make it faster and save time.
Part 2: How to back up/sync your iPhone photos without iCloud (FREE)
If you want to back up your iPhone photos or sync photos across your iOS devices using iCloud, you may encounter issues. To resolve this, consider using Qiling MobiMover Free, a free tool that allows you to transfer and manage iOS data. With MobiMover installed on your PC, you can back up your iOS device to your computer, sync files between devices, or transfer data from your PC to your iPhone or iPad, all for free.
- What can MobiMover transfer or manage for you:
-
Photos: Camera Roll, Photo Library, Photo Stream, Photo Videos
Videos: Movies, TV shows, Music Videos
Audios: Music, Ringtones, Voice Memos, Audiobooks, Playlists
Others: Contacts, Notes, Messages, Voice Mails, Books, and Safari Bookmarks
With MobiMover, you can sync iPhone photos to PC all at once or transfer photos between iOS devices easily and cost-free.
Step 1. Connect your iPhone to your computer with a USB cable and run Qiling MobiMover. Choose "Phone to PC" to back up all your iPhone photos to the computer at once, then click "Next" to proceed.
Step 2. Select the category/categories you'd like to back up, which includes making a copy of all supported file types on your iPhone using the data transfer feature, or backing up specific categories. You can also choose to back up all data or customize the storage path.
Step 3. Now, click the "Transfer" button to start backing up your iPhone photos to computer without using iCloud. The transfer process is high-speed, so you won't have to wait too long.
Related Articles
- How to Sync Contacts from iPhone 8/8 Plus/X to iCloud
- How to Reset iPhone 8/iPhone X to Factory Settings in 2 Ways