How to Transfer Music from Computer to iPod With/Without iTunes
You can transfer music from your computer to your iPad and other devices using four effective methods, or add music to your iPod without iTunes with these additional tips. The first method involves using a USB cable to directly connect your iPad to your computer, then selecting the music files you want to transfer using the iPad's built-in file system.
To add music to your iPod from other devices, you can transfer music from your computer to the device, similar to transferring music to an iPhone. This can be done using various methods, allowing you to download music from your computer to your iPod.
Part 1. How to Transfer Music from Computer to iPod Without iTunes
If you're concerned about losing existing files on your iOS device when using iTunes, you can add music to your iPod without it by using one of two alternative methods.
Method 1. Download Music from Computer to iPod with iOS Data Transfer Software
The most popular solution to transferring music from a computer to an iPod without using iTunes is to use a reliable iOS data transfer software like Qiling MobiMover. This software is compatible with iPhone/iPad/iPod Touch and supports all generations of iPod, including iPod Touch, iPod Shuffle, iPod Nano, and iPod Classic, running iOS 8 and later.
With such a tool installed on your PC or Mac, you are able to quickly and easily create, edit, and manage digital content, including documents, spreadsheets, presentations, and more, streamlining your workflow and increasing productivity.
- Transfer files between a computer and an iPhone/iPad/iPod
- Copy files from one iPhone/iPad/iPod to another
- Manage iOS content from the computer
- Batch convert HEIC pictures to JPG
You cannot only transfer music from your computer to your iPod using Qiling MobiMover, but also transfer music, photos, videos, ringtones, books, contacts, messages, and more from your iPod back to your computer.
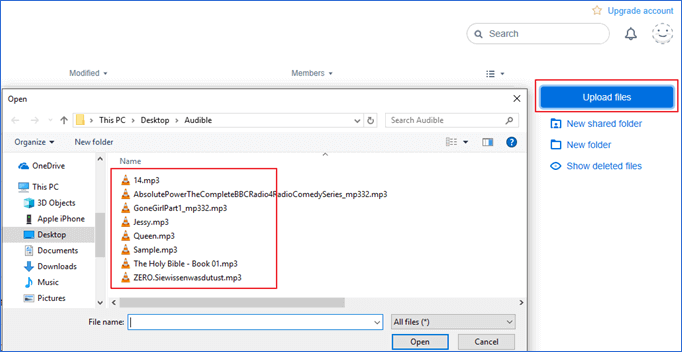
Step 1. Connect your iPod to your computer via a USB cable, tap "Trust" on the iPod to confirm the connection, and then run Qiling MobiMover. Then, navigate to the "PC to Phone" section on the main interface and click "Select Files" to start transferring data from your computer to your iPod.
Step 2. To transfer music to your iPod, select the audio files you want to transfer from your computer, then click "Open" to add them to the transfer list.
Step 3. To transfer data from your computer to your iPod, click "Transfer" and wait for the process to complete. Once done, open the Music app on your iPod to access the transferred music files.
Qiling MobiMover is a tool that can transfer iOS data and also download videos from various websites, including Facebook, Twitter, and YouTube, for free.
Method 2. Transfer Music from Computer to iPod with Cloud Storage Services
You can also transfer music from your computer to your iPod without using iTunes by using a cloud storage service like Dropbox, Google Play Music, or Amazon Music. These services allow you to wirelessly transfer music to your iPod from your computer over Wi-Fi, eliminating the need for a USB cable. However, to use this method, you'll need to prepare your music files and set up the cloud service on both your computer and iPod.
- To use the service, make sure you sign in with the same account you used to create your profile.
- Make sure you have enough cloud storage for the songs, and if not, free up space or buy more storage.
To put music on your iPod, follow these steps: since cloud file-sharing services work in a similar way, let's take Dropbox as an example. If you're ready, start by syncing your music library with your iPod using iTunes, which will transfer your music files to your iPod. Alternatively, you can upload your music files to Dropbox and then sync your iPod with the Dropbox account, which will allow you to access your music library on your iPod. Once you've synced your music, you can start listening to your favorite tunes on your iPod.
Step 1. Download and install Dropbox on both your computer and iPod. You can choose to install it on your mobile device only if you prefer.
Step 2. Sign in to Dropbox with the same account.
Step 3. Upload music from computer to Dropbox.
- To transfer songs from your computer to Google Play Music, first install Dropbox on your computer, then open the program and click "Upload files" to select the songs you want to transfer.
- If you don't install Dropbox on your computer, go to Dropbox.com and upload the items to Dropbox.
Step 4. On your iPod, open the Dropbox app and access the songs from your computer. You can either access them directly from the cloud or download them to your iPod as needed.
Tips: You can add music to your iPhone without using iTunes by subscribing to Apple Music or buying songs and albums from the iTunes Store.
Part 2. How to Transfer Music to iPod with iTunes/Finder
On PC or Mac, if running macOS Mojave or earlier, iTunes can transfer music from computer to iPod. However, on a Mac running macOS Catalina, iTunes is not available and instead, Finder takes over for syncing and backing up data.
Method 1. Put Music on iPod from Computer with iTunes
To ensure a smooth transfer process, install the latest version of iTunes on your computer and use a workable USB cable.
To sync music from computer to iPod with iTunes:
Step 1. Connect your iPod to the computer and wait for iTunes to run automatically. Once iTunes is open, it will recognize your iPod and allow you to sync your music, photos, and other data.
Step 2. Unlock your iPod and trust the computer.
Step 3. If the songs you want to transfer aren't in the iTunes library, you can add them by going to "File" > "Add Files to Library".
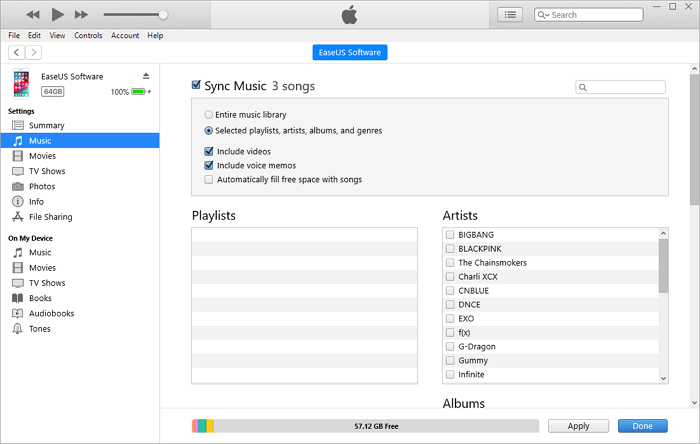
Step 4. Click the device icon and choose "Music".
Step 5. To sync your music, check the "Sync Music" box and choose to transfer either your entire music library or specific playlists, artists, albums, and genres that you want to sync.
Step 6. After selecting the songs and albums, click "Apply" to start transferring music from your computer to your iPod.
Method 2. Sync Music from Mac to iPod via Finder
If you're using a Mac running macOS Catalina or later, you can use the built-in "Quick Actions" feature to quickly create a new document in Pages. To do this, go to the Finder, select a file or folder, and right-click (or control-click) on it.
To download music from computer to iPod using Finder:
Step 1. Open Finder and connect your iOS device to the computer.
Step 2. Unlock your iPod and trust the computer.
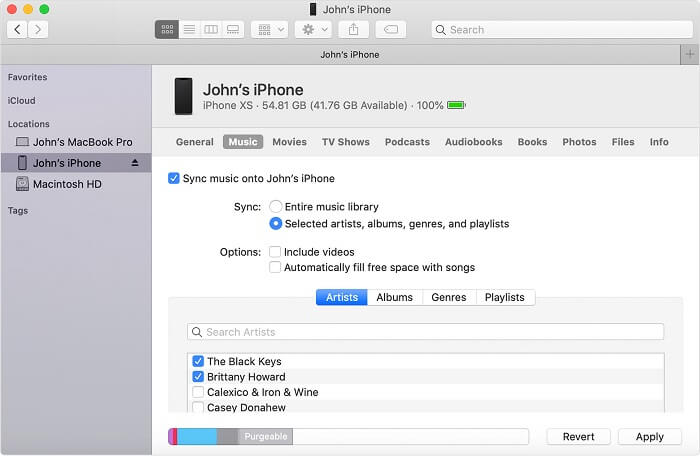
Step 3. To access your music library in Finder, select your device under the "Locations" tab and then click on the "Music" tab.
Step 4. Select the type of content you want to sync with your iPod, such as music, playlists, or podcasts. This will allow you to choose which specific songs, albums, or artists to sync with your device.
Step 5. To start transferring music from your computer to your iPod, click the "Apply" button.
The Bottom Line
For you to make a better choice:
- Qiling MobiMover allows safe transfer of music and other files to or from iPod, iPhone, and iPad without syncing via a USB cable.
- Cloud services allow you to transfer music and other files wirelessly, but this can sometimes lead to storage issues, as the amount of data stored online can become overwhelming and require additional payment for more storage space.
- iPod users may lose existing files on their device when syncing with a computer using iTunes or Finder, which are Apple's solutions for syncing data between a computer and an iDevice.
To transfer music to your iPod with ease, you can use the following methods: iTunes, iCloud, and the Music app. If you're using a computer, connect your iPod to the computer using a USB cable and open iTunes.
Related Articles
- How to Sync Photos from Mac to iPhone X/iPhone 8 in 3 Ways
- How to Transfer Data from iPhone to iPhone After Setup
- How to Transfer Photos from Old iPhone to New iPhone in 6 Ways
- How to Transfer Music from Computer to iPhone