How to Transfer Photos from iPhone to iPhone in 6 Ways
Transferring photos from one iPhone to another is a straightforward process that can be done in six ways. You're looking for a way to transfer photos from your iPhone to another iPhone without using iCloud, or maybe you need to transfer data from an old iPhone to a new one - whatever your needs, you'll find a solution here.
Transferring photos and videos from an old iPhone to a new one is a common practice when upgrading devices, allowing us to preserve cherished memories and share them with others. This process enables us to transfer precious moments from the previous device to the new one, making it easy to share our daily lives with loved ones.
Transferring photos from one iPhone to another is possible through various methods, including using professional iOS data transfer software, iCloud, iTunes, AirDrop, Email, and cloud storage services. Each of these solutions offers a plausible way to transfer photos from one iPhone to another, and they can be used individually or in combination to achieve the desired result.
- How to transfer all/multiple photos from iPhone to iPhone with iOS data transfer software
- How to transfer photos from old iPhone to new iPhone with iCloud
- How to transfer photos from one iPhone to another using iTunes
- How to AirDrop photos from one iPhone to another
- How to send photos from iPhone to iPhone via Email
- How to sync photos between two iPhones via cloud storage services
How to transfer photos from iPhone to iPhone in 6 Ways
Different data transfer methods are suitable for various situations. Choose the one that best fits your specific needs to apply.
Method 1. Transfer photos from iPhone to iPhone with Qiling MobiMover
If you want to transfer photos from one iPhone to another without using iCloud, you can use iOS data transfer software like Qiling MobiMover. This tool allows you to transfer all of your photos and albums from one iPhone to another, or selectively copy some files from one device to another, regardless of the Apple ID used on the devices.
This tool is helpful for transferring photos from iPhone to computer, transferring files from PC to iPhone, and other data transfer tasks, making it a convenient option for frequent data transfers.
Follow to transfer photos from iPhone to iPhone without iCloud:
Step 1. To transfer data from your old iPhone to your new iPhone, connect both devices to your computer and run Qiling MobiMover. Choose "Phone to Phone" from the main interface, then select your old iPhone as the source device and your new iPhone as the target device. Click "Next" to continue the transfer process.
Step 2. To transfer data from your old iPhone to your new one, check the files you'd like to copy, which can include photos, music, ringtones, videos, contacts, and more, aside from photos.
Step 3. To transfer photos from your old iPhone to your new one, click the "Transfer" button on the app, and wait for the process to complete, which may take some time depending on the size of the files. Once done, check the new iPhone's "Photos" app to see the newly copied photos.
Qiling MobiMover can also work as a video downloader, allowing you to download videos from websites like YouTube, Vimeo, Facebook, and more to your computer or iOS device.
Method 2. Transfer photos from old iPhone to new iPhone using iCloud
If you're switching to a new iPhone and want to transfer all your photos from the old one, using iCloud is a convenient option. By enabling iCloud Photos on both devices and using the same Apple ID, you can sync your iPhone photo library across your devices, making it easy to access your photos on your new iPhone.
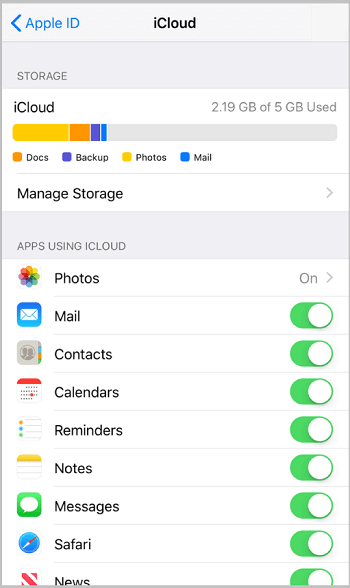
To transfer photos from an old iPhone to a new iPhone using iCloud, go to Settings on your old iPhone, tap on your name, and select "iCloud" and then "Photos". Make sure the "iCloud Photos" option is turned on.
Step 1. To ensure your old iPhone and the new iPhone are using the same Apple ID, simply sign in to both devices with the same Apple ID and password. This will allow you to seamlessly transfer data and settings from your old iPhone to your new one.
Step 2. To sync photos across two iOS devices, go to "Settings", tap on your name, then "iCloud", followed by "Photos", and finally toggle "iCloud Photos" on for both devices. This will enable cloud-based photo syncing.
Step 3. Your old iPhone photos will sync to your new iPhone automatically when they're connected to the same Wi-Fi network.
If you want to transfer everything from your old iPhone to the new one, you should use iCloud Backup instead of iCloud Photos. This method allows you to store almost all of your iPhone content to iCloud, and then restore the new iPhone from the backup of the previous device. For more details, refer to the guide on how to transfer data from iPhone to iPhone.
To avoid issues with iCloud storage, ensure you have enough space available for backups or syncing, whether using iCloud Backup or iCloud Photos.
Method 3. Copy photos from iPhone to iPhone using iTunes
Transferring photos from iPhone to iPhone via iTunes requires a few steps. First, you need to transfer the photos from the source iPhone to a computer, and then sync the photos from the computer to the target device using iTunes. This process can be a bit cumbersome, but it's a workable way to transfer your photos between devices.
To transfer photos from iPhone to computer:
Step 1. Unlock the source iPhone and connect it to the computer.
Step 2. Click "Allow" on your iPhone to trust the computer.
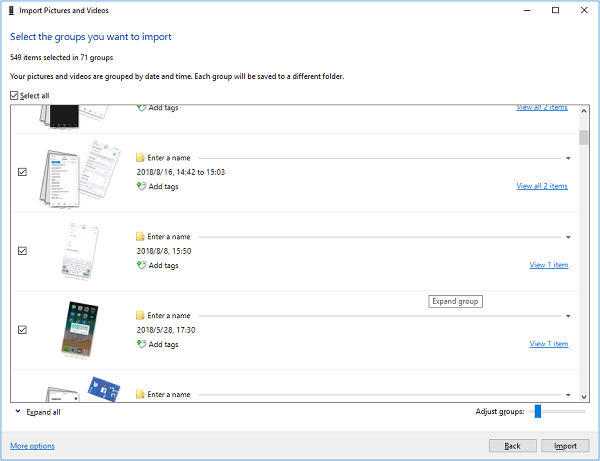
Step 3. On a Windows computer, choose what to do with the device, select "Import photos and videos", and then choose to either review and organize the items to import or import all new items now. You can either select the photos to import or let Windows automatically transfer them from your iPhone.
Notes: The Photos app on Windows only allows you to transfer photos from the Camera Roll, so if you want to copy all your pictures, you'll need to learn how to copy images from your iDevice to your computer.
To transfer photos from computer to iPhone with iTunes:
Step 1. Make sure you have installed the latest version of iTunes on your computer. Connect the target iPhone to the computer and click "Allow" on the iDevice to trust the computer.
Step 2. In iTunes, click the device button and go to "Photos".
Step 3. Check the "Sync Photos" option and select the pictures you'd like to transfer from your computer.
Step 4. Click "Apply" to start transferring photos to your new iPhone.
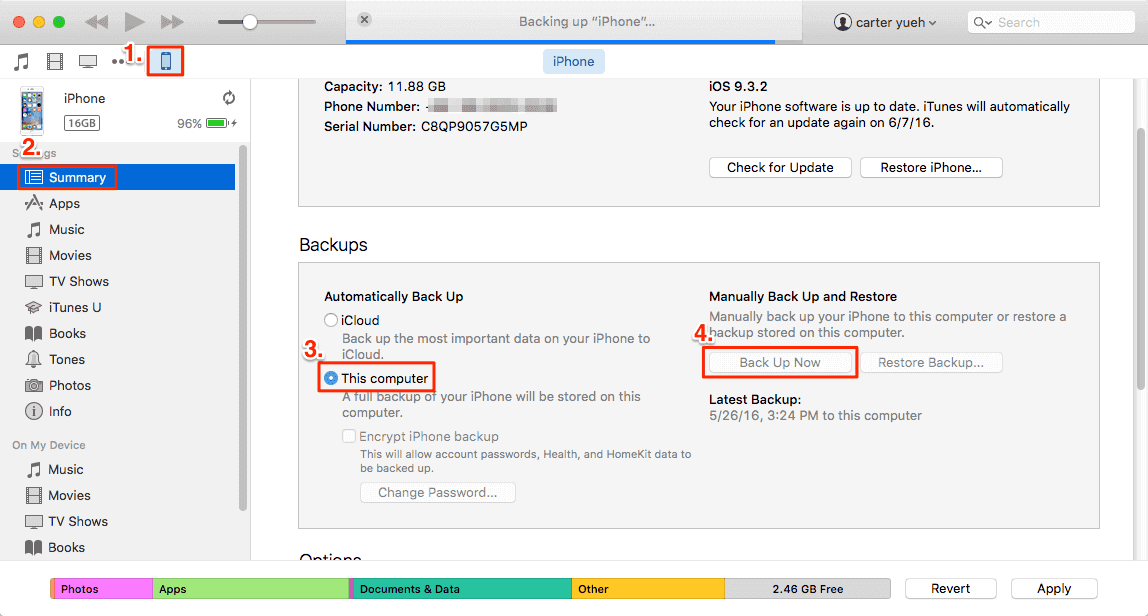
If you're switching to a new iPhone, you can transfer everything from your old one to the new one using iTunes. To do this, you back up your old iPhone in iTunes and then restore the new one from that backup. This method allows you to transfer all your data, settings, and apps to the new device.
Method 4. AirDrop photos from iPhone to iPhone
To wirelessly transfer photos from iPhone to iPhone, you can use AirDrop in addition to iCloud, which syncs all photos. AirDrop allows you to selectively send images, giving you more control over which photos are transferred.
Step 1. To connect an iPhone to another iPhone using AirDrop, the two iPhones must be within the Bluetooth and Wi-Fi range. This allows them to discover each other and establish a connection.
Step 2. To enable Bluetooth and Wi-Fi on your iPhones, make sure Personal Hotspot is turned off. Then, turn on AirDrop, selecting either "Contacts Only" or "Everyone" to transfer files.
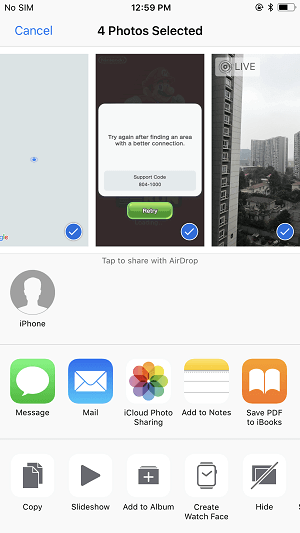
Step 3. To share photos, go to the "Photos" app, select the photos you want to share, and tap the "Share" button.
Step 4. Click "AirDrop" and select the target device.
Step 5. On the target iPhone, click "Accept" to receive the items.
Wireless solutions (iCloud and AirDrop) generally transfer files based on a Wi-Fi connection, which may take a long time for large transfers. To save time, use Method 1 instead.
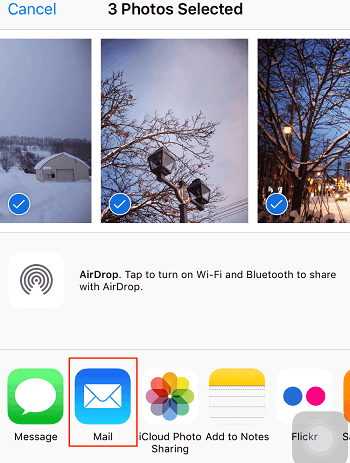
Method 5. Send photos from iPhone to iPhone via Email
You can transfer several photos by adding them as email attachments on the source iPhone, sending the email, checking the email on the target iPhone, downloading the pictures, and then viewing them in the "Photos" app.
Method 6. Transfer photos from iPhone to iPhone via cloud storage services
Cloud storage services like Dropbox will help sync photos from an iOS device to another, similar to iCloud.
Step 1. Download and install the app on both of the iPhones.
Step 2. Sign in to the app with the same account.
Step 3. To upload photos to Dropbox from an iPhone, copy the desired photos to the camera roll, then open the Dropbox app, select the photos to upload, and sync them to another device under a Wi-Fi connection.
The Bottom Line
Here are the ways to transfer photos from iPhone to iPhone in one paragraph:
- Qiling MobiMover is a suitable option if you're looking to transfer data from one iPhone to another without syncing all data.
- If you plan to send a small number of photos, AirDrop and email are recommended.
- If you're switching to a new device that's also yours, iCloud, iTunes, and Dropbox are suitable options for importing data.
If you need to transfer photos from one iPhone to another, you can use the built-in feature called Quick Start. This feature allows you to transfer data, including photos, from one device to another.
I hope this guide can be helpful to you as I expect.
Related Articles
- How to Download Kaltura Videos
- How to Download Videos from Twitter in Every Possible Way
- How to Convert YouTube to MP3 (No Limit)
- Download Facebook Videos to MP3 in 2 Way [100% Work]