[6 Tips]How to Transfer Photos from iPhone to Mac without iPhoto
The iPhone XS/XS Max/XR, iPhone X, iPhone 8/8 Plus, iPhone 7/7 Plus, iPhone 6/6s, MacBook, MacBook Air, MacBook Pro, iMac, and iMac Pro are all compatible with the described feature.
You can import photos from your iPhone to Mac using iPhoto, but the photos you can transfer are limited to the items in Camera Roll. If you're looking for alternative ways to import photos from iPhone to Mac without iPhoto, this article will provide six options for you to consider.
- Option 1. Quickest Way to Import Photos from iPhone to Mac Without iPhoto via All-in-one Transfer tool
- Option 2. How to Import Photos from iPhone to Mac Without iPhoto via Photos App
- Option 3. How to Transfer Photos from iPhone to Mac Without iPhoto via Image Capture
- Option 4. How to Move Photos from iPhone to Mac Without iPhoto via AirDrop
- Option 5. Import photos from iPhone to Mac without iPhoto using iCloud
- Option 6. How to Move Photos from iPhone to Mac Without iPhoto via Email
Option 1. Quickest Way to Import Photos from iPhone to Mac Without iPhoto via All-in-one Transfer tool
To transfer all your iPhone photos from Camera Roll, Photo Stream, and Photo Library to Mac, you can use software like Qiling MobiMover, which allows you to transfer files from iPhone/iPad to Mac, from Mac to iPhone/iPad, or from one iOS device to another, either all at once or selectively.
- What can MobiMover transfer or manage for you:
-
Photos: Camera Roll, Photo Library, Photo Stream, Photo Videos
Videos: Movies, TV shows, Music Videos
Audios: Music, Ringtones, Voice Memos, Audiobooks, Playlists
Others: Contacts, Notes, Messages, Voice Mails, Books, and Safari Bookmarks
You can transfer photos from iPhone to Mac using MobiMover, which also allows you to transfer photos between iPhones or put music on your iPhone. This is a good alternative to using iPhoto or Photos App, and can be done quickly and easily by following the steps provided.
Step 1. Connect your iPhone to your Mac using a USB cable, then open Qiling MobiMover and select the "Phone to Mac" option. Click the "Next" button to proceed.
Step 2. To copy photos from your iPhone to Mac, check the category/categories you want to copy and select other supported files to export together with photos. Then, customize the storage path for the exported photos unless you want to save them on your desktop.
Step 3. To transfer photos or other files from your iPhone to Mac, click the "Transfer" button on MobiMover to start the process without using iTunes. This method is a reliable way to backup your data and avoid unexpected loss.
MobiMover can also work as an iPhone content manager, allowing you to delete, edit, or add files to your iPhone from your computer. This feature is convenient for managing your iPhone's content.
Option 2. How to Import Photos from iPhone to Mac Without iPhoto via Photos App
The Photos app is an optional service from Apple that replaces iPhoto, allowing iOS users to easily manage their pictures. It's faster, less cluttered, and offers more editing options compared to iPhoto. To use it, simply plug your iPhone into your Mac's USB port and open the Photos app.
Step 1. Connect your iPhone to your Mac via a USB cable.
Step 2. To open the Photos app on your Mac, click on the Launchpad icon on the Dock, then click on the Photos icon, or alternatively, click on the Spotlight icon in the top right corner of the screen, type in 'Photos' in the search bar, then click on the Photos icon that appears. If the Photos app has opened automatically, you can ignore this step and proceed with the rest of the instructions.
Step 3. To import photos from your computer, click on the "Import" option in the upper right of your Photos app's screen.
Step 4. To transfer photos from your phone to your Mac, select the desired photos and click the "Import" button to begin the transfer process.

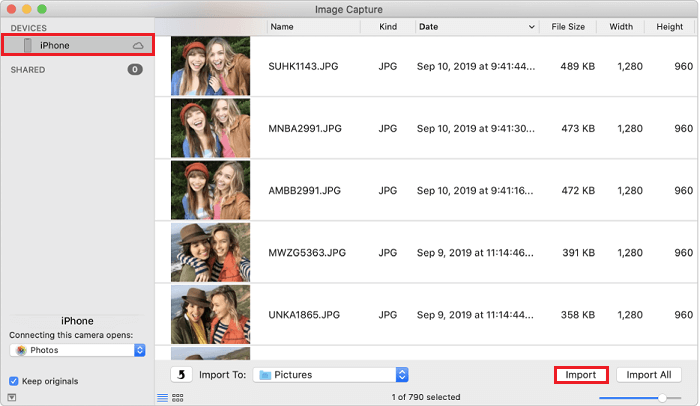
Option 3. How to Transfer Photos from iPhone to Mac Without iPhoto via Image Capture
Image Capture makes it easy to transfer photos between an iPhone and a Mac, preserving the original format and quality of the images during the transfer process.
Step 1. To transfer photos from your iPhone to your Mac, plug your iPhone into your Mac using a USB cable. Then, open the Image Capture application on your Mac by pressing Command + Space and typing "Image" to open it.
Step 2. Select your iPhone from the device list on the Image page.
Step 3. You'll see a list of your photos along with some technical information like file sizes, file types, width, and height.
Step 4. To import photos, click on the "Import" button to transfer the selected photos or click on "Import All" to transfer all images.
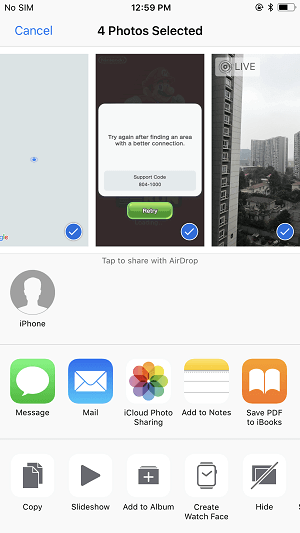
Option 4. How to Move Photos from iPhone to Mac Without iPhoto via AirDrop
You can import photos from your iPhone to your Mac without using iPhoto and transfer them wirelessly at the same time by using AirDrop.
Step 1. Turn on AirDrop on your Mac.
- To enable AirDrop on your Mac, go to Finder, select "Go" from the top menu bar, and then click on "AirDrop". This will open the AirDrop window.
- To set the option Allow to be discovered by, select Everyone or Contacts Only.
Step 2. Turn on AirDrop on iPhone.
- To access Control Center on your iPhone, simply swipe up from the bottom of the screen.
- To enable AirDrop on your iPhone, press deeply on the module where Airplane Mode is located, and then tap on AirDrop. From there, you can set your iPhone to be discovered by either "Contacts Only" or "Everyone".
Step 3. Transfer photos from iPhone to Mac.
- Open Photos App on your iPhone.
- To import photos from your iPhone to your Mac, select the desired photos in the Photos app on your iPhone by tapping on them, then tap the "Share" icon and select "Import Photos" to transfer them to your Mac. Alternatively, use the "Wireless Transfer" feature by creating a shared album on your iPhone, adding the photos you want to transfer, and then accessing the shared album on your Mac by signing in with your Apple ID.
- To import photos from your iPhone to your Mac without using iPhoto, click the Share button on your iPhone and select the name of your Mac in the AirDrop section. This will allow you to transfer photos directly from your iPhone to your Mac.
Option 5. Import photos from iPhone to Mac without iPhoto using iCloud
You can use iCloud to wirelessly transfer photos from your iPhone to your Mac without needing iPhoto. To do this, go to Settings on your iPhone, select your name, then iCloud, and finally Photos. Turn on iCloud Photo Library on your iPhone, and then follow the steps to transfer your photos to your Mac using iCloud.
Step 1. Go to visit iCloud.com from your Mac.
Step 2. To log into iCloud with your Apple ID and password, simply enter the credentials you use to sign into iCloud on your iPhone. This will allow you to access your iCloud account and view your stored data.
Step 3. To view photos on your iPhone, select "Photos" from the available options, and you will see all the photos stored on your device.
Step 4. To import photos from iPhone to Mac, select the desired photos and click the download icon at the top right corner, allowing for a transfer without using iPhoto.
If you need to download iCloud photos to a PC, you can follow the same steps as downloading iCloud photos to a Mac. This process involves using a browser to access your iCloud account, selecting the photos you want to download, and choosing the download location on your PC.

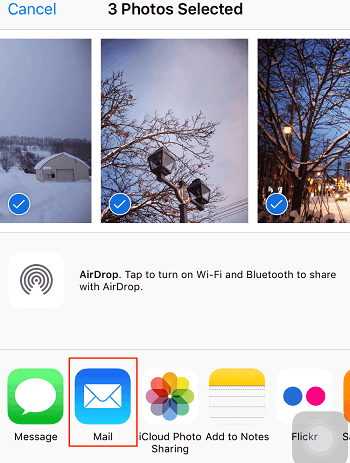
Option 6. How to Move Photos from iPhone to Mac Without iPhoto via Email
Email is the last option to move photos, as it is a slow method, making it suitable only for sending one or two pictures.
Step 1. To move photos from an iPhone to a Mac, open the Photos app on your iPhone, select the photos you'd like to move, and then proceed with the transfer process.
Step 2. Click on the "Share" button and select "Email."
Step 3. Enter your email address.
Step 4. Login your Email on the Mac and download the photos to your Mac.
The Bottom Line
You can transfer photos from iPhone to Mac without using iPhoto by using Qiling MobiMover, a free application that can also move other iOS data, videos, and unlock iOS, making it the optimal choice among six possible methods.
Related Articles
- How to Delete Subscribed Calendars on iPhone
- Stray Lost Progress: 2 Best Ways to Recover Lost Stray Game Saves on PC/PS4/PS5
If your Stray game save is corrupted, you can recover the lost data using Qiling game data recovery software on your PC. Simply download and run the software, and follow the simple clicks to restore your Stray game data. Alternatively, you can watch a video to learn how to recover Stray data on your PS4 or PS5. - How to Fix Starfield Save Games Missing and Restore Progress
If your Starfield save games are missing on Steam and Xbox, don't worry! You can recover lost game data using Qiling data recovery software, which we recommend to help you restore your lost game data on your computer. - 4 Working Ways to Recover Lost Files After macOS Monterey Update
If you've lost files after updating to macOS Monterey, don't panic! There are practical ways to recover them, and Qiling Mac data recovery software is a standout option for its ease and efficiency. To get started, simply follow the steps to recover your lost files on macOS Monterey.