5 Tips | How to Transfer Data from One iPhone to Another
When buying a new iPhone, one of the first things on your mind is likely transferring data from your old iPhone to the new one. Fortunately, there are a few ways to get the job done, and this guide will walk you through them.
- Part 1. Transfer Data from iPhone to Another via Quick Start
- Part 2. Transfer Data to New iPhone via iPhone Migration
- Part 3. Transfer Data from iPhone to iPhone with A Data Transfer Tool
- Part 4. Transfer Files Between iPhonesvia iCloud
- Part 5. Transfer Data from iPhone to iPhone Without iCloud via iTunes
Part 1. How to Transfer Data from iPhone to Another via Quick Start [iOS 11 or Higher]
To use the Quick Start feature in iOS 11, ensure you have prepared your new iPhone by making sure it is updated to the latest version of iOS. This feature allows users to transfer data to a new iPhone, making the transition smoother and more efficient. Before using Quick Start, ensure your new iPhone is updated to the latest version of iOS.
- Both iPhones are running iOS 11 or later.
- Bluetooth and Wi-Fi are enabled on both devices.
Step 1. Activate Quick Start on Your New iPhone
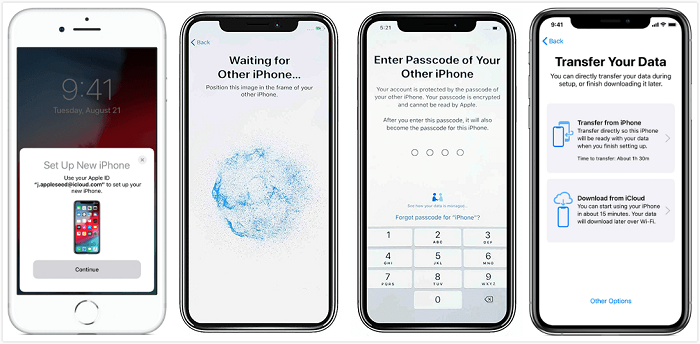
Turn on your new iPhone and place it close to your old one. A Quick Start screen will appear, prompting you to set up your new iPhone with your Apple ID. Tap "Continue" to proceed.
Step 2. Pair Your Old iPhone and New iPhone
To transfer data from your old iPhone to your new one, place your old device over the new one and center the animation in the viewfinder. Wait for a message that says Finish on New [Device Name] and then enter your old device's passcode on your new device.
Step 3. Set Up Your Face/Touch ID
Follow the on-screen instructions to set up Face ID or Touch ID on your new iPhone, enter your Apple ID password, and if you have multiple devices, enter their passcodes, one by one.
Step 4. Restore from iCloud Backup
After setting up your new device, you'll have the option to restore apps, data, and settings from your most recent iCloud backup or update your current device's backup and then restore. Simply choose one backup that contains the data you want to use to set up your new iPhone.
If your current iPhone or iPad is running iOS 12.4 or later, you can use the iPhone Migration feature to transfer data to the new iPhone.
Part 2. How to Transfer Data to New iPhone via iPhone Migration [iOS 12.4 or Higher]
With the release of iOS 12.4, Apple has introduced a new iPhone Migration feature that allows for quicker and easier data transfer between two iPhones. To get started, ensure that both devices are running iOS 12.4 and that they are connected to the same Wi-Fi network. Then, on the source iPhone, go to Settings > [your name] > Migration, and follow the prompts to begin the transfer process.
- Bluetooth is enabled on both devices.
- Both iPhones are fully charged.
- Bring both iPhones close to each other.
Step 1. To set up your new iPhone using QuickStart, bring your old iPhone close to it during the setup process. On your old iPhone, QuickStart will automatically pop up, prompting you to tap "Continue".
Step 2. Confirm your identity using Touch ID or Face ID.
Step 3. The new iPhone displays an animation that needs to be scanned by the old iPhone's camera. If the old iPhone's camera is not functioning, the "Authenticate Manually" option can be used to complete the process automatically.
Step 4. To transfer data from your old iPhone to your new iPhone, you'll need to enter the Passcode of your old iPhone on your new iPhone, and then set up Face ID/Touch ID on your new iPhone.
Step 5. After completing all the jobs, it's time to decide how to transfer data, with the options being either transferring data from the old iPhone or restoring from an iCloud backup, both of which display the estimated time required for the process.
Part 3. How to Transfer Data from iPhone to iPhone with A Data Transfer Tool
Both the QuickStart and Migration features require restoring the whole backup to your new iPhone, which may not be what you want to do. Instead, consider using a reliable iPhone data transfer tool to transfer all or specific items from your old iPhone to your new one. This approach allows for a more targeted and efficient transfer process, giving you more control over what data is transferred.
You can transfer specific data from your old iPhone to your new one, and also save music and text messages to your computer using Qiling MobiMover.
To transfer all files from iPhone to iPhone, simply download Qiling MobiMover on your computer and follow the steps below. This will enable you to quickly and easily transfer all your files to your new iPhone.
Step 1. Connect two iPhones to your computer with USB cables and tap "Trust This Computer" on each device. Launch Qiling MobiMover, select "Phone to Phone" mode, choose the data transfer direction, and click "Next".
Step 2. MobiMover allows you to transfer iPhone data directly without using iTunes. You can select specific data to sync and click "Transfer" to initiate the process.
Step 3. The process begins to transfer data from iPhone A to iPhone B without using iTunes. Don't disconnect your devices until the process is finished, after which you can open the corresponding apps to check the synced items.
Part 4. Transfer Files Between iPhones via iCloud
If you prefer not to install a third-party application, you can use iCloud's backup and sync feature to transfer files to a new iPhone. You can either back up your whole device to the cloud storage and restore it to your new iPhone, or sync specific items between your old and new iPhone. To do this, go to Settings on your old iPhone, tap on your name, and select "iCloud." Then, tap on "iCloud Backup" and turn it on.
Option 1. Transfer data from iPhone to iPhone with iCloud backup
Step 1. If you haven't already, make a copy of your iPhone data as a precaution. This will ensure that you have a backup of your important information in case something goes wrong.
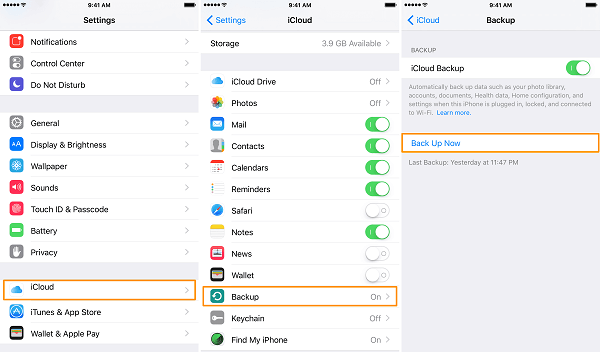
1. Go to Settings > [your name] > iCloud > Backup.
2. Switch on iCloud Backup > Tap on "Back Up Now."
Step 2. Restore your new iPhone from the iCloud backup
If your iPhone is brand new, you can restore it from an iCloud backup during the setup process. If it's not new, you'll need to erase the device and then restore it from the iCloud backup.
Restore iPhone from iCloud backup when setup:
1.Turn on your new iPhone and choose your language.
2. To set up your iPhone, start by connecting to a Wi-Fi network. Then, set up Face ID or Touch ID, which is the facial recognition or fingerprint scanning feature that allows you to unlock your phone with a glance or touch.
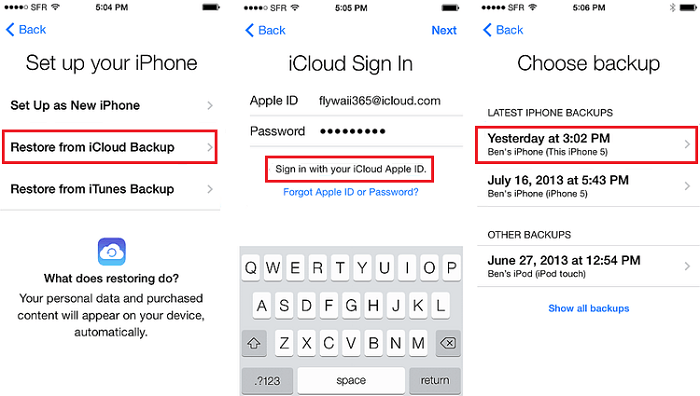
3. When you see the Apps & Data screen, choose the "Restore from iCloud Backup" option.
Restore iPhone from iCloud backup after setup:
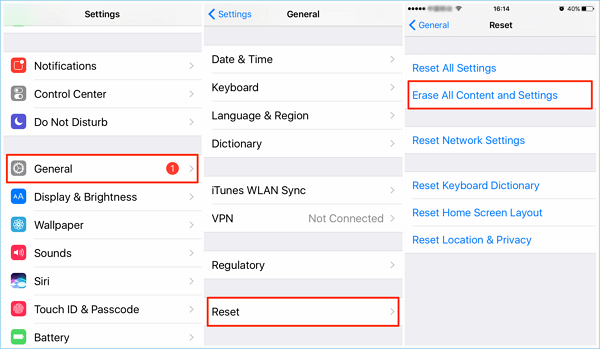
1. Open your new device, go to"Settings," and tap on "General."
2. Choose "Reset" and click "Erase All Content and Settings."
3. Tap on "Erase iPhone" and choose "Restore from iCloud Backup."
4. Choose the recent backup of your old iPhone.
Option 2. Sync Specific Items from iPhone to iPhone with iCloud syncing
To sync data between iPhones, connect both devices to the same Wi-Fi network and log in to the same Apple ID on both phones.
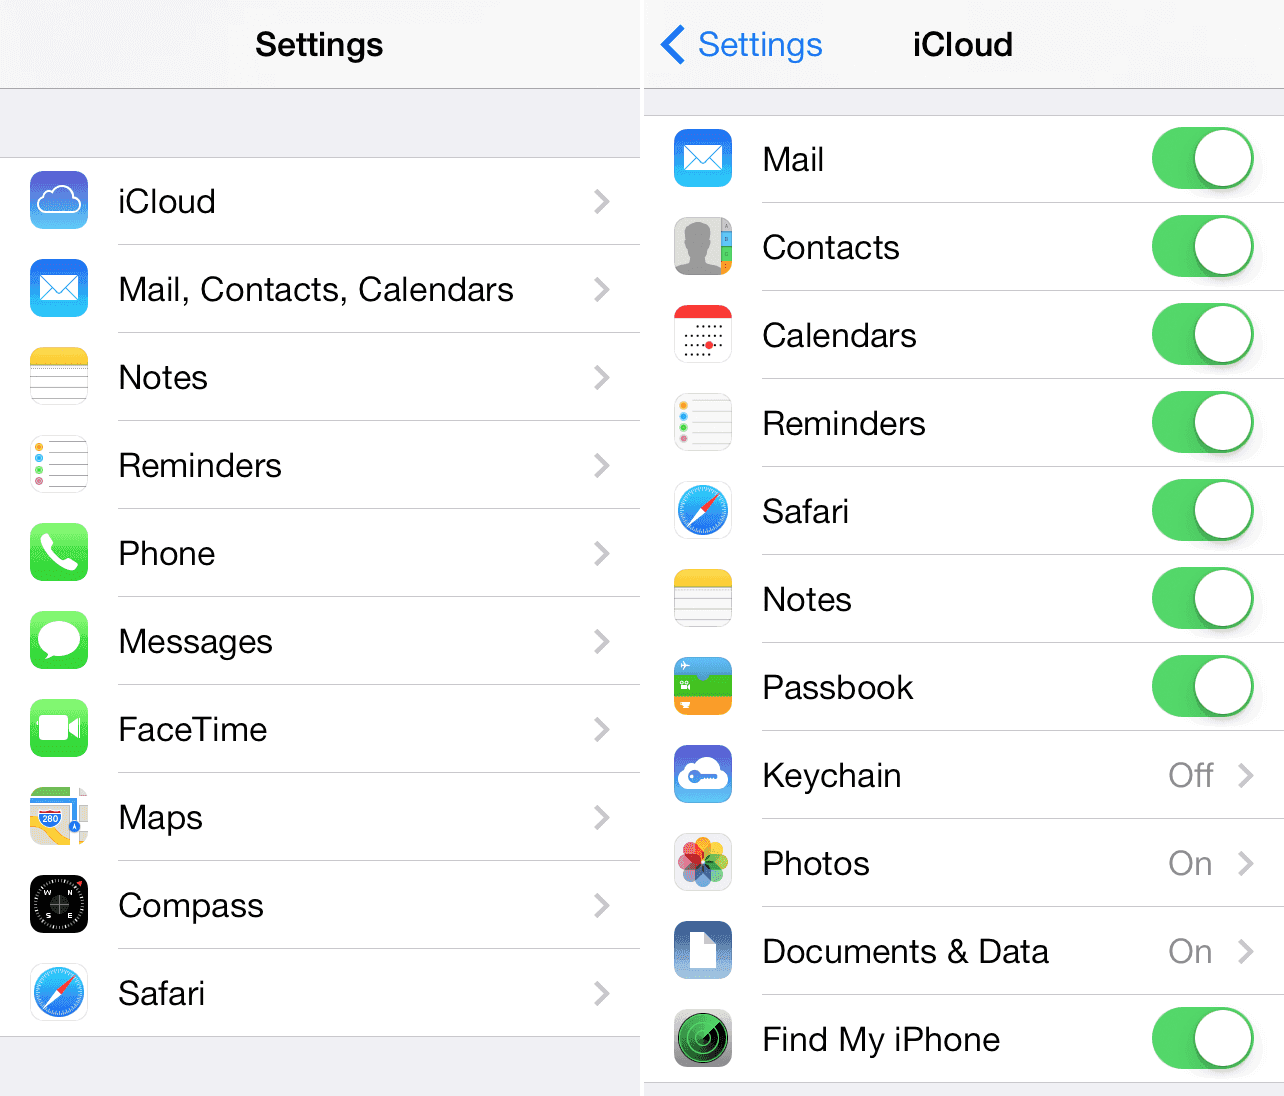
Step 1. To access iCloud settings, go to the "Settings" app, then choose "iCloud" (or tap on your name and then choose "iCloud" if you're using iOS 10.3 or later).
Step 2. To start the transfer process, tap on "Move Data from iPhone to iPad" and follow the on-screen instructions. Make sure both devices are connected to the same Wi-Fi network.
Step 3. Apply the same steps on your new iPhone.
Part 5. How to Transfer Data from iPhone to iPhone Without iCloud via iTunes
You can also use iTunes to transfer files between two iOS devices, apart from iCloud. To do this, you'll first need to back up your old iPhone with iTunes. Then, you can follow the steps to sync the data to your new iPhone.
If your new iPhone hasn't been activated yet, you should:
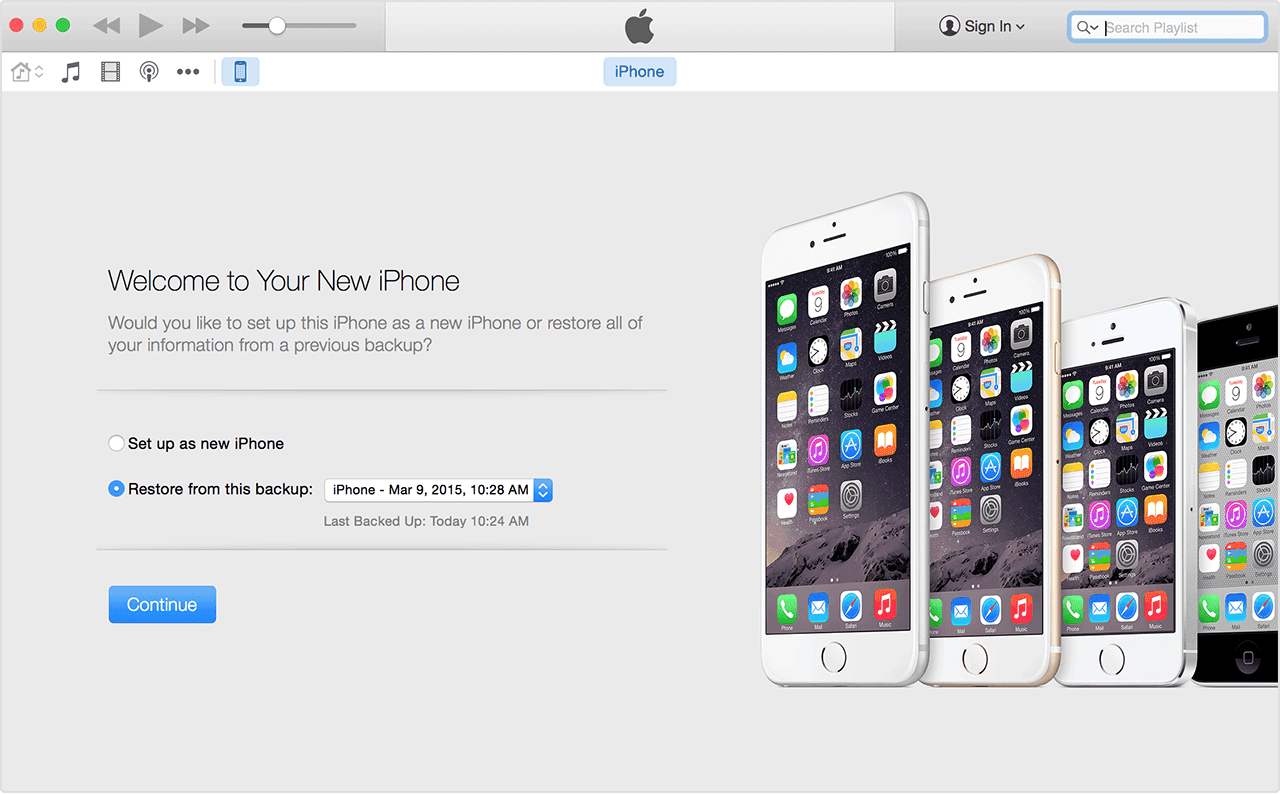
Step 1. Connect your new iPhone to the computer that has the backup of your old iPhone and launch iTunes. Then, go to iTunes and select your new iPhone from the top left corner of the screen.
Step 2. Click the Device tab.
Step 3. In the "Welcome to Your New iPhone" window, choose "Restore from this backup" and select the backup of your old iPhone you recently made, then click "Continue".
If your new iPhone has been activated, you can follow the steps below to continue. If it hasn't been activated yet, learn how to set up a new iPhone according to the way to set up iPhone 7.
Step 1: Connect your iPhone to your computer and run iTunes.
Step 2: To view the device summary, tap on the "Device" tab and select "Summary" from the "Settings" section.
Step 3. Choose "Restore Backup".
Step 4. Select a backup and click "Restore."
The Bottom Line
Transferring data from an old iPhone to a new one can be done in several ways. Users can back up their old iPhone to iCloud or iTunes, which allows them to restore their data to their new iPhone.
If you want to transfer all data, including core settings, from one iPhone to another, both QuickStart and Migration are viable options.
If you don't want to restore the entire backup from iCloud, you can use MobiMover to selectively transfer data from your old iPhone to your new one.
For users who prefer to use iTunes and iCloud, either Part 4 or Part 5 is a good choice, allowing them to enjoy their new iPhone with a seamless transfer experience.
Related Articles
- iPhone Backup Taking Forever? - How to Speed Up iPhone Backup
- How to Download YouTube Videos to iPhone/iPad in 4 Ways
- How Do I Convert HEIC to JPG on Windows, Mac, iPhone, and Android
- How to Fix Xbox One Only Shows Green Screen
If you're experiencing issues with your Xbox One, getting stuck on a green screen can be frustrating. Fortunately, this article provides solutions to help resolve the problem, allowing you to get back to gaming without any further issues.