Why Are My iPhone Photos HEIC and How to Convert
Why Are My iPhone Photos HEIC
HEIC is a file format adopted by Apple since iOS 11, offering improved image quality and reduced device space compared to JPG. As a result, Apple uses it as the default format for storing iPhone photos, helping users save valuable storage space on their devices.
However, since HEIC is a relatively new format, it is not widely accepted or supported by some devices or programs, making it difficult to open and use HEIC files on non-Apple devices like Windows PCs.
You may need to convert your iPhone camera's HEIC photos to JPG format to use them on Windows, Android, or other common programs, as these devices/programs may not support HEIC.
How to Save Photos in JPG on iPhone
To save iPhone photos in JPEG instead of HEIC, go to Settings, then Photos, and toggle the switch next to "High Efficiency" to the "Off" position. This will change the format of your saved photos to JPEG.
To save photos in JPG on iPhone:
Step 1. Go to the Settings app on your iPhone.
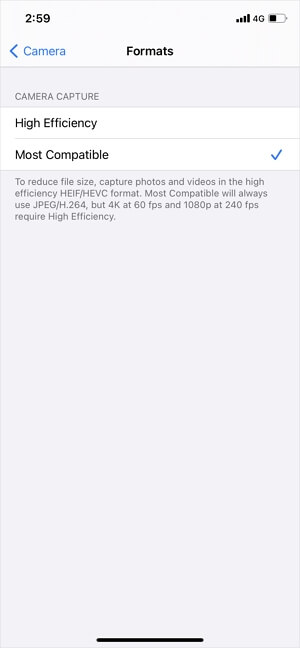
Step 2. Scroll down to choose "Camera" and tap "Formats."
Step 3. To save your photos as JPEG files, select the "Most Compatible" option. This will ensure that your photos are saved in a widely supported format.
How to Convert HEIC to JPG
You can convert HEIC to JPG using different methods depending on the device you're on. On your iPhone, you can use the Photos app to export HEIC images as JPGs. On a computer, you can use software like Adobe Photoshop or Preview to make the conversion.
Convert HEIC to JPG on iPhone
To change HEIC to JPG directly on your iPhone, you can use the Files App to help.
To convert iPhone photos to JPEG:
Step 1. To convert photos to JPEG, go to the Photos app on your device, select the pictures you want to convert, and then click on the "Share" button. From the share menu, select "Save to Files" and choose the "JPEG" format from the options.
Step 2. Tap the "Share" icon and select "Copy Photos."
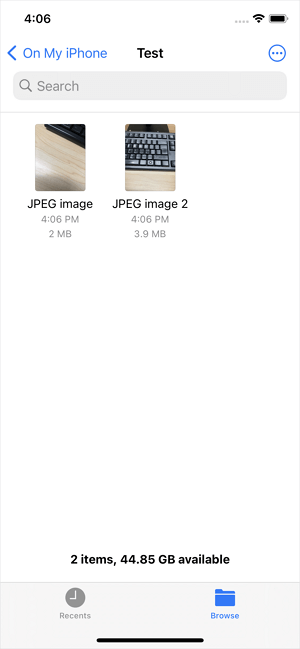
Step 3. To access the files stored on your iPhone, go to the Files app and tap on "Browse" and then select "On My iPhone" from the menu.
Step 4. To paste an image, press and hold any part of the blank area and tap "Paste".
Step 5. Now you can see that the photos are JPG files on your iPhone.
Change HEIC to JPG on PC/Mac
After transferring photos from your iPhone to a computer, especially a PC, you'll need to convert HEIC to JPG to view them. Qiling MobiMover, an iPhone data transfer tool and photo converter, can help with this process. With MobiMover installed on your Mac or PC, you can convert HEIC to JPG in batch or selectively. This tool will assist you in easily opening and viewing your iPhone photos on your computer.
- Transfer files between an iPhone/iPad/iPod and a computer
- Transfer files between two iDevices
- Back up iPhone/iPad/iPod data
- Convert HEIC to JPG
Qiling MobiMover is a comprehensive tool that provides a range of features to manage and transfer content between your iDevice and computer, making it a useful utility for iDevice users.
To convert HEIC to JPG on Windows or Mac:
Step 1. Launch Qiling MobiMover on your Mac, go to "HEIC to JPG," and click "Browse" to select the HEIC images you want to convert.
Step 2. Select the HEIC files you want to convert and click "Open" to start the conversion process.
Step 3. To convert HEIC to JPG on your Mac, click "Convert" or "Start All" to initiate the conversion process. Once the process is complete, click the "View" button to access the converted JPG photos.
If you're a Mac user, you can use built-in apps to convert HEIC images to JPG format. For more information, check out the guide on how to convert HEIC to JPG on Mac.
The Bottom Line
Now you know why your iPhone photos are HEIC instead of JPG, and you've learned how to change HEIC to JPG. With your iPhone set to take JPG photos, you can easily transfer and open these pictures on various devices like PC or Android, and use them in your projects.
Related Articles
- How to Sync Contacts from iPhone to iPad With/Without iCloud
- How to Transfer Contacts from iPad to iPhone 13/12/11
- Free iPhone Ringtones Maker to Add Ringtones to iPhone Easily
- Best Vlive Video Downloaders You Can't Miss