How to Use Clonezilla on Windows 10/11 [2024 Guide] 💡
Clonezilla is a free cloning tool that can be used to clone a hard drive, but it may not be the best choice for beginners due to its complex interface. It requires relevant computer skills to operate.
If you're looking to employ Clonezilla as your cloning tool, this guide will walk you through how to use Clonezilla on Windows. Clonezilla will provide step-by-step instructions and real-time images to ensure a seamless cloning experience.
Cloning a hard drive can be a time-consuming process, but there's an alternative solution. Qiling Disk Master is a tool that allows you to clone an entire drive in just three easy clicks, making it a more efficient option.
How to Use Clonezilla
Clonezilla is a free and open-source disk cloning and imaging software that allows users to create a bit-for-bit image of a hard drive, enabling them to restore the exact same data to another drive. It can also be used to clone a hard drive to another, making it a useful tool for backing up and restoring data, as well as deploying identical systems. This section will provide a brief overview of what Clonezilla is and how to use it, making it a great resource to share with those unfamiliar with the software.
What Is Clonezilla
Clonezilla, first released in 2007, is an open-source disk cloning program that has gained recognition for its free features. It also offers additional features like system deployment, data backup, creating disk images, and disk partitions, and is compatible with Windows, macOS, and Linux operating systems. Two versions are available: Clonezilla Live for individual cloning tasks and Clonezilla Server, with Clonezilla Live being suitable for cloning small amounts of data.
How to Use Clonezilla to Clone Windows Hard Drive
Here are the detailed steps for cloning a hard drive using Clonezilla software in one paragraph:
#1 Create a Bootable USB
Step 1: Turn on your Windows computer and open the internet browser.
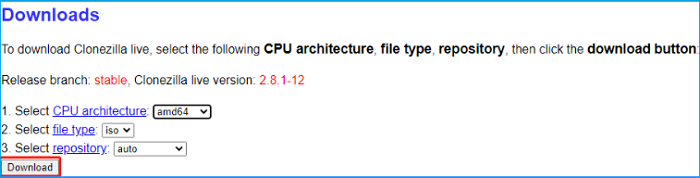
Step 2: Download Clonezilla Live software on its official website.
Note* Select CPU architecture: amd64, and file type: iso.
Step 3: To create a bootable device, download any burning tool such as Rufus 3.20, which we are using, or use other similar tools.
Step 4: Insert a USB drive into the Windows computer.
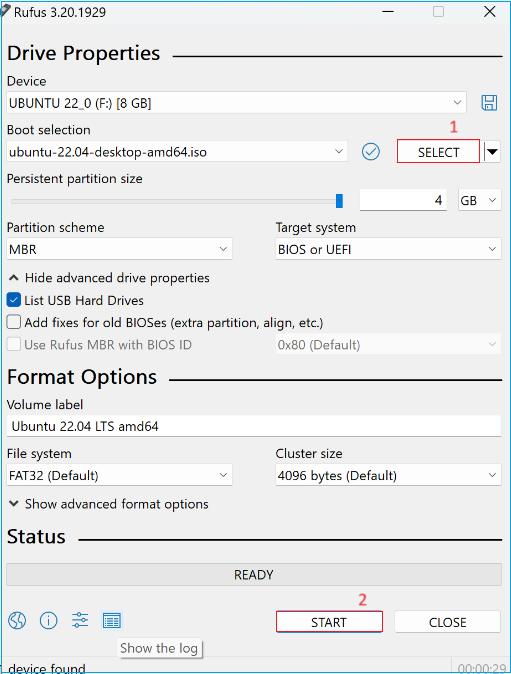
Step 5: Go to downloads and launch Rufus's ".exe" file.
Step 6: Click the "Select button" under the "boot selection."
Step 7: Download the Clonezilla file, click on it and select "START" from the bottom to begin creating a bootable Clonezilla for the connected USB drive.
Step 8: If the process is over, restart your computer.
Step 9: Press the relevant function key to enter the BIOS configuration.
Note* If you're unsure about the correct "Fn" key, you can quickly search the internet for the model number of your computer, which should provide you with the correct information. This will help you identify the correct key combination for your specific laptop model.
Step 10: Once you're in the BIOS settings, navigate to the menu and use the + and - keys to move the USB drive to the top of the list.
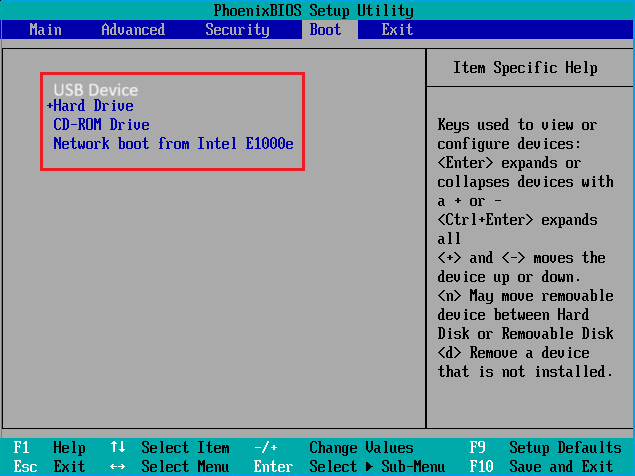
Step 11: Select the "Save and exit" option.
#Clone Hard Drive with Clonezilla Live
To clone data from the original drive to the bootable device, we need to ensure the USB drive is connected and then use a cloning software like Qiling Backup to create an exact copy of the original drive. This process will preserve all data, including operating systems, programs, and files, and will be used to boot up the computer. The cloning software will handle the complex process of duplicating the drive's contents, including the operating system, programs, and data, to the bootable device.
Step 1: Boot the computer using the USB drive, then connect a targeted SSD or HDD to the system.
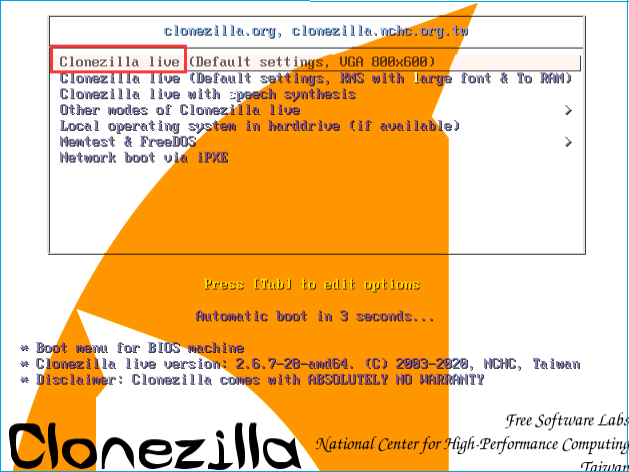
Step 2: To clone a hard drive using Clonezilla Live, click the "Clonezilla Live" option when you see the interface, then press the "Enter" key to proceed.
Step 3: Choose the language as "English" and press "Enter.
Step 4: Select the keyboard layout as "default."
Step 5: Choose "Proceedzilla" to continue.
Step 6: Choose the "device-device work directly from a disk or partition to a disk or partition" mode and press Enter.
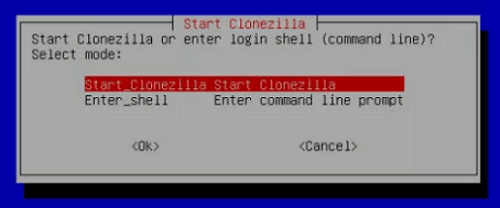
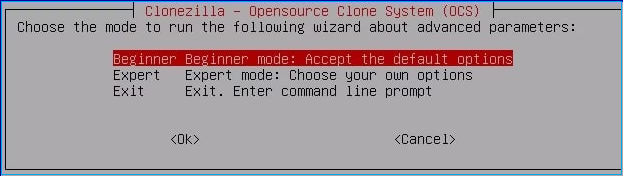
Step 7: Select "Beginner" and press "Enter" to run the wizard.
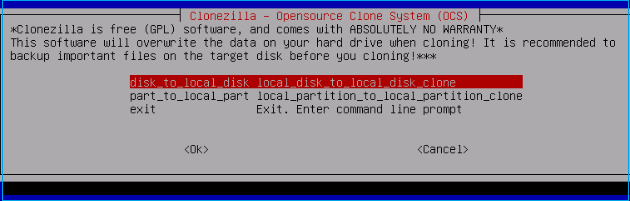
Step 8: Select the "disk_to_local_disk local_disk_to_local_disk_clone" option as a cloning method and hit "Enter. This will clone the source disk to a local disk, which is a good option for creating a clone of the source disk.
Step 9: After selecting the desired disk, it will prompt you to choose the source disk and target drive. Simply select the relevant drives according to your needs.
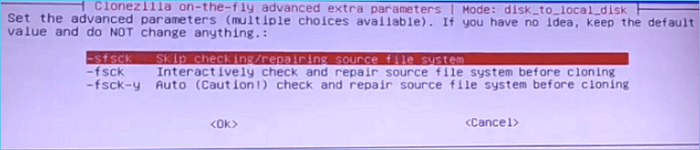
Step 10: Choose the "Skip checking/repairing source file system" and hit Enter."
Step 11: Press "Y" three times, then hit Enter.
Step 12: To clone your computer, start the cloning process, wait for it to complete, and then turn off your computer once the cloning is successful.
Step 13: Remove the bootable flash drive and turn on your computer.
Note* If the computer won't boot normally, plug in the bootable drive and adjust the boot order from the BIOS settings.
Cloning with Clonezilla can be a complex process for those who are new to it. However, there's an alternative that makes cloning easy and automated, requiring just a few clicks.
Best Alternative to Clonezilla - Qiling Disk Master
Qiling Disk Master Professional is a user-friendly utility that simplifies the process of cloning a hard drive, completing the task in just three clicks, and also offers additional disk management features such as partition creation, resizing, and formatting.
Unlike Clonezilla, which requires computer expertise, Qiling Disk Master offers a user-friendly interface that makes it easy for both novice and experienced users to manage the cloning process with clear on-screen instructions.
Download Qiling Disk Master, a user-friendly tool, and follow the straightforward steps to clone your hard drive with ease.
Step-by-step Guide to Clone a Hard Drive Using Qiling Disk Master
Step 1. Select the source disk.
- To clone a disk, click the "Clone" option from the left menu, select either "Clone OS Disk" or "Clone Data Disk", and then click "Next".
- Choose the source disk and click "Next".
Step 2. Select the target disk.
- Select the desired hard drive or solid-state drive as the destination and click "Next" to proceed.
- Read Warning message and confirm "Yes" button.
Step 3. View the disk layout and edit the target disk partition size to customize your disk configuration.
Then click "Continue" when the program warns it will wipe out all data on the target disk. (If you have valuable data on the target disk, back up it in advance.)
You can choose from three options to customize your disk layout: Autofit the disk, Clone as the source, or Edit disk layout. The last option is recommended if you want to leave more space for the C drive.
Step 4. Click "Start" to start the disk cloning process.
Additional Features:
- Disk/Partition Clone: Easily clone entire drives or specific partitions.
- OS Migration: Transfer the operating system to another computer without reinstallation.
- Data Backup: To prevent data loss while cloning a hard drive to another, ensure that the target drive has enough free space to accommodate the entire contents of the source drive. Additionally, make sure the target drive is not the same drive as the source drive, and that the cloning software being used is reliable and up-to-date. It's also a good idea to back up any important files on the source drive before starting the cloning process, just in case something goes wrong.
Experience the power of Qiling Disk Master for efficient cloning and disk management. With its user-friendly interface and powerful features, you can enjoy hassle-free disk management and try it now to see the difference for yourself.
Conclusion
Clonezilla is a useful tool for transferring data from one drive to another, but it requires advanced computer skills. To use it on Windows 10/11, you can create a bootable USB drive with Rufus and follow the provided steps. However, if you're not comfortable with the complex process, consider using Qiling Disk Master as an alternative, which offers advanced features for cloning and disk partitioning needs.
Discover more useful details in the following articles:
FAQs About How to Use Clonezilla
Here are answers to some common queries if you want to know more about using Clonezilla on Windows 10/11.
1. How do I use the Clonezilla device image?
To clone a disk using Clonezilla, start by booting into the Clonezilla environment and following the on-screen instructions to use the Clonezilla device image. You will then be presented with options to clone a disk, create a disk image, or restore a disk from an image. Simply select the disk image option and follow the on-screen instructions to complete the cloning process.
2. How can I format a hard drive with Clonezilla?
Formatting a hard drive with Clonezilla is a straightforward process. To do so, simply follow these steps:..
Step 1: Boot your hard drive with Clonezilla live USB.
Step 2: Choose the disk formatting option from the screen.
Step 3: Locate the hard drive you want to format.
Step 4: Pick the preferred file system format and confirm your action.
Step 5: Reboot your computer.
3. Can Clonezilla save to the NTFS file system?
Clonezilla supports saving images to the NTFS file system, allowing users to choose the NTFS partition or disk as the target destination during the cloning or restoration process.
Related Articles
- How to Clone and Move System Reserved Partition to Another Drive or Another Disk Windows 11/10
- How to Remove Partition on External Hard Drive [2024 Updated]
- How to Free Up Disk Space Windows in 7 Quickly
- M.2 SSD Shows Empty on the New PC, but Definitely Not
Have you ever encountered this 'M.2 SSD shows empty on the new PC, but definitely not' problem? Let me explain why this issue will happen and how to resolve it easily. - HDD Regenerator Free Alternative on Windows 10/8/7
Finding free HDD Regenerator alternative works similar or even better? Here is the best alternative to HDD Regenerator. Just free download the HDD repair software and try it to check and repair file system errors, bad sectors, disk error on your hard disk drive and recover corrupted files. - Free Download HDD Regenerator Crack + Serial Key (Safe Alternative)
If you're looking to download HDD Regenerator crack, serial number, or keygen to repair bad sectors and retrieve data, we recommend a safer alternative: Qiling free hard disk bad sector repair software. This solution helps you avoid potential risks associated with cracked software. Simply download the Qiling software to get started.