How to Convert Dynamic Disk to Basic Disk in Windows 11
Why Convert a Dynamic Disk to Basic
Converting a dynamic disk to a basic disk in Windows 11 results in a more stable partition scheme, where each partition has its own allocation table and acts as an independent volume. This change occurs as the dynamic disk becomes a basic disk, allowing for more flexibility and stability in partition management.
Converting a dynamic disk to a basic disk in Windows 11 is often necessary for multi-boot configurations and better performance. This is because basic disks support older versions of Windows operating systems, making it easier to switch between different versions. Additionally, formatting a dynamic disk can be tricky, and converting it to a basic disk can help resolve compatibility issues and improve overall performance.
Switching between different disk configurations on Windows 10 might be necessary for various reasons, such as changing from a complex storage scheme to a more streamlined one, or converting a Dynamic disk to Basic due to system errors or corruption. (Note: I've kept the original text's content, but condensed it into a single paragraph with a more neutral tone)
How to Convert Dynamic Disk to Basic Without Data Loss in Windows 11
You can convert a dynamic disk to a basic disk in two ways. One method is through the Disk Management console, but this approach is not recommended. Alternatively, you can use the Qiling Partition Master tool, which allows you to directly convert the dynamic disk to a basic disk without any data loss, keeping all volumes intact.
With Qiling Partition Master, converting a dynamic disk to basic or vice versa is a straightforward process. The program's user-friendly wizard guides you through the conversion process, allowing you to execute it directly without losing any data on your Windows 11 laptop or computer.
Step 1. Install and open Qiling Partition Master on your Windows computer.
Step 2. The process involves selecting the disk you want to convert, right-clicking on it, and choosing the conversion option from the context menu.
- Basic to Dynamic: right-click a basic disk and select "Convert to Dynamic".
- Dynamic to Basic: right-click a dynamic disk and select "Convert to Basic".
Qiling Partition Master simplifies complex disk partition operations into a few easy steps, ensuring safe and successful results with advanced disk management features.
- Disk quick formatting
- Partition resizing
- Hard drive migration
- Supports both MBR and GUID partitions
- Rebuild MBR
- Migrate OS from HDD to SSD without any data loss
Download this program and manage your hard drive with ease now.
How to Convert Dynamic Disk to Basic with Disk Management
Converting a dynamic disk to a basic disk in Windows Disk Management is not recommended, as it can cause data loss and other issues.
When converting a dynamic disk to a basic disk, all data on dynamic volumes will be lost, so it's essential to back up any important data before proceeding.
To convert a dynamic disk to a basic one on Windows 11 using the Disk Management tool, follow these steps: Open the Disk Management tool by typing 'diskmgmt.msc' in the Run dialog box or searching for it in the Start menu. In the Disk Management window, right-click on the dynamic disk you want to convert and select 'Convert to Basic Disk'.
Step 1.To open the Windows 11 Disk Management tool, press the Windows button on your keyboard and search for Disk Management. Once found, press Enter to open the tool.
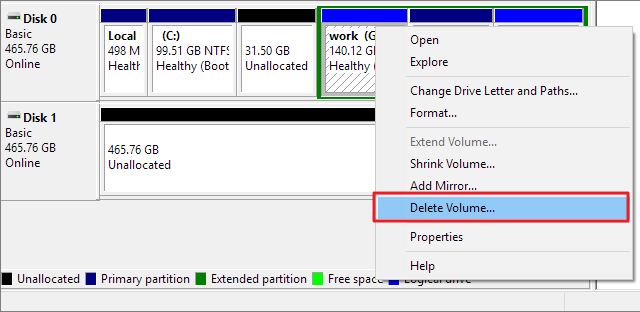
Step 2.Now, right-click on the dynamic disk volume and select "Delete Volume".
Repeat this for every volume available on the disk drive.
After deleting all volumes from a dynamic disk, it's impossible to recover any data from those volumes. The dynamic disk itself can be reinitialized, but the deleted data cannot be recovered.
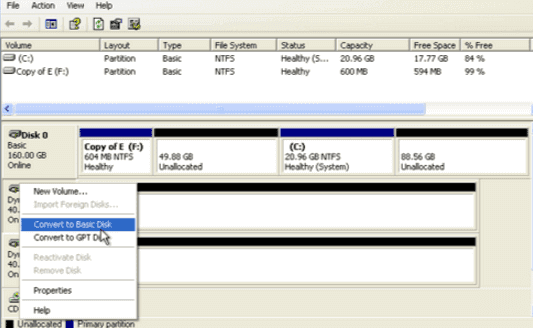
Step 3.Once all volumes have been deleted, select the disk in Disk Management and click "Convert to Basic". When prompted, assign a new volume label.
How to Convert Dynamic Disk to Basic with Command Prompt
Converting a Dynamic disk to a Basic disk will erase all data on the Dynamic disk without warning, so it's essential to back up any important data before proceeding. If you're certain that this is the right time to make the switch, make sure you've backed up all necessary files and data. Never attempt to convert a Basic disk that contains your operating system or essential applications.
Step 1. Open the search box and type diskpart.

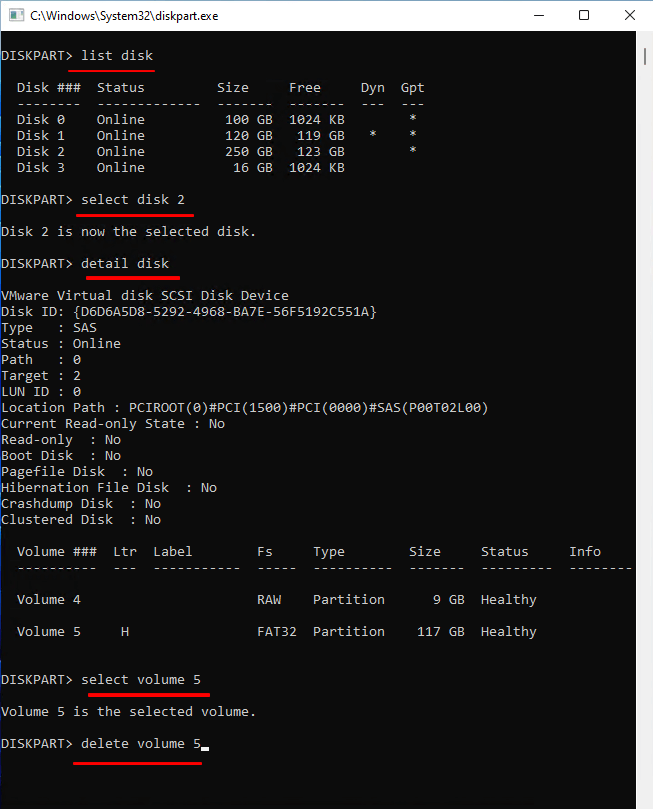
Step 2. Type list disk and note the disk number of your volume you want to convert to basic. It goes like this:
list disk.
select disk 2 (You can Replace 2 with your dynamic disk number).
detail disk.
select volume 5 (Replace 5 with dynamic disk number you want to delete).
delete volume 5
To convert a dynamic disk to a basic disk, you will need to delete all existing volumes on the disk. This will allow you to convert the disk from dynamic to basic.
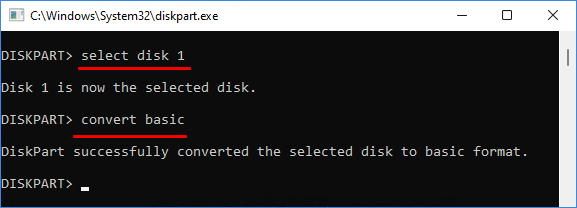
Step 4.After deleting all the disk volumes, run the below commands and press Enter every time.
- select disk 1 (Press Enter)
- convert basic (Press Enter)
- select disk 2 (Press Enter)
- convert basic (Press Enter)
To convert all volumes from dynamic to basic on Windows 11, repeat the following commands for any number of disks: `wmic diskdrive where index>0 rename "Basic (C:)"` `wmic diskdrive where index>0 rename "Basic (D:)"` `wmic diskdrive where index>0 rename "Basic (E:)"` and so on, replacing `(C:)`, `(D:)`, `(E:)`, etc. with the actual drive letter of each disk.
Step 5.1. Open the Command Prompt as an administrator.
It's easier to use third-If you want to change a dynamic disk to a basic disk, it's recommended to use a third-party disk manager like Qiling Partition Master, which is easier than using the Command Prompt. This approach can help avoid any potential issues or complications that may arise from manually converting the disk format.
Concluding Words
Qiling Partition Master offers a powerful disk management solution, allowing users to optimize their PC's performance by converting dynamic disks to basic disks on Windows 11 using its dynamic disk conversion function.
Qiling Partition Master is a reliable partition software that offers a complete solution for managing your hard disk, allowing you to resize, move, copy, clone, shrink, and merge partitions with ease, making it an affordable and secure way to manage your hard drive space.
Related Articles
- How to Download Partition Assistant for Server with License Key to Manage Disks [2022 New]
- Fixed: WD My Passport Ultra Not Showing Up/Detected
- Top 7 Best Drive Eraser Software For Your PC & Mac
- How to Clone 2TB HDD to 1TB SSD in Windows 11/10/8/7? Your Guide Is Here
- How to Recover and Repair USB Drive/SD Card Partition in 2022
Here, you can find a simple solution to repair a damaged USB partition. Additionally, Qiling partition recovery software can help recover, undelete, or unformat lost data from USB drives. - A Starter Guide to the Windows Disk Management
What is disk management? This guide gives you an overall glimpse of Windows disk management. If you want to use this Windows-built tool to set up a hard drive, start from the definition to all features.