How To Create Bootable USB for Windows Server
In recent years, USB has largely replaced optical media, serving various functions such as data transfer, operating system installation, and booting on any PC. A USB is typically used for installation, and installing a Windows server from a USB disk is a relatively straightforward process.
People now prefer to burn the Server 2019 ISO on a USB device to create a bootable drive, as it allows for easy installation on different PCs or servers, saving time and effort.
If you have a portable server on a USB, you can transfer it to another computer without reinstalling it, saving you time and effort.
To make a bootable USB, start by downloading the Windows Server.iso file from Microsoft's official website. Then, you can use a third-party tool to make the task faster and easier. This tool can streamline the process of creating a bootable USB, saving you time and effort. Once you have the tool, you can follow its instructions to create a bootable USB drive that can be used to install Windows Server.
After clicking on the link, select ISO and fill in the required information to download the App Compatibility FOD. You can download a trial version with additional features, which enhances server compatibility, troubleshooting, and debugging capabilities.
Now let's take a look at the details.
| Workable Solutions | Step-by-step Troubleshooting |
|---|---|
| Fix 1. Create Windows Server 2019 Bootable USB from ISO | Insert the USB drive and run Command Prompt...Full steps |
| To create a USB bootable for Windows Server installation using a third-party tool, you can use Rufus, a free and open-source utility. First, download the Windows Server ISO file from the official Microsoft website. Next, download and install Rufus on your computer.Easier) | Connect USB to PC and start to create bootable...Full steps |
How to Create Windows Server 2019 Bootable USB from ISO
To begin the procedure, you must first complete the prerequisites. This includes having the necessary factors ready ahead of time, such as _______________________.
- You're using an 8GB USB and Windows Server 2019 is consuming 4GB while burning, requiring extra space due to the ISO image being divided into chunks larger than 3GB.
- The data is completely erased during the disk creation process, so it's essential to make a complete backup of your data to avoid losing important information.
To create a bootable USB for Windows Server 2019, we have already set up the necessary prerequisites. If you have obtained the ISO file from the official website, you can use the command line to boot a USB disk. Follow the detailed steps outlined below to complete the process.
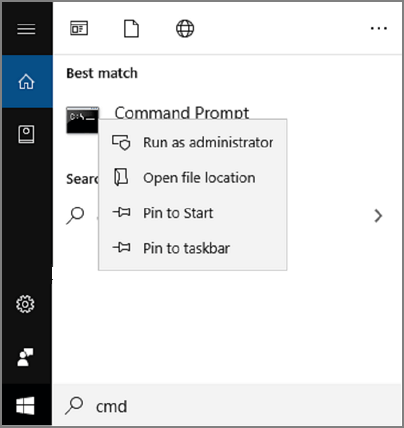
Step 1. To begin, insert the USB drive into your PC and then go to Start, type "cmd" in the search box, and click on "Run as administrator" to open a command prompt.
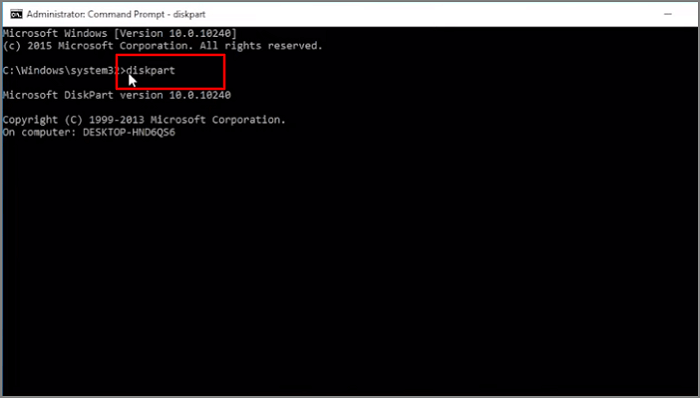
Step 2. Type command diskpart and press enter. The diskpart tool will appear.
Step 3. Type the following command one by one and press enter:
- list disk and press enter to appear disk list.
- select disk x
Here x denotes the number of your flash drive. You can enter the disk name which you want to make bootable.
Type the following commands one by one:
- clean
- create partition primary
- select partition 1
you will select the partition as per your own requirement
- format fs=ntfs quick (if you want to create UEFI bootable USB, type "format fs=fat32 quick").
- active
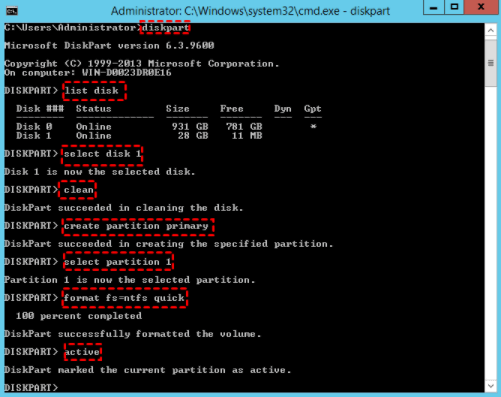
Step 4. To exit the diskpart command, simply type Exit and press enter. This will close the diskpart command.
To create a bootable USB from ISO on Windows, you can use the built-in command-line feature. By typing a few commands, you can make your USB bootable and use it on any other system. This method is straightforward and doesn't require any additional software. The command-line approach is a convenient and efficient way to create a bootable USB.
After learning how to use the built-in feature, we can now explore a third-party utility tool that can simplify the task at hand, making it easier and quicker to accomplish.
Easier Solution: How to Create a USB Bootable for Windows Server Installation
Before starting the process, ensure you back up your data and that your USB has at least 8GB of free space.
On Windows Server, Microsoft doesn't provide a feature to create bootable USB drives. Instead, you can use Qiling Partition Master, a free third-party utility that also helps with disk space allocation and management.
The following are the key features of Qiling Partition Master:
- It supports converting NTFS to FAT32.
- It is capable of supporting split partition.
- It reduced the frequent restart requirement.
- By correctly assigning the disk space it maximizes system performance.
- Change partition label.
- Flexibly adjust partition size by entering the exact partition size.
- Prevent data loss.
- Safe and secure to use.
- Available for a free trial.
- It's a tool that reformats and deletes data from various types of storage devices, making them reusable.
- To ensure security, it entirely wipes out the data on the hard disk.
Steps to Create Bootable USB:
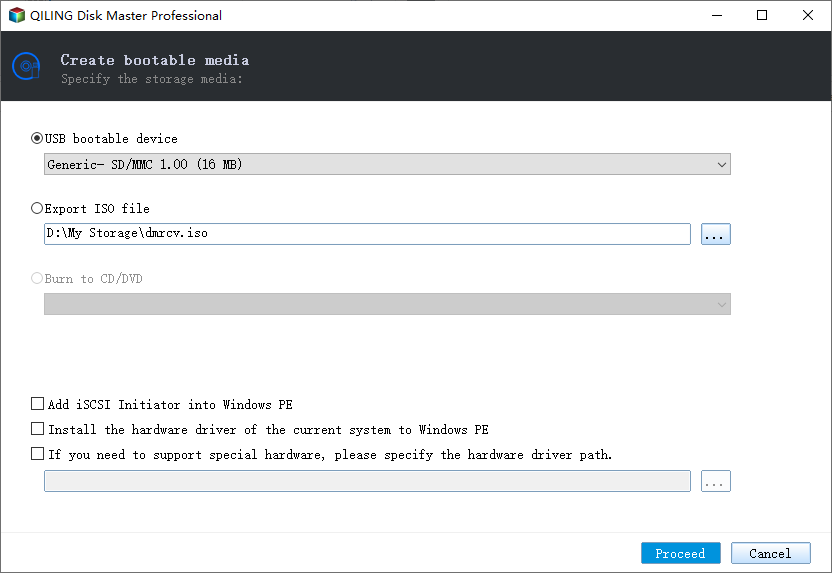
Step 1. To create a bootable disk of Qiling Partition Master, prepare a storage media like a USB drive, flash drive or CD/DVD disc, and connect it to your computer.
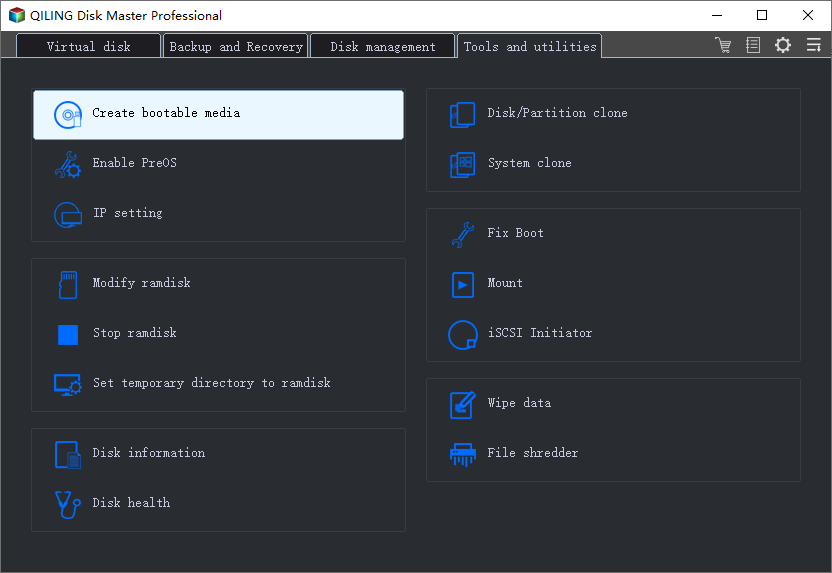
Step 2. Launch Qiling Partition Master, click on the "Create bootable media" feature at the top.
Step 3. You can choose to save the ISO file to a USB, CD/DVD, or local drive. If you don't have a storage device, you can save the file to a local drive and burn it later. Once you've made your choice, click "Proceed" to start the process.
After creating the Qiling Partition Master WinPE bootable disk, the process is complete. This enables you to manage your hard disks and partitions using the bootable drive when your computer fails to boot normally. This allows you to troubleshoot and resolve boot issues with ease.
To successfully load a RAID drive, you should first click on "Add Driver" from the menu bar, which allows you to add the specific driver for your device under the WinPE environment. This is crucial for devices like RAID or certain hard drives that may not be recognized without their respective drivers installed.
To create a USB drive, consider using a trusted third-party tool like Qiling Partition Master, which can format external devices, manage partitions flexibly, and efficiently allocate space.
Qiling Partition Master Enterprise
Your trustworthy Windows Server disk manager.
- Extend System drive, combine/split partitions.
- Clone disk, migrate OS to HDD/SSD.
- Convert MBR to GPT, GPT to MBR, no data loss.
- 1-click adjust disk layout, create volumes at one time.
Conclusion
Creating a bootable USB for a Windows server is a relatively simple process, but it's recommended to use a tool like Qiling Partition Master to make it easy and safe. However, since the bootable USB Windows Server has not been released by Microsoft, using an alternative is necessary, such as creating a bootable USB for Windows Server 2019.
To make a USB drive bootable, you can follow a step-by-step guide using the command line, but it's recommended to use Qiling Partition Master, which has a free trial and efficiently handles the task.
Related Articles
- exFAT VS NTFS: What Are the Differences Between Them
- SMART Status Bad Error: How to Repair HDD Smart Error with Free Software
- What is Dynamic Foreign Disk, How to Import Foreign Disk Without Data Loss
- Best Solutions on How To Fix Adobe Acrobat Error 0 104
- Samsung SD Card Format Tool Free Download 2024 [Step-by-step Guide]
If you're looking for tools to format your SD Card, this post provides an introduction to the Samsung SD Card Format Tool, as well as other effective format tools, along with step-by-step instructions. - SD Card Benchmark App 2024 Updated Recommend [Detailed Guide]
Do you want to check your SD Card Performance? Then check out the best SD Card Benchmark App with a detailed guide. This article introduces a reliable app for SD Card benchmarking.