How to Create WinPE Bootable Disk for All Windows OS
What is WinPE Bootable Disk
WinPE, known as Windows Pre-Windows 10/8/7/XP Lite, also known as Windows To Go, is a portable version of Windows that can be run from a USB drive or other external storage device. It's a minimal operating system that allows you to prepare a PC for installation, deployment, and Windows servicing in a lightweight and efficient way.
Why Need to Create a WinPE Bootable Disk
A WinPE bootable disk is a powerful tool that allows you to manage hard disk partitions, even when your Operating System crashes. It enables you to resize primary drives, reinstall other OS, and manage partitions on a computer without OS. Furthermore, it provides the ability to recover deleted partitions, extend system partitions, and rebuild MBR without losing any data. The most significant advantage is that it can boot a crashed computer and a computer without OS, making it a valuable resource for troubleshooting and recovery. This guide will show you how to create a WinPE bootable disk in two different ways.
Method 1. Create WinPE Bootable Disk in Two Steps
Creating a WinPE bootable disk is a complex process that requires advanced computer knowledge and involves many steps. For Windows beginners, we recommend using a third-party tool like Qiling Partition Master, which specializes in computer partition management and allows users to resize, move, and extend partitions, as well as migrate OS to HDD/SSD without losing data. Additionally, Qiling Partition Master can help users create a WinPE bootable disk with fewer steps, making it a more accessible and user-friendly option.
To create a WinPE bootable disk, download Qiling Partition Master and follow the guide below. The process is straightforward and can be completed easily.
Step 1. To create a bootable disk of Qiling Partition Master, prepare a storage media like a USB drive or CD/DVD disc, and correctly connect it to your computer.
Step 2. Launch Qiling Partition Master, click on the "WinPE Creator" feature.
Step 3. You can choose to save the ISO file to a USB, CD/DVD, or a local drive on your computer. If you don't have a storage device, you can save the ISO file to your computer and burn it to a storage media later. Once you've made your choice, click the "Proceed" button to start the process.
After the process finishes, you will have successfully created a Qiling Partition Master WinPE bootable disk, allowing you to manage your hard disks and partitions through the bootable drive whenever your computer fails to boot normally.
To load the RAID driver, click Add Driver from the menu bar, which can help you add the driver of your device under the WinPE environment. This is especially useful for devices like RAID drives or specific hard disks that cannot be recognized without drivers installed, allowing you to access and utilize them under the WinPE environment.
Method 2. Create WinPE Bootable Disk with Windows ADK
Another method you could apply is to use Windows ADK, a slightly more complicated approach that involves a step-by-step guide. If you're up for the challenge, you can try this method.
Step1.Download the Windows ADK (Assessment and Deployment Kit). It contains the CopyPE and MakeWinPEMedia command-line utilities.
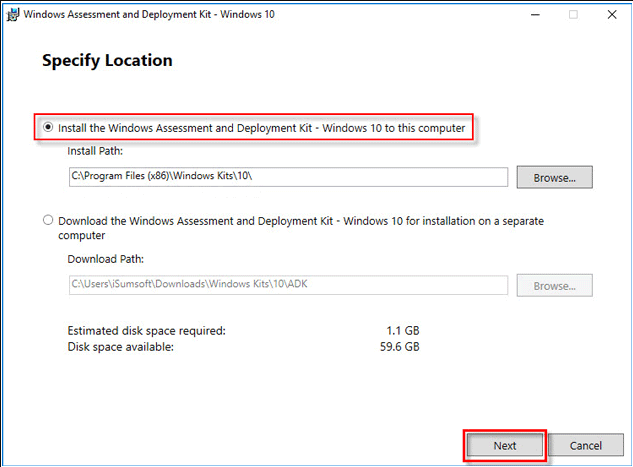
Step 2. Launch the ADK tool, select the "Install the Windows Assessment and Deployment Kit-Windows 10 to this computer" and click "Next".
Step 3. On the subsequent page, click "Next" and "Accept".
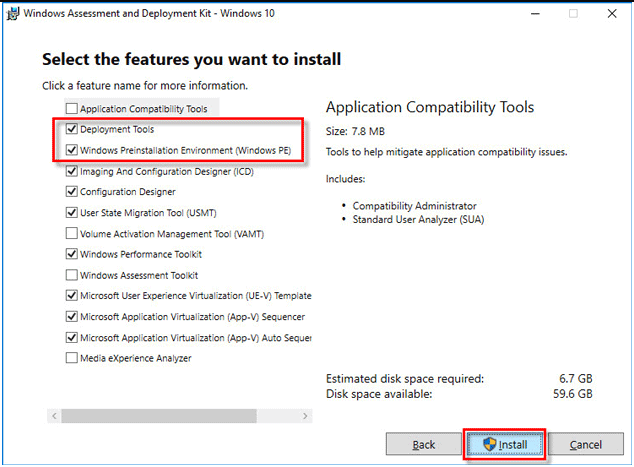
Step 4. To install Windows Preinstallation Environment (Windows PE), select the "Deployment Tools" and "Windows Preinstallation Environment (Windows PE)" options and click "Install".
Step 5. Once the installation is complete, close the installation process. Then, go to the Start menu and navigate to "Windows Kits". Right-click on "Deployment and Imaging Tools Environment" and select "Run as administrator" from the dropdown menu.
Step 6. When it runs, execute the command: copype amd64 G:\WinPEx64 (replace G:\ with your drive letter).
Step 7. Execute the command: MakeWinPEMedia /ISO G:\WinPEx64 G:\WinPEx64\WPE64.iso, which creates WinPE files and saves them to the specified location. The command will run until completion, indicated by "100% complete" and "Success" messages. This confirms the successful creation of WinPE files.
Step 8. Navigate to the G drive or the location where you created the WinPE files, where you will find a WinPE iso file.
To make a USB drive bootable, you can connect it to a computer, and then use Windows To Go to burn ISO files onto it, making it bootable. This feature is available in Windows 10 Education/Enterprise/Pro and Windows 8/8.1 Enterprise.
Step 9. Type "Windows To Go" in the search box to launch this tool.
Step 10. It will automatically search for all inserted USB drives. Choose the destination USB drive and then proceed with the process by clicking "Next".
Step 11. To add a search location, click on the "Add search location" button and then select the mounted ISO file of the Windows installation. This will allow the search to look for the ISO file in the specified location.
Step 12. To encrypt your Windows To Go workspace, set a BitLocker password on the next window.
You will finally have a WinPE bootable disk for Windows 10.
Related Articles
- How to Fix Crtical Process Died Error in Windows 11 [2021 Guide]
- How to Safely Delete Recovery Partition in Windows 10/8/7 PC and Laptop
- Asus Laptop Boot Menu: Get Everything Clear to Boot Asus PC and Laptop (from USB)
- Should I Choose MBR or GPT for SSD? Which Is Better?
- Yellow Screen of Death In Windows 10 [Detailed Info & Fixes]
The yellow screen of death is a common Windows 10 error that can be frustrating to deal with. Fortunately, resolving this issue is relatively straightforward, and there are several practical methods to try. - How to Fix Your PC Did Not Start Correctly | 8 Ways🔥
If you power up your computer and only find a warning message: Your PC did not start correctly, as this post will offer you eight workable solutions to fix this error immediately.