How to Safely Delete Recovery Partition in Windows 10/8/7 PC and Laptop
What Is A Recovery Partition in Windows 10/8/7?
To delete a recovery partition, open Windows Disk Management, find the recovery partition in the status "Healthy (Recovery Partition)", and select it. Then, right-click on it and choose "Delete Volume" or "Delete Partition". Confirm the deletion by clicking "Yes" or "OK" in the pop-up window. Note that deleting a recovery partition will not affect the overall system, but it will free up some disk space.

A recovery partition on Windows is protected from deletion and formatting, unlike a regular data partition. This is because it contains critical files and installations associated with the operating system, and is used to restore the computer to its factory state in case of a disaster. As a result, deleting a recovery partition requires advanced measures beyond the standard Disk Management method.
Two Forms of A Recovery Partition
A recovery partition is created during Windows installation or preinstalled in the computer's HDD or SSD by the manufacturer, especially for laptops from brands like Lenovo, Dell, and Asus, and is sometimes labeled as an OEM partition.
How to Delete OEM Partition in Windows 10/8/7
The OEM partition is a small partition on a computer that contains the operating system and software provided by the manufacturer, such as Dell, Lenovo, or HP. It's usually around 100-500 MB in size and is not meant to be used for storing user data. Deleting the OEM partition is generally safe and won't cause any issues with the computer's functionality.

A recovery partition, whether from a Windows installation or a manufacturer, serves the same purpose of restoring a corrupted operating system to a factory restore point.
Are You Sure to Delete A Recovery Partition?
Having a recovery partition in Windows allows for easy system recovery in case of an issue, restoring the system to its original state with just one click. Before deleting the partition, it's essential to consider the importance of having a recovery option and take necessary precautions to ensure safe removal.
TIP 1#. Create a system image backup with Windows backup and recovery software
A system image backup is more advantageous than the recovery partition because it preserves all the data, programs, and settings on your computer, whereas restoring OS using the recovery partition will wipe out everything and revert your PC to its factory settings.
To create a system image on a USB drive in Windows 10/8/7, you'll need a USB drive with enough free space to hold the image. First, connect the USB drive to your computer.
Unlike the system restore point, the biggest advantage of creating a system image is its portability, allowing you to save your system backup image to either a local drive or an external storage device.
TIP 2#. To delete a protected partition on Windows, you can't use the built-in Disk Management tool. Instead, you need to download a third-party software like Qiling Partition Master, which allows you to delete a recovery partition from a WinPE environment.
TIP 3#. In some cases, a manufacturer's recovery partition can be resistant to deletion even in a WinPE environment. To overcome this, one must first change the partition type ID using DiskPart, and then attempt to delete it using an appropriate method. This step can help ensure the successful removal of the stubborn partition.
How to Delete A Recovery Partition in Windows 10/8/7
To recover a recovery partition in a Windows computer or laptop, you'll need to use a third-party utility as Windows' built-in Disk Management can't handle it. Qiling Partition Master is a capable tool that can replace all Windows Disk Management functions and offers additional advanced features, such as resizing, deleting, merging, and converting partitions, as well as migrating the OS.
If Windows won't let you manipulate a protected drive, like a recovery partition, you can use Qiling partition magic software to achieve the desired results.
- Tip
- If the recovery partition was created during Windows installation, you can simply delete it using the normal method, as it's not necessary to create a bootable Qiling Partition Master USB drive to delete it.
Follow the step-To delete a recovery drive with Bootable Qiling Partition Master, follow these steps: First, download and install Qiling Partition Master, then create a bootable USB drive. Next, boot your computer from the USB drive and launch Qiling Partition Master.
Step 1. To delete a Windows protected partition, you'll need to access the WinPE environment. First, use Qiling Partition Master's WinPE Creator to create a bootable USB drive. This will allow you to start the system and access the partition.
Step 2. Open Qiling Partition Master WinPE edition. Right-click on the recovery partition and choose "Delete".
Step 3. To confirm the deletion of the selected partition, click "OK" after the message "Are you sure you want to delete the selected partition?" appears, which will completely remove the recovery partition.
How to Change A Partition Type ID to Be Able to Delete The Recovery Partition
If the delete option for the recovery partition is greyed out, try changing the partition type ID in Qiling Partition Master before attempting to delete it. This additional step may allow you to proceed with the deletion.
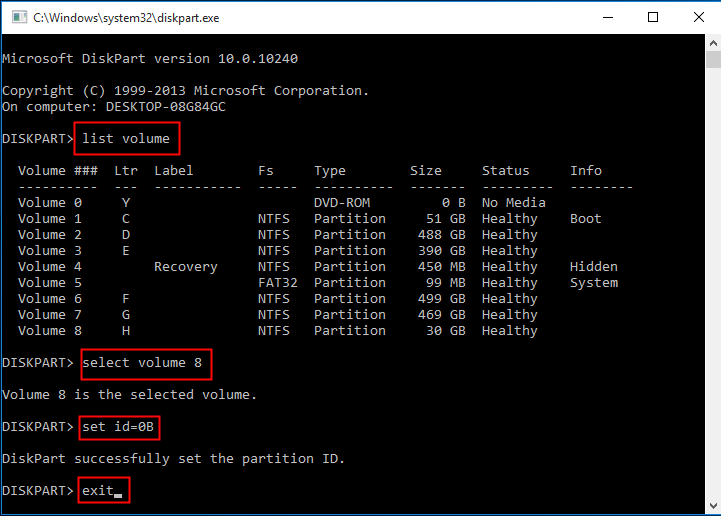
Step 1. To open Diskpart, press the Windows key + R to open the Run dialogue, type "diskpart" and press Enter.
Step 2. Type list volume and press Enter.
Step 3. To select the volume/partition of which you want to change partition type ID, type select volume # (ex: volume 8) and press Enter.
Step 4. To set a new partition type ID, type set id= followed by the desired ID (e.g.
The leading "0x" of the ID is omitted when specifying the hexadecimal partition type.
Step 5. Type exit and press Enter to exit Diskpart.
In Conclusion
This article explains how to delete a recovery partition, covering five key points. Firstly, it defines what a recovery drive is, and secondly, it discusses whether you should or shouldn't delete a recovery partition.
You'll need to use Qiling Partition Master, a reputable third-party partition manager software, to manage your computer and laptop's hard drives. This tool offers a range of features that go beyond what the Windows Disk Management tool provides.
If you're unable to delete a recovery partition with Qiling Partition Master, it's likely due to the partition type ID, which can be modified using DiskPart. You can then attempt to delete the partition using the partition manager software.
Related Articles
- USB Partition Tool/Manager: Partition USB or Create Portable USB Drive
- [Simple & Easy] Wipe Your HDD/SSD Data Completely
- Check This Guide to Learn How to Check RAM Speed Windows 10
- How to Check Total Hard Disk Size in Windows 10/8/7 in Every Possible Way
- How to Clone Windows to New SSD [Most Efficient Way]
Cloning Windows to a new SSD can be efficiently done using professional cloning software, and this article will guide you through a step-by-step process to achieve this. - How to Clone Windows to NVMe [2024 Full Guide]
Cloning Windows to an NVMe drive is a simple way to improve your computer's performance without reinstalling Windows. You can clone your existing Windows installation to an NVMe drive, which can significantly improve your computer's write and read performance.