Crucial SSD Cloning Software: Move Windows Safely
A new Crucial SSD may be eligible for a vendor-provided cloning tool, but the exact offer and requirements depend on the model and current support terms. You can also migrate Windows with a general-purpose system-clone tool.
Check the Drive and Tool First
Confirm whether the SSD is 2.5-inch SATA or M.2 NVMe, whether your computer supports that interface, and whether you can connect both drives at once. A single-slot laptop often needs a compatible USB enclosure. Compare the used space of the Windows system partitions with the destination's real capacity; a smaller SSD cannot hold more data than it can address.
Crucial provides information about Acronis True Image for Crucial on its support site, but eligibility and download terms should be checked there for your specific product. Avoid unverified activation keys or third-party installers. Back up irreplaceable files and save any BitLocker recovery key before changing the boot disk.
Clone the Windows System with Qiling
This procedure migrates the boot-related Windows partitions. It is not a promise to copy every separate data partition on the old drive. If D: or another partition contains needed files, back it up or choose an appropriate whole-disk workflow instead.
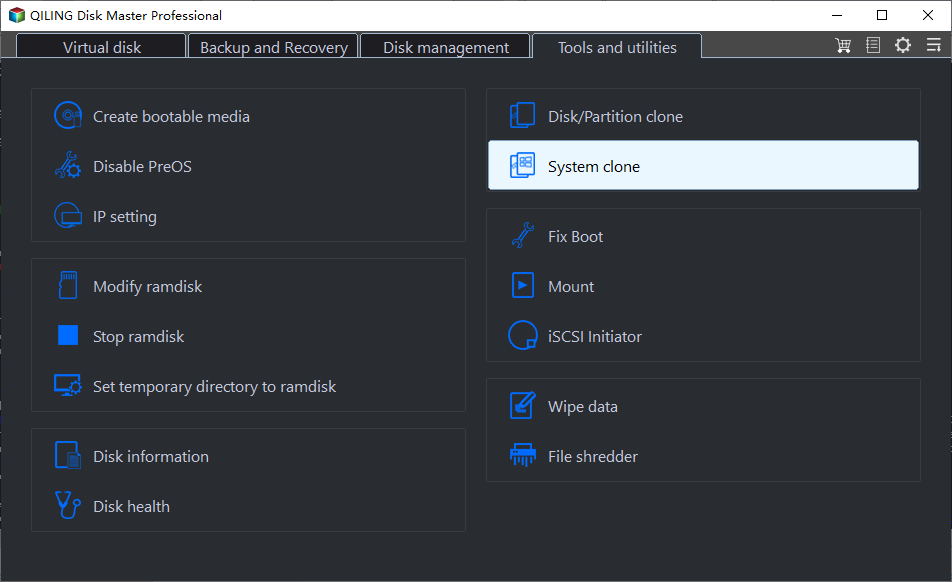
Step 1. Connect the Crucial SSD and identify it by model and capacity in Windows Disk Management. Open Qiling Disk Master, then select Tools and utilities > System clone.
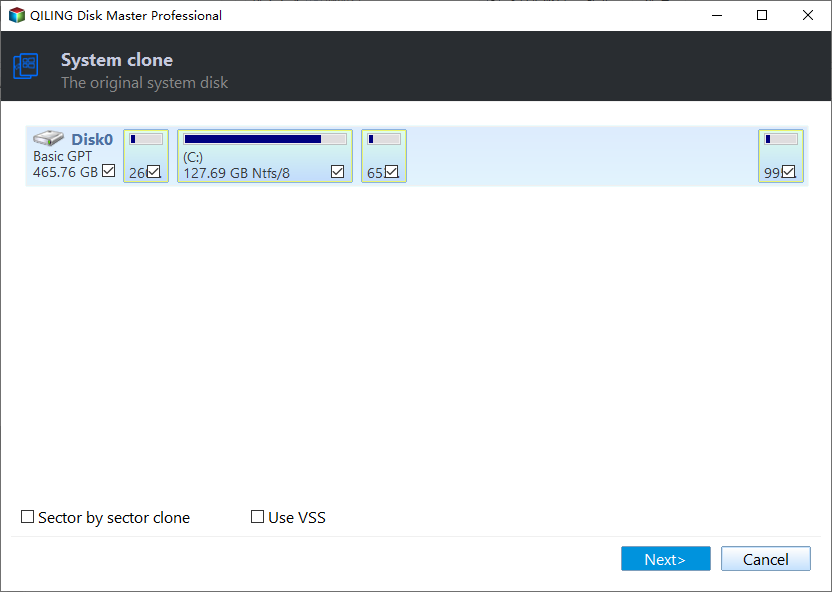
Step 2. Review the automatically identified Windows source disk and its checked boot partitions. Confirm that it is the installation you intend to move, then click Next.
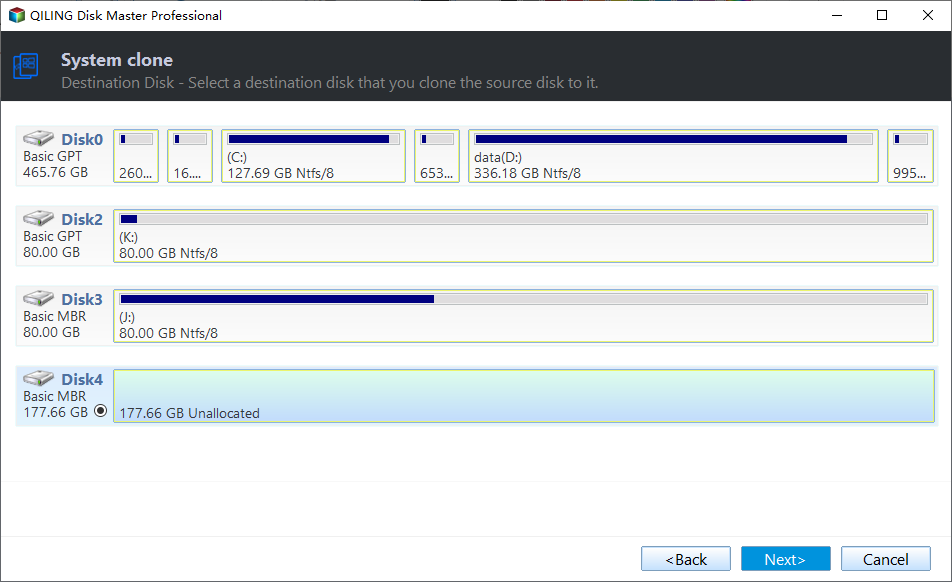
Step 3. Select the new Crucial SSD as the destination. Check model and capacity again, because the selected target's existing content will be replaced, then click Next.
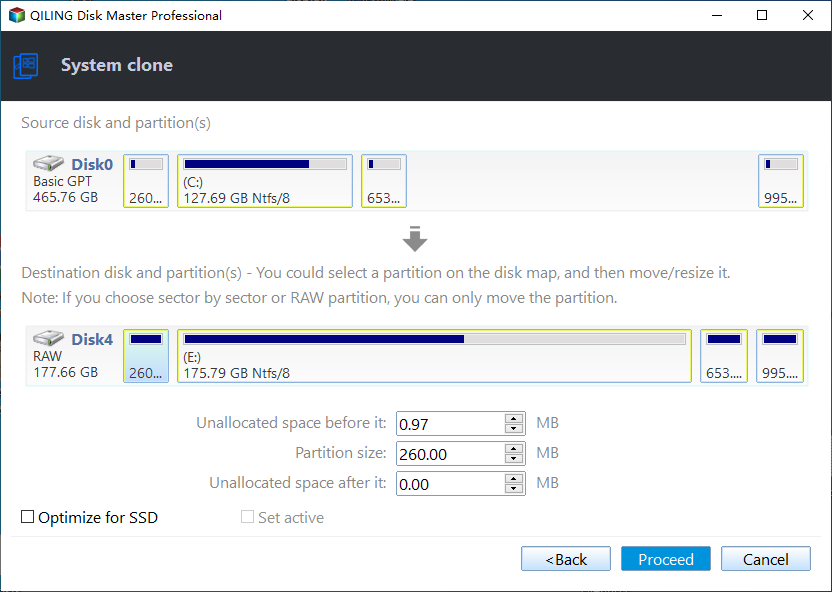
Step 4. Inspect the boot, Windows, and recovery layout in the preview. Select Optimize for SSD if appropriate, and verify that the capacity arrangement fits the target. Click Proceed and confirm the erase warning.
Step 5. Wait for the task to finish without disconnecting either drive. Do not format the source yet.
Boot and Validate
Shut down, fit the Crucial SSD in its intended internal slot, and disconnect the old system disk for the first test when possible. Select the new drive's Windows Boot Manager in firmware. Restart more than once, open important apps and files, and check activation and encryption status. If the drive is larger, use Disk Management to see whether unallocated space is adjacent to C: before extending it.
If the new SSD does not boot, do not overwrite the old drive. Check connection, firmware mode, boot order, and whether the source was healthy before attempting another clone.
Common Questions
Does cloning also transfer my programs?
A successful system clone copies installed Windows applications on the system partitions. Launch them afterward; some licenses may require reactivation. Programs installed on a separate data partition are outside a system-only clone.
Can I clone an HDD to a smaller Crucial SSD?
Only when the selected system partitions can fit and the tool supports the proposed layout. First reduce used space and back up separate data; do not assume that the source disk's advertised capacity is the amount that must be copied.
Conclusion
Verify model eligibility and hardware fit, protect your files, clone the Windows system, and test the Crucial SSD independently before reusing the source.
Related Articles
- How to Clone HDD to a Crucial SSD
Compare a full-disk clone with a system-only move. - Does Crucial Have Cloning Software?
Check vendor software and alternative migration options.
Products
Articles & Tutorials
- Data Recovery
- Data Backup
- File Recovery
- File Backup
- System Backup and Restore
- Disk and Partition Clone
- Technical articles
- Mobile articles
- Disk Master Help
- Windows Data Recovery Tutorials
- Windows Secure Delete Tutorials
- Windows Partition Management Tutorials
- Windows File Backup and Restore Tutorials
- Windows System Backup and Restore Tutorials
- Windows Disk Backup and Restore Tutorials
- Windows Clone Tutorials