Does SSD Get Slower When Full? Easy Tricks to Fix SSD Slowing Down
| Workable Solutions | Step-by-step Troubleshooting |
|---|---|
| Do SSDs Slow Down When Full | The drive is slowing down if you are running SSD and the existing data account for 70%...Full steps |
| How Much Slower When SSDs Get Full | The read speed is still fast as ever, but the write...Full steps |
| How to Fix SSD Slowing Down |
1. SSD Optimization...Full steps 2. Make Sure AHCI Mode Is Enabled...Full steps 3. Check the TRIM Is Enabled...Full steps 4. Check That Write Caching is Enabled...Full steps 5. Enter BIOS and Enable AHCI Mode...Full steps |
Do SSDs Slow Down When Full?
Filling up an SSD can lead to slower performance, a problem that unfortunately occurs. As you continue to write files and boot applications, the time it takes to complete tasks will increase, potentially causing your PC to get stuck while performing tasks such as playing games, video editing, or writing essays.
SSDs are faster than HDDs, but they have a unique limitation. When an SSD's storage is 70% filled, its performance can slow down due to the way it handles data. Since SSDs can only write to empty blocks, when new data is added, the drive must first delete the marked data and then fill the space with the new information. This process, known as garbage collection, can slow down the drive as it tries to free up space and keep up with new data.
How Much Slower When SSDs Get Full?
As we test, the read speed remains fast, but the write speed slows down by 40-50%.
Check more articles:
How to Fix SSD Slowing Down?
1. SSD Optimization - Use Qiling Partition Master to Speed Up SSD
To fix a slowing down SSD, it's helpful to optimize the SSD space by adjusting the drive space, which can be done by deleting a volume to free up space next to the targeted drive, but this requires deleting important data unless you're willing to give up all of it.
Download Qiling Partition Master free edition, a free disk manager that allows resizing, shrinking, deleting, formatting, merging, and creating partitions without data loss.
Tool 1. Use Qiling Partition Master to Extend Space
Download free partition manager:
How to Extend SSD Space:
Step 1. Shrink partition to free up space to extend partition.
If the hard drive has enough unallocated space to extend the target partition, jump to step 2. Otherwise, free up space by deleting or resizing other partitions if necessary.
- Click on the partition next to the target partition and select "Resize/Move".
- To free up space, drag the partition ends, leaving enough unallocated space behind the target partition, and then click "Proceed".

Step 2. Extend target partition.
Click on the target partition and select "Resize/Move".

To extend the target partition, drag the partition handle into the unallocated space on the disk map. This action will automatically resize the partition to occupy the newly allocated space, effectively increasing its size.
Step 3. Keep all changes.
Click the "Proceed" button to keep all changes.
Other Tools to clean Unnecessary Files:
1. Run Disk Cleanup to Clean Junk Files
Step 1. To clean up your computer, search for "Disk Cleanup" on the Start menu and click to open it.
Step 2. Click on the drive you want to clean up, and then click OK.
Step 3. Delete the scanned junk files.
2. Defragment and Optimize Drives
Step 1. To run the Disk Defragmenter program, search for "Defrag" in the Start menu and click on the result to open it.
Step 2. You can select the targeted drives to optimize SSD's performance by choosing the drive and clicking on the "Optimize" button.
2. Make Sure AHCI Mode Is Enabled
AHCI mode is crucial for SSD performance. If it's disabled, your device may experience an unexpected boot error. Please ensure AHCI is enabled.
Step 1. To access the Device Manager, right-click the Start icon and choose Device Manager from the menu.
Step 2. Expand IDE ATA/ATAPI controllers.
If it says "Enable," click on it to change it. If it says "Disable," leave it as is.
The computer may be missing the "IDE ATA/ATAPI controller" as explained by Dell in their fix, which is a required component for the system to function properly. This can be resolved by reinstalling the IDE ATA/ATAPI controller in the device manager. If you are unable to locate the IDE ATA/ATAPI controller, it is recommended to read the fix provided by Dell for further assistance.
3. Check the TRIM Is Enabled
Solid-SSDs record data in a different way than HDDs, which requires cleaning existing data before writing new data. This process can be time-consuming, potentially slowing down SSD speed. However, the TRIM command helps by automatically zeroing out deleted data cells before rewriting, improving SSD performance.
Follow the in-depth tutorial to make sure the TRIM is enabled:
Step 1. Open Windows search and search for cmd on the box. Choose "Run as administrator."
Step 2. Type command line and press Enter: fsutil behavior query disabledeletenotify.
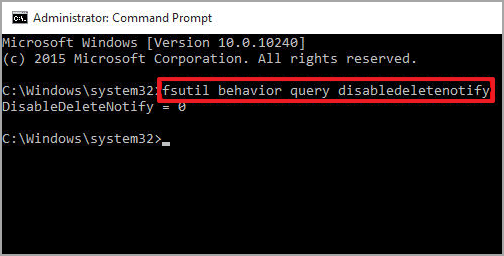
Step 3. Then check the command line and estimate if the TRIM is enabled on SSD.
NTFS DisableDeleteNotify = 0 - it means "TRIM is enabled."
NTFS DisableDeleteNotify = 1 - it means "TRIM is disabled."
If your TRIM technology is not enabling, you can continue to type command line. To do this, open the command prompt as an administrator and type the following command: fsutil behavior set DisableCompression 0.
Input the command: fsutil behavior set disabledeletenotify 0
Then press Enter to enable it.
4. Check That Write Caching is Enabled
The Write Caching is necessary to increase your SSD performance. But it makes your PC vulnerable to data loss when it comes to equipment power failure. So if you choose to take the advance, follow the steps to enable TRIM:
Step 1. Right-click the Start icon and select "Device Manager."
Step 2. Expand "Disk drives" and click on the "Properties" button.
Step 3. To enable write caching on the device, go to the Policies tab and select the option "Enable write caching on the device."
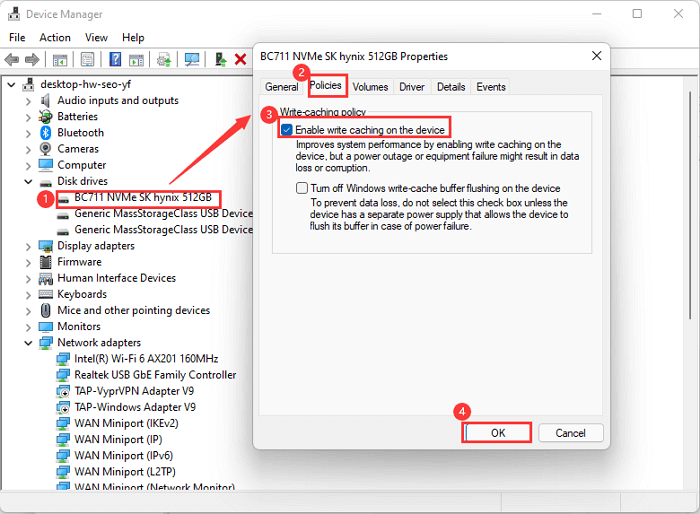
Step 4. Click on "OK."
5. Enter BIOS and Enable AHCI Mode
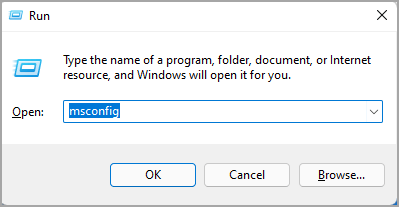
Step 1. To open the System Configuration Utility, press the Windows key and the "R" key together to open the Run dialog box. Type "msconfig" and press Enter to open the System Configuration Utility.
Step 2.Go to the Boot tab and select "Safe boot" under the Boot options.
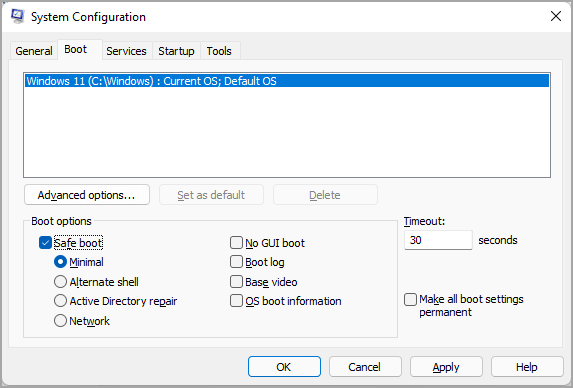
Step 3. Save changes and reboot the PC.
Step 4. Enter BIOS:
To change the SATA mode from IDE to AHCI, follow these steps: Turn on your computer, then press the F12, F2, or DEL key to access the BIOS settings. Once in the BIOS settings, navigate to the SATA mode option and change it from IDE to AHCI.
Step 5. Reboot PC > Repeat Step 1 > Untick "Safe Boot" under Boot tab.
Related Articles
- How to Fix Data Error Cyclic Redundancy Check on External Hard Drive
- FREE MBR Repair Tool: How to Fix MBR on Internal and External Hard Disk
- How to Initialize SSD in Windows 10/8/7, How to Initialize a Hard Drive
- 5 Ways to Increase Transfer Speed of USB 3.0 External Hard Drive
- How to Install and Format SD Card for Steam Deck [Step-by-Step Guide]
To install the SD card on Steam Deck, you need to do some preparations first to make it boot properly. This article provides detailed steps to help you successfully install and format the SD card for Steam Deck. - How to Install Windows 10 on New PC Without Operating System
Are you in possession of a new PC and eager to set up Windows 10? Learn how to install Windows 10 on a new PC without an operating system in this guide.