Fixed: We Couldn't Format the Selected Partition | 0x8004242d Error [2022]
To fix the "Failed to format the selected partition. error: 0x8004242d" issue when trying to format your HDD for a clean install of Windows 10, try running the built-in Check Disk utility (chkdsk) to scan and repair any disk errors. If that doesn't work, try booting from a Windows 10 installation media, selecting the "Repair" option, and running the built-in disk check and repair tools. If the issue persists, try using a third-party disk formatting tool like Qiling Partition Master to format the partition. Additionally, ensure the HDD is properly connected and recognized by the system, and that any existing partitions are properly deleted before attempting to format.
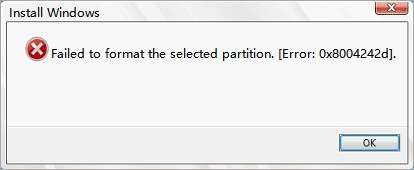
0x8004242d is an error code that typically occurs during the Windows installation process, displaying a message that reads "Failed to format the selected partition. Error: 0x8004242d" on a popup window. This error usually indicates a problem with formatting the selected partition, which is a crucial step in the Windows installation process.
Quick Fix Navigation:
Here is quick navigation of all possible fixes. Try the next fixes to get rid of the 0x8004242d error from your computer now:
| Workable Solutions | Step-by-step Troubleshooting |
|---|---|
| Fix 1. Format the selected partition under the bootable disk | Run Qiling Partition Master > Go to the WinPE Creator...Full steps |
| Fix 2. Delete Disk Partition, Create New Volume | Boot from Bootable USB > Delete all partitions > Create new volume...Full steps |
| Fix 3. Clean Disk with Diskpart.exe | Run Command Prompt > Type diskpart > list disk > select disk # (# is disk number) > clean...Full steps |
| Fix 4. Format Disk during Windows installation process | Run the install Windows setup > Accustom(Advanced) > Delete > Create > Format...Full steps |
Error 0x8004242d - Failed to Format the Selected Partition
If you're experiencing issues with formatting a selected partition, there might be underlying causes preventing you from installing Windows OS on the target disk.
The 0x8004242d error during the Windows installation process can be caused by various factors. These include issues with the Windows installation media, problems with the hard drive or disk, corrupted system files, insufficient disk space, or conflicts with other installed software. Additionally, the error may occur due to issues with the BIOS or firmware, or incompatibility with the UEFI firmware.
Causes of 0x8004242d Error: Failed to or We Couldn't Format the Selected Partition:
- The setup disk has a corrupted file system error.
- Windows is unable to read or write to a device due to a compatibility issue with the mass storage controller or driver.
- A mass storage controller or mass storage driver is an outdated term that refers to a type of hardware or software component responsible for managing data storage and retrieval operations on a computer system.
- The data cable in the computer is loose.
- The hard disk which you want to install Windows OS on is a dynamic disk.
You May Also Interest In:
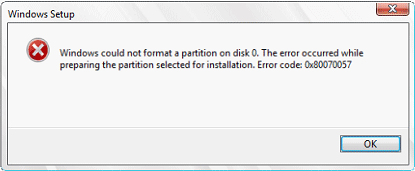
Windows was unable to format a partition on Disk 0 due to error 0x80070057, which translates to a "The parameter is incorrect" error. This error typically occurs when there's a problem with the disk or partition, such as a bad sector, incorrect disk geometry, or an issue with the disk controller.
If you're experiencing issues with installing Windows due to the 0x8004242d error or a similar issue like 0x80070057, there are steps you can take to resolve the problem. These errors often relate to issues with the installation media, such as corrupted files or incorrect formatting. To fix the 0x8004242d error, you can try using the Media Creation Tool to create a new installation media, or you can use the Windows ISO file to create a new installation media.
So how do you fix the 0x8004242d error - "Failed to format the selected partition" error and allow Windows to install on the target partition again? Follow to make your disk available for Windows installation again with the fixes in the next part.
4 Fixes for Failed to Format the Selected Partition | 0x8004242d Error
After identifying the reasons behind the formatting error 0x8004242d when trying to format a disk partition for a Windows 10/8/7 installation, you can now find the best solutions to fix this issue.
Quick Fix: Open the computer case and inspect the connection cable to the drive, tightening it if it's loose. This simple step can often resolve the issue, and restarting the PC afterwards may be all that's needed to get the drive recognized again.
If this quick fix worked, congratulations and you can stop here. If not, Move to the guide below, you'll fix this issue.
- Warning
- Before proceeding, it's essential to create a backup of important files on your target disk to prevent data loss. A file backup software like Qiling can assist in this process.
Fix 1. Format the Selected Partition via Qiling Bootable Disk
If the target disk contains file system corruption errors or unknown disk errors, it sends an error message when trying to format the partition to install Windows.
You can download Qiling Partition Master software to format your hard drive from a bootable disk, allowing you to install Windows without any issues.
#1. Create an Qiling Partition Master Bootable Disk
Step 1. To create a bootable disk of Qiling Partition Master, you need to prepare a storage media like a USB drive or CD/DVD disc and connect it to your computer.
Step 2. Launch Qiling Partition Master, find the "WinPE Creator" feature on the top, click on it.
Step 3. If the USB or CD/DVD drive is available, you can choose one as the storage device. Alternatively, you can save the ISO file to a local drive and burn it to a storage media later. Once you've made your choice, click the "Proceed" button to start the process.
After completing the process, you'll have a Qiling Partition Master WinPE bootable disk that allows you to manage your hard disks and partitions through a bootable drive, even when your computer fails to boot normally.
To load the RAID driver in a WinPE environment, click "Add Driver" from the menu bar and select the driver for your device, which is necessary for recognizing devices like RAID or specific hard disks that may not be recognized without drivers installed.
#2. Boot PC from Qiling Bootable Disk
Step 1. Connect the bootable disk USB to your PC.
Step 2. Restart PC and press F2/F8/Del to enter BIOS.
Step 3. To make Qiling bootable USB as the boot drive, set it as the primary boot device in the BIOS settings, save the changes, and restart the PC. This will allow the USB drive to initiate the boot process and load the operating system.
#3. Format The Target Partition with Qiling Partition Master
After booting your computer from the bootable disk, you can proceed with the formatting process using Qiling Partition Master.
Here are the steps to format the target disk with the 'failed to format the selected partition' error:
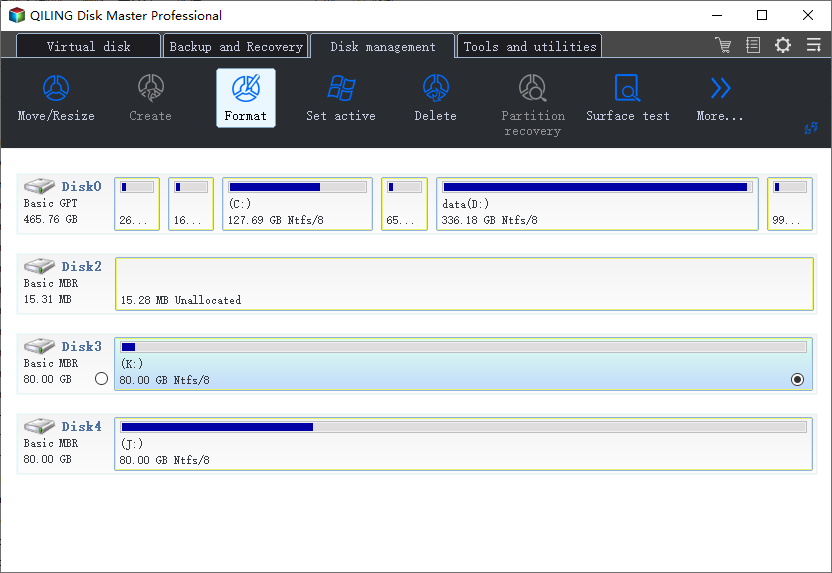
Step 1. Run Qiling Partition Master, right-click the hard drive partition you intend to format and choose "Format".
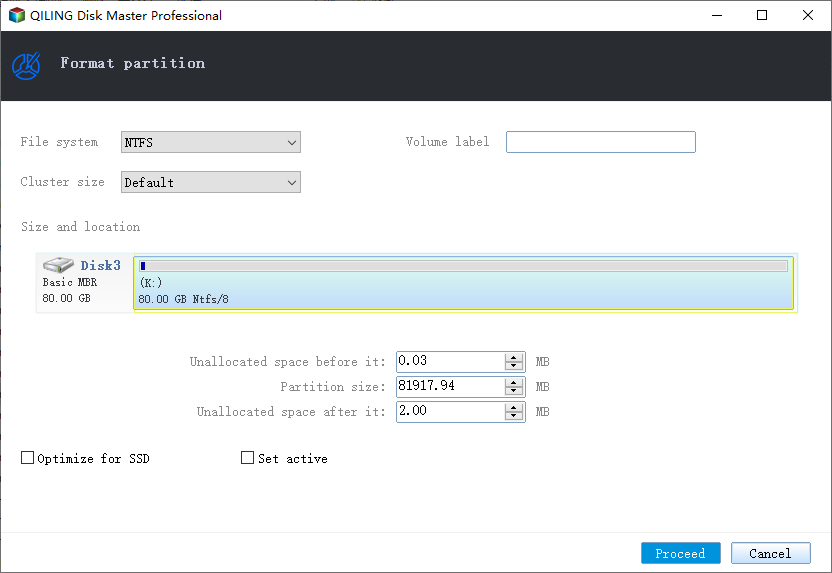
Step 2. Set the partition label, file system, and cluster size in the new window, then click "Proceed" to format the partition.
Step 3. To format the partition on your hard drive, open the Disk Management tool in the Control Panel, select the partition you want to format, and click on the "Format" option. A warning window will appear; click "OK" to proceed with formatting the partition.
Fix 2. Delete All Partitions and Create a New Volume
If Fix 1 doesn't work, or the target drive contains a partition that is not supported by Windows, you may also receive this error during the Windows installation process.
To resize a partition in Qiling Partition Master, you can simply right-click the partition you want to resize and select "Resize" from the context menu. Then, you can adjust the size of the partition to your liking.
#1. Create and Boot PC from Qiling Partition Master Bootable Disk
Step 1. Create a bootable disk via Qiling Partition Master.
Step 2. Connect the bootable disk to your PC and reboot the computer. In the BIOS settings, set the computer to boot from the USB drive.
Step 3. To access the BIOS settings and set the bootable disk as the primary boot drive, press the corresponding keys (F2, F8, or Del) as the system boots up, and navigate to the Boot section. Here, select the desired boot drive (e.
Step 4. Save the changes and restart the PC.
#2. Delete All Partitions
Step 1. Launch Qiling Partition Master on your computer.
Step 2. To delete a partition or all partitions on a hard drive, you can follow these steps. First, ensure that you have backed up any important data on the drive, as deleting partitions will erase all data on the drive.
- Delete single partition: Right-click on a partition you want to delete and choose "Delete...".
- Delete all partitions: To delete all partitions from a hard drive, right-click on the drive you want to delete all partitions from and select "Delete All...".
Make sure to back up your important data on the selected partition before proceeding, as this method will completely remove all data from that partition.
Step 3. Click "OK" to confirm the deletion.
- Important
- You can enter Disk Management and check if your target disk is Dynamic.
- If yes, you need to convert Dynamic to Basic disk first.
#3. Create A New Volume as NTFS
To create a new partition for Windows installation on a Basic disk, ensure the disk is indeed Basic by running the command `diskpart` and typing `list disk`, then `select disk 0` (assuming the disk is the first one), and finally `clean` to remove any existing partitions. Once the disk is clean, type `create partition primary` to create a new primary partition.
Step 1. Open Disk Management and right-click the unallocated target disk.
Step 2. To create a new simple volume, select the "New Simple Volume" option, assign a new drive letter to the disk, and choose the "NTFS" file system.
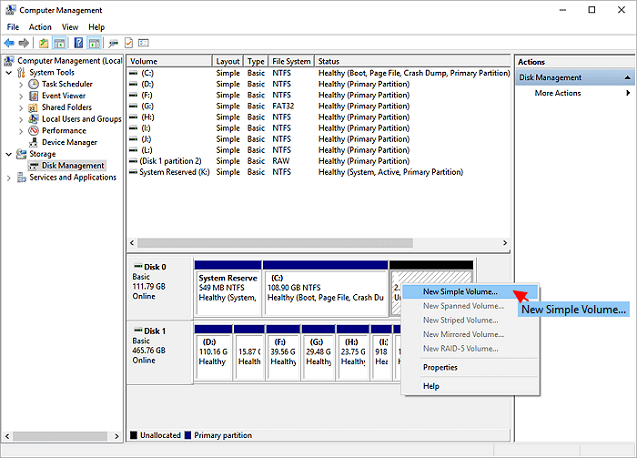
Step 3. To combine all space into one partition, select the partition you want to expand, click "OK" and then click "Finish".
To resolve the 0x8004242d error while installing Windows OS, you can try reinstalling the Windows OS on the target disk from the Windows installation media, and then select the correct disk to install Windows OS on. If the issue persists, you can try using the built-in Windows System File Checker (SFC) tool to scan and replace any corrupted system files, and then try installing Windows OS again.
Fix 3. Clean Disk with Diskpart.exe Utility
To resolve the format error, use Diskpart to clean the problematic disk, but note that all partitions and data on the disk will be deleted permanently, so back up the drive if the data is valuable.
Step 1. Launch a Command Prompt as administrator.
Step 2. Type diskpart into the Command Prompt window, and press "Enter".
Step 3. Type list disk and press "Enter".
The command `sudo apt-get autoremove` cleans up unnecessary packages, but it doesn't clean the disk. If you want to clean the disk, you need to use a different command, such as `sudo apt-get autoclean` or `sudo apt-get clean`.
Step 4.Type `select disk #` (replace the # with the number of the disk you are going to clean) and hit Enter.
Step 5.Be cautious, as this action is irreversible and will wipe all data on the selected disk. If you're sure, type 'clean' and press Enter. This will delete all partitions and data on the selected disk.
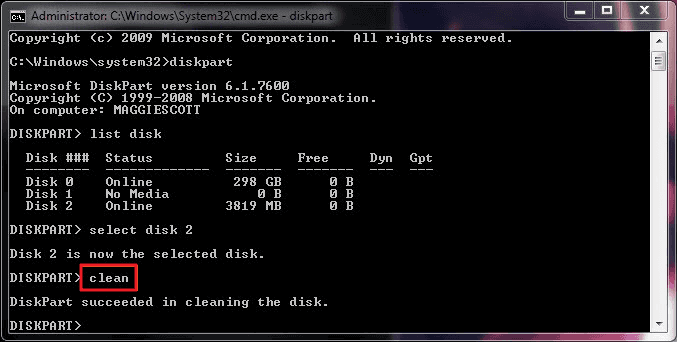
When the "diskpart succeeded in cleaning the disk" message appears, it indicates that the disk partition has been successfully wiped.
Step 6. Type create partition primary and hit Enter.
Step 7. Type format fs=ntfs and hit Enter.
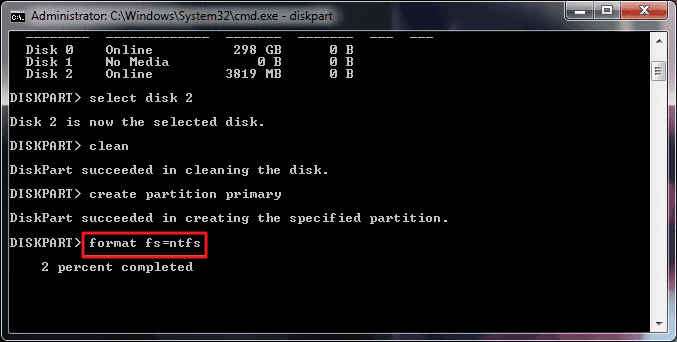
Step 8. Type assign + a new drive letter and hit Enter.
Step 9. Type exit and hit Enter to close Prompt Command.
After this, close the Command Prompt to continue installing Windows OS on the disk.
Fix 4. Format Partition during Window Installation Process
To resolve errors like 0x8004242d or 0x80070057, you can try deleting all existing partitions, creating a new one, and then formatting it. This approach may resolve the issue and allow you to continue with the installation process.
Step 1. Run the Windows installation setup program - like Windows installation media.
Step 2. Click "Install Now". Choose "I accept the terms of license", click "Next".
Step 2. Click "Custom(advanced)".
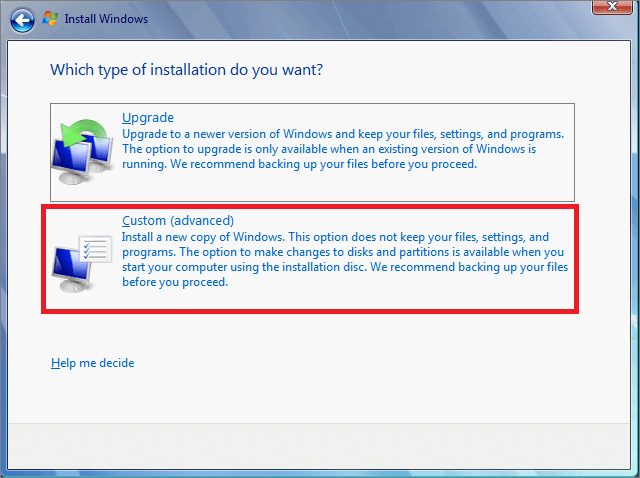
Step 3. Choose partition and click "Delete".
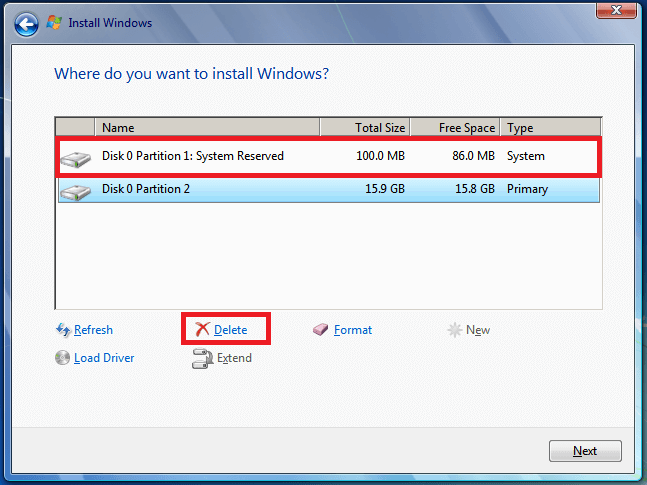
- Notice:
- If you have multiple partitions, select each one for deletion in turn, which will create unallocated space. Once you have done this, you can select the "New" option to create a new partition.
Step 4. To prepare the target disk, delete the existing partition and create a new one by clicking "Create new partition" and selecting the new partition, then click "Format" to finalize the process.
What to Do after Fixing 0x8004242d Error? Install Windows on Your Disk
If you're experiencing a Windows installation failure with the error "Failed to format the selected partition. Error: 0x8004242d", - this guide can help. On this page, we've collected 4 reliable fixes to help you resolve this issue.
Qiling Partition Master can help you boot PC from a bootable disk and complete the format, efficiently resolving the 0x8004242d error on your target disk.
After running the command, the disk is now viable for installing Windows 10/8/7 without any further issues. You can refer to the step-by-step guide on "Fresh Install Windows 10/8/7" for assistance.
Related Articles
- How to Make C Drive Bigger Windows 7/10| Assigning More Space to C Drive
- eMMC vs. SSD: What's The Difference and How to Replace eMMC with SSD
- 2022 Solved: Unable to Format SD Card, SD Card Won't Format on PC/Android
- 2 Best Disk Manager for Windows Server Free Download [Free & Paid]
- How to Remove USB Partition on Windows 10/11
Removing a USB partition is relatively straightforward and requires just a few steps. - How to Repair Windows 10 From USB [Complete Guide]
Having trouble with your Windows 10? Discover the power of USB repair, which allows you to repair Windows 10 from a USB device and easily fix common issues. By following a step-by-step guide, you can troubleshoot and restore your system efficiently.